
"Weaving in YouTube's Video Selection A Step-by-Step Guide for 2024"
Weaving in YouTube’s Video Selection: A Step-by-Step Guide
YouTube is an excellent resource for entertainment, education, and general information, but did you know you can also display a YouTube playlist on your website?
Embedding a YouTube playlist will allow you to showcase a collection of videos on a topic or theme on your website. It’s also a great way to keep your visitors engaged on your site for more extended periods.
To help you with the process, we’ll explore different step-by-step methods to embed a YouTube playlist on a website to add interactivity to your site.
So, if you’re ready to get started, read on!
How To Embed a YouTube Playlist on a Website
If you want to embed and display a YouTube playlist on your website, we’ll give you a complete rundown of the three methods you can try to get this done. But, of course, each method has its pros and cons, so you’ll need to decide which is right for you.
Here’s how to embed a YouTube playlist on a Website:
Embedding a YouTube Playlist on Website Using WordPress Plugin
The plugin is the simplest way to add a YouTube Playlist to your WordPress website. This will help you get this done in no time without having to write any code for the process.
With plugins like YouTube Feed Pro by Smash Balloon , you can extend your website’s functionality and create, customize, or embed a YouTube playlist with just a few clicks of a mouse.
To embed and add a YouTube playlist on your website page/post, do the following steps in sequence:
Step1 Launch a browser on your PC and head to your WordPress website’s login page. Sign in to your dashboard using your username and password.
Step2 Click the “Plugins” option from the left-hand side menu on the WordPress dashboard. Now, click “Add New” and use the search option to find and install the YouTube Feed Pro plugin. Afterward, click the “Activate” option to enable the plugin.
Step3 Click the “YouTube Feed” option from the left menu and open “All Feeds.” On the next page, click “Add New” at the top left of the screen.

You will now be asked what type of feed you want to create. Select “Playlist” and click “Next.”

Step4 You need to create your YouTube API Key , copy it, and paste it into the pop-up. Click “Add” to connect your YouTube account to the plugin.
Step5 Select the Playlist you want to display on your WordPress website and take its ID. Paste that in the next pop-up window and click “Next” to continue the process.

Your YouTube playlist will be connected to your WordPress website. To further customize it, select the template you want and click “Next.” You can also configure the Feed Layout and Color Scheme.

Step6 Once you are done with customization, click the “Embed” option on the top-right side of the screen, and a pop-up window will appear. Next, click “Add to a Page,” and a list of pages on your website will be displayed.
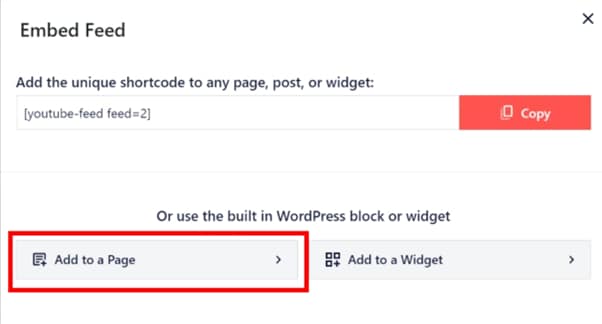
Choose your page and click “Add” at the bottom of the pop-up window. You’ll be directed to a new page where you can embed the feed. Click the “Plus” icon at the top-left of the screen, search for YouTube Feed and choose the Feeds for YouTube block to embed and add your playlist.
That’s about it! You’ve successfully embedded a YouTube playlist on your WordPress website.
Embedding a YouTube Playlist on a Website Using oEmbed Code
Another method to embed a YouTube playlist on your WordPress website is to use oEmbed Code. This method requires basic CSS, HTML, or Java knowledge; otherwise, you won’t be able to customize your playlist.
Moreover, this method is too complicated for beginners, and you will miss the customer support provided by WordPress plugin developers in case of any mishaps.
To use the oEmbed Code method, do the following steps:
Step1 In the first step, head to your YouTube account and access the Playlist you want to embed. Next, click the three dots below it and copy its URL.
Step2 Now, login to your WordPress dashboard and open the post or page editor where you want to add the playlist.
Step3 Paste the URL directly in the editor and click “Update” to save the changes.
WordPress will grab your playlist from YouTube and automatically show it in your post using oEmbed. The outcome is a single video with a menu that your viewers can click to see other videos in the playlist.
Embedding a YouTube Playlist on WebsiteUsing
Conclusion
This article discusses step-by-step methods to embed a YouTube playlist on a website using the WordPress plugin, oEmbed code, and iFrame embed code.
Additionally, we’ve recommended Wondershare Filmora for making engaging and captivating YouTube videos that you can export directly to your channel from the software.
We hope you’ve found this article informative and can now display your YouTube playlist on your site without hassle.
Free Download For Win 7 or later(64-bit)
Free Download For macOS 10.14 or later
With this software, you can quickly make eye-captivating YouTube videos by recording from a screen or webcam and can edit them using advanced editing features. Filmora also allows you to instantly export your content to YouTube with just a few clicks, which you can later embed into your website.
Some key features of Wondershare Filmora are as follows:
- Advanced video editing features include keyframing, speed ramping, Boris FX, Motion Tracking, Titles, and more.
- Massive library of preset templates, effects, transitions, animations, and royalty-free music.
- Instant Export to YouTube channel.
- Record from webcam, screen, and voiceover.
- Simple drag-and-drop interface.
Conclusion
This article discusses step-by-step methods to embed a YouTube playlist on a website using the WordPress plugin, oEmbed code, and iFrame embed code.
Additionally, we’ve recommended Wondershare Filmora for making engaging and captivating YouTube videos that you can export directly to your channel from the software.
We hope you’ve found this article informative and can now display your YouTube playlist on your site without hassle.
IMovie Guide to Stellar Video Introduction Designs
How to Make a Cool YouTube Video Intro in iMovie (Step-by-Step)

Shanoon Cox
Mar 27, 2024• Proven solutions
A YouTube video intro is a short clip shown at the beginning of your YouTube video, which introduces the main topic and the vlog poster.
YouTube intro videos have the necessary info about the name and logo of the channel. Your YouTube video intro is one of the best chances to make a great first impression on your viewers within a few short minutes of your video.
It is important to have the right intro maker to create impressive video intros. So, in this article, we will introduce how to make a cool and free YouTube Intro with Apple iMovie and with an iMovie Alternative in an easier way.
- Part 1: An Easier Way to Make YouTube Video Intro with iMovie Alternative
- Part 2: How to Make YouTube Video Intro in iMovie (step-by-step)
Part 1: How to Make a Video Intro Using an iMovie Alternative - Wondershare Filmora
While iMovie is a dynamic tool to make a high-impact intro, you can actually find it a little complicated to follow through with all the options and buttons on the interface to complete the process.
Filmora on the other hand simplifies the process and giving even beginners and amateurs a chance to make great intro videos. It is available for both Mac users and Windows users.
Let’s watch the tutorial about how to make your YouTube intro first.
 Download Mac Version ](https://tools.techidaily.com/wondershare/filmora/download/ )
If the tutorial above is not enough for you, you can refer to the steps (for Mac) below to make your YouTube intro now.
Related:
How to Make a YouTube Intro Video Step-by-step?
Step 1. Simply drag and drop your intro clip to the media library.

Step 2. Add your video to the timeline and go to the Effects tab to apply a great effect (such as the Filter 007 series) to your intro clip.

Step 3. Then switch to the Titles tab, and you will see a great variety of text templates. You can choose and drag the text template you want and apply it to your intro clip.

Step 4. Double-click the text box in the timeline, select Advanced, and input the text you want. Then you can switch to the Animation tab to get more than 50 kinds of text animations, and finally, you can apply the animation you like to your text and make your video more vivid.

If you have any questions about the steps above, you can read more detailed information on Filmora Editing Tips . And you can also watch the video below and download the Filmora trial version to start your editing.

Part 2: How to Make Video Intro in iMovie?
An important aspect of intro making is that it usually contains tile cards and opening credit info within the shot. The key is to find a YouTube intro maker that works best with the text and video edit both.
iMovie is a great program for editing simple yet high-impact on professional video intros. You can use the simple process outlined below to create your YouTube intro with iMovie.
Step 1. Open the interface and click on the menu displaying “File and Open project” to choose the video you want to attach the intro to.
Step 2. Click on the Titles tab on the right side of the interface and check for the black review box to appear.

Step 3. The customization bar for the effects you can place on your video will appear just under the black preview box. Experiment with the effects to get the perfect combination for your video.
Step 4. Type in the correct words in the text box below the effects bar. Different effects allow different space for phrases, so experiment with both effects and text until you get it right.

Step 5. You can also edit the font color, speed of transitions, and background.
Step 6. Finally, drag the intro onto the clip viewer and the iMovie interface will automatically turn it into a video clip to be inserted at certain places on the main video timeline.
You may also like: How to Add Video Effects in iMovie
You can click on help to get directions if you are stuck at any part of the process. Do not over-apply multiple effects and keep the colors bright but subtle. Check the tutorial below about how to make a good YouTube intro with iMovie.
If you want to learn more iMovie editing tips, please check Top 10 iMovie Tips You Should Know .
Related: Add Transitions between Video Clips in iMovie
Shanoon Cox
Shanoon Cox is a writer and a lover of all things video.
Follow @Shanoon Cox
Shanoon Cox
Mar 27, 2024• Proven solutions
A YouTube video intro is a short clip shown at the beginning of your YouTube video, which introduces the main topic and the vlog poster.
YouTube intro videos have the necessary info about the name and logo of the channel. Your YouTube video intro is one of the best chances to make a great first impression on your viewers within a few short minutes of your video.
It is important to have the right intro maker to create impressive video intros. So, in this article, we will introduce how to make a cool and free YouTube Intro with Apple iMovie and with an iMovie Alternative in an easier way.
- Part 1: An Easier Way to Make YouTube Video Intro with iMovie Alternative
- Part 2: How to Make YouTube Video Intro in iMovie (step-by-step)
Part 1: How to Make a Video Intro Using an iMovie Alternative - Wondershare Filmora
While iMovie is a dynamic tool to make a high-impact intro, you can actually find it a little complicated to follow through with all the options and buttons on the interface to complete the process.
Filmora on the other hand simplifies the process and giving even beginners and amateurs a chance to make great intro videos. It is available for both Mac users and Windows users.
Let’s watch the tutorial about how to make your YouTube intro first.
Download Mac Version ](https://tools.techidaily.com/wondershare/filmora/download/ )
If the tutorial above is not enough for you, you can refer to the steps (for Mac) below to make your YouTube intro now.
Related:
How to Make a YouTube Intro Video Step-by-step?
Step 1. Simply drag and drop your intro clip to the media library.
Step 2. Add your video to the timeline and go to the Effects tab to apply a great effect (such as the Filter 007 series) to your intro clip.
Step 3. Then switch to the Titles tab, and you will see a great variety of text templates. You can choose and drag the text template you want and apply it to your intro clip.
Step 4. Double-click the text box in the timeline, select Advanced, and input the text you want. Then you can switch to the Animation tab to get more than 50 kinds of text animations, and finally, you can apply the animation you like to your text and make your video more vivid.
If you have any questions about the steps above, you can read more detailed information on Filmora Editing Tips . And you can also watch the video below and download the Filmora trial version to start your editing.
Part 2: How to Make Video Intro in iMovie?
An important aspect of intro making is that it usually contains tile cards and opening credit info within the shot. The key is to find a YouTube intro maker that works best with the text and video edit both.
iMovie is a great program for editing simple yet high-impact on professional video intros. You can use the simple process outlined below to create your YouTube intro with iMovie.
Step 1. Open the interface and click on the menu displaying “File and Open project” to choose the video you want to attach the intro to.
Step 2. Click on the Titles tab on the right side of the interface and check for the black review box to appear.
Step 3. The customization bar for the effects you can place on your video will appear just under the black preview box. Experiment with the effects to get the perfect combination for your video.
Step 4. Type in the correct words in the text box below the effects bar. Different effects allow different space for phrases, so experiment with both effects and text until you get it right.
Step 5. You can also edit the font color, speed of transitions, and background.
Step 6. Finally, drag the intro onto the clip viewer and the iMovie interface will automatically turn it into a video clip to be inserted at certain places on the main video timeline.
You may also like: How to Add Video Effects in iMovie
You can click on help to get directions if you are stuck at any part of the process. Do not over-apply multiple effects and keep the colors bright but subtle. Check the tutorial below about how to make a good YouTube intro with iMovie.
If you want to learn more iMovie editing tips, please check Top 10 iMovie Tips You Should Know .
Related: Add Transitions between Video Clips in iMovie
Shanoon Cox
Shanoon Cox is a writer and a lover of all things video.
Follow @Shanoon Cox
Also read:
- [New] In 2024, Ultimate Guide 20 Incredible No-Cost Storage Platforms (1TB+)
- [New] In 2024, Your Journey Through the World of iPhone Memos
- [Updated] In 2024, The Grandmasters' Choice Best Martial Arts Games List
- [Updated] In 2024, The IG Boom Technique How to Amass a Massive Follower Count Quickly
- [Updated] Skyrocket Your Content Tips for Trending Videos
- How To Get Windows 11 Home Operating System Installed Locally Without Signing Into a Microsoft Account
- How to recover lost data from Galaxy Z Fold 5?
- How to Upgrade Apple iPhone 15 without iTunes? | Dr.fone
- In 2024, Optimizing Your Safari Experience Enabling/Disabling Dual Screen
- In 2024, YouTube's Celebrated Click-It Achievements
- Sourav Joshi's Financial Acumen in the World of YouTube Earnings for 2024
- Troubleshooting Startup Woes: Eliminating Black Screens on Monster Hunter: World Launch
- Unleash YouTube Potential with Imaginative Splitscreens for 2024
- Title: Weaving in YouTube's Video Selection A Step-by-Step Guide for 2024
- Author: Kenneth
- Created at : 2024-12-10 22:58:50
- Updated at : 2024-12-15 17:50:42
- Link: https://facebook-video-footage.techidaily.com/weaving-in-youtubes-video-selection-a-step-by-step-guide-for-2024/
- License: This work is licensed under CC BY-NC-SA 4.0.