![[Updated] Smooth Transition of Online Videos to TV Screens](https://thmb.techidaily.com/a333bfbef34affdca1048ed2699696db5230242a15d7fcb3455927615d5179aa.JPG)
[Updated] Smooth Transition of Online Videos to TV Screens
Smooth Transition of Online Videos to TV Screens
Loop is a YouTube video format that allows viewers to watch a continuous sequence of videos. Loop is similar to traditional YouTube videos, but it can be played on a TV screen like a traditional TV show. Loop is a great way to keep viewers engaged with your content. It’s like a one-stop shop for all your content needs. You can use it to promote your latest video series.
Why looping YouTube videos on a TV is a great idea? First, it can be a fun way to watch your favorite videos without having to worry about the time. Second, it can be a way to save money on your cable. By watching your favorite videos on loop, you can cut down on the number of times you need to watch them.
If you are watching a series of videos, for example, looping them can help you to remember what happened in each one. Secondly, it can help you to learn new information more easily. If you are watching a tutorial or a video about a new topic, looping can help you to remember the details better.
Free Download For Win 7 or later(64-bit)
Free Download For macOS 10.14 or later


Part 1: How to Create a Loop Video for YouTube
There is a lot of debate around whether or not creating a loop video is necessary for success on YouTube. Some people believe that it’s not necessary, while others believe that it is a must. The main benefit of creating a loop video is that it helps to keep your audience engaged. It also helps to create a sense of continuity between your videos.
Creating a loop video for your YouTube channel increases engagement because viewers can watch the video over and over again. This can lead to more clicks on your ads, which can lead to more revenue. It can also increase your subscribers and views. Maybe some people want to watch the same video multiple times in a row without having to keep pressing the play button on the remote.
Filmora is the best video loop editor:
If you need a powerful video editing tool that will let you create high-quality clips with multiple loops, look no further than Filmora . This software allows you to make various loops of your videos for use in social media, on your website or wherever desired. Plus, with Filmora, there is no limit on the number of loops you can create.
Loop video works well for corporate presentations, tutorials, explainer videos, and much more. You can create looping videos by choosing from one of Filmora’s many templates or creating your own. It’s easy to get started with looping video editing in Filmora! Some people want to watch a video while they do other things, like work on the computer.
Filmora is incredibly easy to use. You can quickly create videos by importing footage, editing and adding effects, and exporting your videos. Plus, the software has several built-in tools that let you customize your videos further. It has many features that make it an excellent choice for anyone looking to create high-quality videos quickly and easily.
How can we loop a video on Filmora? Follow these steps to create a looping video on Filmora:
Step 1 Download the Filmora and create a project
Free Download For Win 7 or later(64-bit)
Free Download For macOS 10.14 or later
You can download the Filmora for free. After installation of this software open it and click on Create New Project. Filmora is not only the video maker or editor, you can also add text and music to your videos, and share them on social media or with friends.

Step 2 Open the video and make copies
Open the video in your timeline. All you need to do is right-click on the video and click on copy. Then simply click or press Ctrl+V on your keyboard and do that for times. You can make as many copies as you want. Then you will have the same clip over and over again which creates the loop effect.

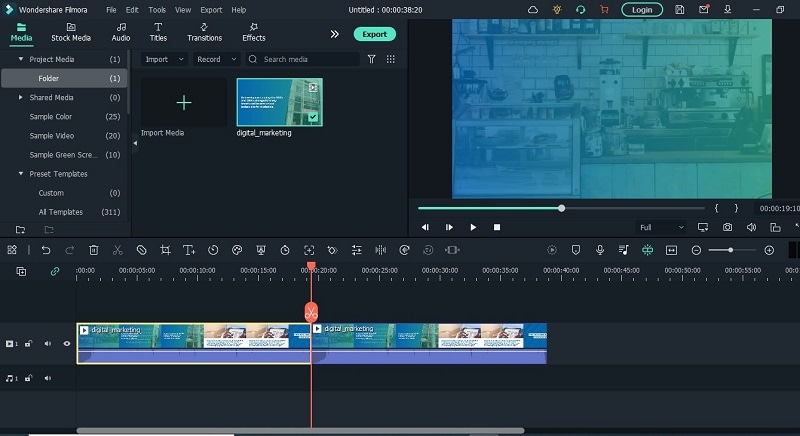
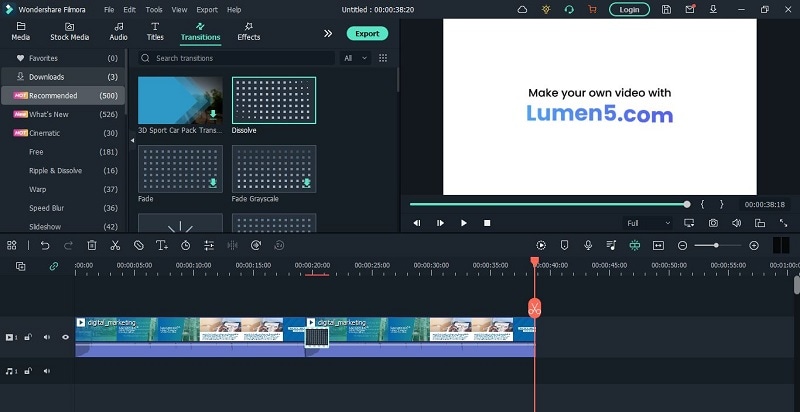
Step 3 Add Transition or any title in the video
After making copies of your video. Add some transitions in your video. Adding transitions to videos can help to keep your videos looking polished and professional. Not only do transitions add an extra layer of visual interest, but they can also help to underscore specific points in your video.
Benefits to create loop video on Filmora
There are many benefits to creating looping videos, especially when using a tool like Filmora. Loop videos are great for social media since they can be set to play on a loop and are viewable without sound. They’re also perfect for short attention spans since you can watch them over and over again without getting bored.
This can be useful for marketing purposes, as it can keep people interested in your video content. Additionally, looping can create a more engaging video experience for viewers, as it keeps them engaged by playing the same clip over and over again. You can easily add captions, and titles to your loop video.
When viewers can pause, rewind, and playback a video over and over again, they are more engaged with it. This increases the chances that they will watch the entire video, and may even share it with friends. You can create a sense of community and connection with your customers. And best of all? You can keep the magic going by adding sound effects and music!
Part 2: Loop a YouTube Video on TV from a Mobile
One of the great features of YouTube is that you can loop YouTube videos on your TV. This means that you can watch a video over and over again without having to fast forward through it. This is great for kids who are constantly asking to watch the same video over and over again. You can also use this feature to watch videos that you have missed.
There is something about relaxing music on the loop that can help to take the edge off. Whether it’s to help you wind down before bed, or to help you relax after a long day, there’s no doubt that looping YouTube on TV can be helpful. Whether you’re looking for something light and calming, or something to help you wind down after a long day, there’s sure to be something on YouTube that can fit the bill.
Let’s have a look at some steps that how to repeat YouTube videos on smart TV.
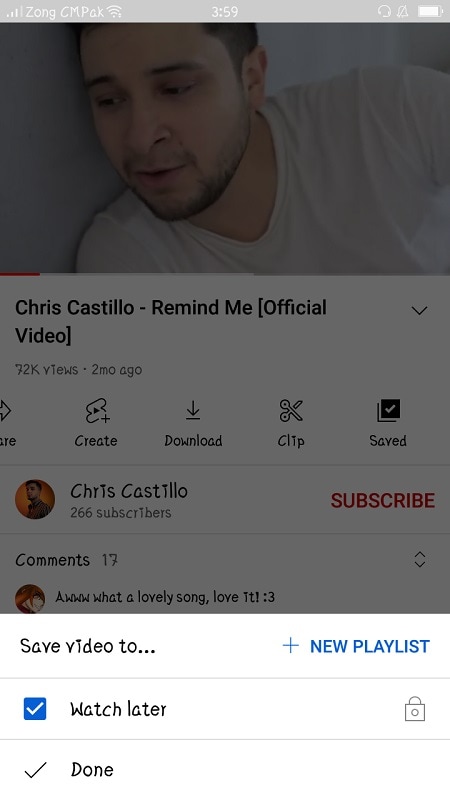
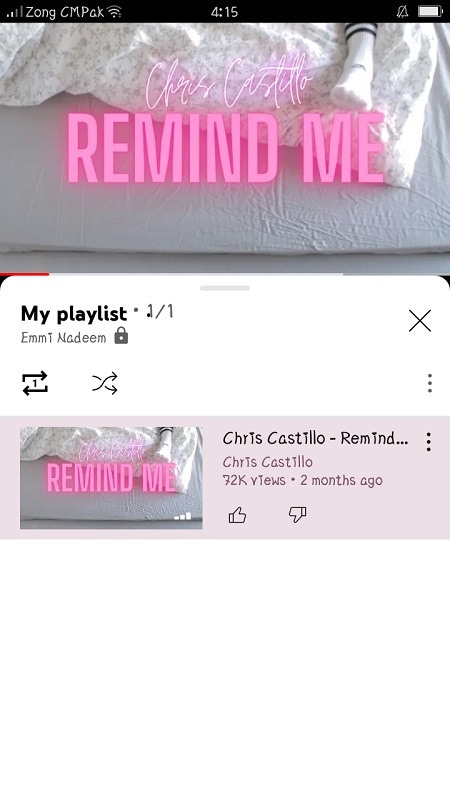
Step 1 Create a Playlist of one or multiple videos
The YouTube app is available on the google play store. You can easily download it from your mobile phones, android, etc. When you open a video on YouTube, several options will appear (like, share, subscribe). You can save the video in your existing playlist or you can create a new playlist.
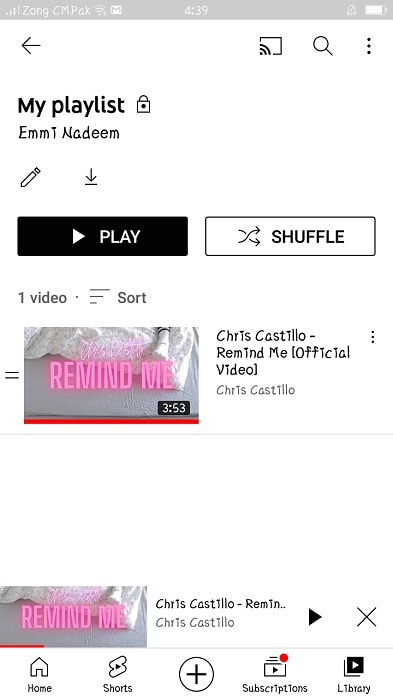
Step 2 Go to the library and select the loop symbol
Click on library this will take you to a list of libraries that have YouTube collections. This can be a great way to find new material to watch, or to find old material that you may have missed. Play back the playlist that you want to loop on the smart TV.
Step 3 Loop the playlist and send the list to the TV
Play the list and click on the loop symbol. At last, launch the YouTube video on your TV. The video will start playing in a loop. It can only be stopped from your mobile phone on which you start playing the list.

Why you might want to loop a YouTube video on a smart TV?
Some people want to watch a video over and over again without having to wait for it to load each time. Looping in a YouTube video can help you do this. Another reason to loop a YouTube video on your TV is if you want to watch it while you are doing something else. YouTube only loops the playlist.
Looping a YouTube video on your TV can also be useful if you have a lot of videos that you want to watch but don’t have enough time for. Looping YouTube videos on your television is a great way to keep your young ones entertained and engaged. Not only are they getting their daily dose of educational content, but they are also being kept enertained.
Wondershare Filmora Loop YouTube videos on PC and Mac with simple clicks.
Free Download Free Download Learn More

![]()

Conclusion
Looping YouTube videos on smart TV is an excellent way to watch the content you love, no matter where you are. While it may be true that loop YouTube videos on a smart TV are not imminent, there are some major benefits to be gained from implementing the new technology.
It’s easy to do, and it can be a great way to spend time with family members and friends. Looping YouTube videos on a smart TV is a great way to add some fun and excitement to your experience. The best part is, there are no limitations or restrictions you can loop as many videos as you want, and watch them in any order!
Free Download For Win 7 or later(64-bit)
Free Download For macOS 10.14 or later
Part 1: How to Create a Loop Video for YouTube
There is a lot of debate around whether or not creating a loop video is necessary for success on YouTube. Some people believe that it’s not necessary, while others believe that it is a must. The main benefit of creating a loop video is that it helps to keep your audience engaged. It also helps to create a sense of continuity between your videos.
Creating a loop video for your YouTube channel increases engagement because viewers can watch the video over and over again. This can lead to more clicks on your ads, which can lead to more revenue. It can also increase your subscribers and views. Maybe some people want to watch the same video multiple times in a row without having to keep pressing the play button on the remote.
Filmora is the best video loop editor:
If you need a powerful video editing tool that will let you create high-quality clips with multiple loops, look no further than Filmora . This software allows you to make various loops of your videos for use in social media, on your website or wherever desired. Plus, with Filmora, there is no limit on the number of loops you can create.
Loop video works well for corporate presentations, tutorials, explainer videos, and much more. You can create looping videos by choosing from one of Filmora’s many templates or creating your own. It’s easy to get started with looping video editing in Filmora! Some people want to watch a video while they do other things, like work on the computer.
Filmora is incredibly easy to use. You can quickly create videos by importing footage, editing and adding effects, and exporting your videos. Plus, the software has several built-in tools that let you customize your videos further. It has many features that make it an excellent choice for anyone looking to create high-quality videos quickly and easily.
How can we loop a video on Filmora? Follow these steps to create a looping video on Filmora:
Step 1 Download the Filmora and create a project
Free Download For Win 7 or later(64-bit)
Free Download For macOS 10.14 or later
You can download the Filmora for free. After installation of this software open it and click on Create New Project. Filmora is not only the video maker or editor, you can also add text and music to your videos, and share them on social media or with friends.
Step 2 Open the video and make copies
Open the video in your timeline. All you need to do is right-click on the video and click on copy. Then simply click or press Ctrl+V on your keyboard and do that for times. You can make as many copies as you want. Then you will have the same clip over and over again which creates the loop effect.

Step 3 Add Transition or any title in the video
After making copies of your video. Add some transitions in your video. Adding transitions to videos can help to keep your videos looking polished and professional. Not only do transitions add an extra layer of visual interest, but they can also help to underscore specific points in your video.
Benefits to create loop video on Filmora
There are many benefits to creating looping videos, especially when using a tool like Filmora. Loop videos are great for social media since they can be set to play on a loop and are viewable without sound. They’re also perfect for short attention spans since you can watch them over and over again without getting bored.
This can be useful for marketing purposes, as it can keep people interested in your video content. Additionally, looping can create a more engaging video experience for viewers, as it keeps them engaged by playing the same clip over and over again. You can easily add captions, and titles to your loop video.
When viewers can pause, rewind, and playback a video over and over again, they are more engaged with it. This increases the chances that they will watch the entire video, and may even share it with friends. You can create a sense of community and connection with your customers. And best of all? You can keep the magic going by adding sound effects and music!
Part 2: Loop a YouTube Video on TV from a Mobile
One of the great features of YouTube is that you can loop YouTube videos on your TV. This means that you can watch a video over and over again without having to fast forward through it. This is great for kids who are constantly asking to watch the same video over and over again. You can also use this feature to watch videos that you have missed.
There is something about relaxing music on the loop that can help to take the edge off. Whether it’s to help you wind down before bed, or to help you relax after a long day, there’s no doubt that looping YouTube on TV can be helpful. Whether you’re looking for something light and calming, or something to help you wind down after a long day, there’s sure to be something on YouTube that can fit the bill.
Let’s have a look at some steps that how to repeat YouTube videos on smart TV.
Step 1 Create a Playlist of one or multiple videos
The YouTube app is available on the google play store. You can easily download it from your mobile phones, android, etc. When you open a video on YouTube, several options will appear (like, share, subscribe). You can save the video in your existing playlist or you can create a new playlist.
Step 2 Go to the library and select the loop symbol
Click on library this will take you to a list of libraries that have YouTube collections. This can be a great way to find new material to watch, or to find old material that you may have missed. Play back the playlist that you want to loop on the smart TV.
Step 3 Loop the playlist and send the list to the TV
Play the list and click on the loop symbol. At last, launch the YouTube video on your TV. The video will start playing in a loop. It can only be stopped from your mobile phone on which you start playing the list.
Why you might want to loop a YouTube video on a smart TV?
Some people want to watch a video over and over again without having to wait for it to load each time. Looping in a YouTube video can help you do this. Another reason to loop a YouTube video on your TV is if you want to watch it while you are doing something else. YouTube only loops the playlist.
Looping a YouTube video on your TV can also be useful if you have a lot of videos that you want to watch but don’t have enough time for. Looping YouTube videos on your television is a great way to keep your young ones entertained and engaged. Not only are they getting their daily dose of educational content, but they are also being kept enertained.
Wondershare Filmora Loop YouTube videos on PC and Mac with simple clicks.
Free Download Free Download Learn More
![]()
 Greeting Card Builder
Conclusion
Looping YouTube videos on smart TV is an excellent way to watch the content you love, no matter where you are. While it may be true that loop YouTube videos on a smart TV are not imminent, there are some major benefits to be gained from implementing the new technology.
It’s easy to do, and it can be a great way to spend time with family members and friends. Looping YouTube videos on a smart TV is a great way to add some fun and excitement to your experience. The best part is, there are no limitations or restrictions you can loop as many videos as you want, and watch them in any order!
From Raw to Refined: Expert Techniques for YouTube Content Creators
How to Edit Youtube Videos by the YouTube Video Editor
 Allavsoft Batch Download Online Videos, Music Offline to MP4, MP3, MOV, etc format

Richard Bennett
Mar 27, 2024• Proven solutions
Note: From 20th September 2017 users will no longer be able to use the complimentary editing suite. Check the best YouTube video editor alternatives from this complete guide. Now, it is back again.
Video editing usually requires a fair amount of technical knowledge and professional software. But YouTube has introduced its new YouTube Video Editor. It’s deceptively simple compared to the traditional desktop editing programs.
If you haven’t tried the YouTube editor , it’s time to get started.
It’s easy to learn and the guide below will give you an introduction for editing videos on YouTube.
You May Also Like:
Royalty free music for YouTube Videos >>
Best Screen Recorders for YouTube >>
YouTube Video Dimensions/Size: Guide for Upload Settings >>
The Best Video Editors for YouTube >>
How to edit a YouTube video with Filmora
If you want to have more controls on editing YouTube video, here we recommend using Filmora .
You can use it to trim/cut/split YouTube videos with handy tools. It also offer more than 50 royal free music to use. Various video filters and effects are available to make your videos amazing. The best part is you can apply animated text/titles to videos like a pro. After editing, you can directly upload videos to YouTube.
Now, download it now to have a try!
 Download Mac Version ](https://tools.techidaily.com/wondershare/filmora/download/ )
How to Use YouTube Video Editor to Edit Video on YouTube
Step 1. Get access to YouTube Video Editor
Sign in to your YouTube (or Google) account. To get access to YouTube Video Editor, you can go directly to YouTube studio (video editor) . Or click avatar icon in your YouTube site > YouTube Studio.
Learn more about Upload MP3 to YouTube


 PDF application, powered by AI-based OCR, for unified workflows with both digital and scanned documents.
 Step 2. Add your videos to the timeline
After getting to the editor, all your YouTube videos will appear. If you want to add a clip from the pool of videos into the project, simply drag it onto the timeline or hit the plus icon in the top right hand corner of each clip. You can also add any YouTube videos that were uploaded with a “Creative Commons” license.
To do this, go to the CC tab, find a video and drag it to the timeline.

Looking for best YouTube video editor alternatives? Check this complete guide here >>
Step 3. Edit the videos as you like
With the YouTube video editor, you can quick fix your videos, add audio track of your video, add texts, use various filters and more. Below is a detailed guide on how to use YouTube video Editor.
#1 Trim/Cut/Split video
To cut or split your video, hover over the target clip and hit the scissor icon to cut the clip into pieces. You can also cursor over the edge of your video in the timeline and drag the handle to shorten or trim your video.


#2 Change video settings
YouTube Video Editor also provides the “Quick fixes” function which does a quick analysis of the video and tweaks its color, brightness, and contrast settings automatically.
You can just double click the video to enter the “Quick fixes” tab and easily change brightness and contrast, add slow motion and pan zoom effect, and stabilize, audio fix or rotate video.


#3 Add filters
You can also add stunning video filters provided by this editor. To get access this function, double click the video and switch to the “Filter” tab.

#4 Add text to video
To add text to video, go to the “Text” tab, tick “Enable text” and enter the text to the text column. Then customize the font, size, color, position of the text as you like.

#5 Add music to video
YouTube also allows you to swap out the audio with one of its licensed tracks. To do this, go back to the main interface of the editor and click the Audio tab. Then select a song from the library and either drag it to the soundtrack timeline or press the plus sign to the right of each title.
 Project Manager - Asset Browser for 3Ds Max

Note: You should note that some are songs are subject to licensing agreements, which means YouTube will automatically add advertisements to the video clip.
Another short coming is that you can’t edit the audio track at all. If a song is longer than your video, you can do nothing but let it play from the beginning until your video stops.
#6 Add transitions to video
If several video clips have been added to the timeline, you need transition to make the whole project smoother. To add transition, go to the Transition tab and choose from 16 transition effects.

YouTube Video Editor is really easy to use, but it only provides some basic video editing functions and is really easy to crash when dealing with large file. If you want to make your video more professional, try Wondershare Filmora .
This desktop video editing tool can help you easily complete video editing tasks.
Download it now to have a try!
Download Mac Version ](https://tools.techidaily.com/wondershare/filmora/download/ )
Richard Bennett
Richard Bennett is a writer and a lover of all things video.
Follow @Richard Bennett
Richard Bennett
Mar 27, 2024• Proven solutions
Note: From 20th September 2017 users will no longer be able to use the complimentary editing suite. Check the best YouTube video editor alternatives from this complete guide. Now, it is back again.
Video editing usually requires a fair amount of technical knowledge and professional software. But YouTube has introduced its new YouTube Video Editor. It’s deceptively simple compared to the traditional desktop editing programs.
If you haven’t tried the YouTube editor , it’s time to get started.
It’s easy to learn and the guide below will give you an introduction for editing videos on YouTube.
You May Also Like:
Royalty free music for YouTube Videos >>
Best Screen Recorders for YouTube >>
YouTube Video Dimensions/Size: Guide for Upload Settings >>
The Best Video Editors for YouTube >>

How to edit a YouTube video with Filmora
If you want to have more controls on editing YouTube video, here we recommend using Filmora .
You can use it to trim/cut/split YouTube videos with handy tools. It also offer more than 50 royal free music to use. Various video filters and effects are available to make your videos amazing. The best part is you can apply animated text/titles to videos like a pro. After editing, you can directly upload videos to YouTube.
Now, download it now to have a try!
Download Mac Version ](https://tools.techidaily.com/wondershare/filmora/download/ )
How to Use YouTube Video Editor to Edit Video on YouTube
Step 1. Get access to YouTube Video Editor
Sign in to your YouTube (or Google) account. To get access to YouTube Video Editor, you can go directly to YouTube studio (video editor) . Or click avatar icon in your YouTube site > YouTube Studio.
Learn more about Upload MP3 to YouTube
 Jet Profiler for MySQL, Enterprise Version: Jet Profiler for MySQL is real-time query performance and diagnostics tool for the MySQL database server. Its detailed query information, graphical interface and ease of use makes this a great tool for finding performance bottlenecks in your MySQL databases.
 Step 2. Add your videos to the timeline
After getting to the editor, all your YouTube videos will appear. If you want to add a clip from the pool of videos into the project, simply drag it onto the timeline or hit the plus icon in the top right hand corner of each clip. You can also add any YouTube videos that were uploaded with a “Creative Commons” license.
To do this, go to the CC tab, find a video and drag it to the timeline.
Looking for best YouTube video editor alternatives? Check this complete guide here >>
Step 3. Edit the videos as you like
With the YouTube video editor, you can quick fix your videos, add audio track of your video, add texts, use various filters and more. Below is a detailed guide on how to use YouTube video Editor.
#1 Trim/Cut/Split video
To cut or split your video, hover over the target clip and hit the scissor icon to cut the clip into pieces. You can also cursor over the edge of your video in the timeline and drag the handle to shorten or trim your video.
#2 Change video settings
YouTube Video Editor also provides the “Quick fixes” function which does a quick analysis of the video and tweaks its color, brightness, and contrast settings automatically.
You can just double click the video to enter the “Quick fixes” tab and easily change brightness and contrast, add slow motion and pan zoom effect, and stabilize, audio fix or rotate video.
#3 Add filters
You can also add stunning video filters provided by this editor. To get access this function, double click the video and switch to the “Filter” tab.
#4 Add text to video
To add text to video, go to the “Text” tab, tick “Enable text” and enter the text to the text column. Then customize the font, size, color, position of the text as you like.
#5 Add music to video
YouTube also allows you to swap out the audio with one of its licensed tracks. To do this, go back to the main interface of the editor and click the Audio tab. Then select a song from the library and either drag it to the soundtrack timeline or press the plus sign to the right of each title.
Note: You should note that some are songs are subject to licensing agreements, which means YouTube will automatically add advertisements to the video clip.
Another short coming is that you can’t edit the audio track at all. If a song is longer than your video, you can do nothing but let it play from the beginning until your video stops.
#6 Add transitions to video
If several video clips have been added to the timeline, you need transition to make the whole project smoother. To add transition, go to the Transition tab and choose from 16 transition effects.
YouTube Video Editor is really easy to use, but it only provides some basic video editing functions and is really easy to crash when dealing with large file. If you want to make your video more professional, try Wondershare Filmora .
This desktop video editing tool can help you easily complete video editing tasks.
Download it now to have a try!
Download Mac Version ](https://tools.techidaily.com/wondershare/filmora/download/ )
Richard Bennett
Richard Bennett is a writer and a lover of all things video.
Follow @Richard Bennett
Richard Bennett
Mar 27, 2024• Proven solutions
Note: From 20th September 2017 users will no longer be able to use the complimentary editing suite. Check the best YouTube video editor alternatives from this complete guide. Now, it is back again.
Video editing usually requires a fair amount of technical knowledge and professional software. But YouTube has introduced its new YouTube Video Editor. It’s deceptively simple compared to the traditional desktop editing programs.
If you haven’t tried the YouTube editor , it’s time to get started.
It’s easy to learn and the guide below will give you an introduction for editing videos on YouTube.
You May Also Like:
Royalty free music for YouTube Videos >>
Best Screen Recorders for YouTube >>
YouTube Video Dimensions/Size: Guide for Upload Settings >>
The Best Video Editors for YouTube >>
How to edit a YouTube video with Filmora
If you want to have more controls on editing YouTube video, here we recommend using Filmora .
You can use it to trim/cut/split YouTube videos with handy tools. It also offer more than 50 royal free music to use. Various video filters and effects are available to make your videos amazing. The best part is you can apply animated text/titles to videos like a pro. After editing, you can directly upload videos to YouTube.
Now, download it now to have a try!
Download Mac Version ](https://tools.techidaily.com/wondershare/filmora/download/ )
How to Use YouTube Video Editor to Edit Video on YouTube
Step 1. Get access to YouTube Video Editor
Sign in to your YouTube (or Google) account. To get access to YouTube Video Editor, you can go directly to YouTube studio (video editor) . Or click avatar icon in your YouTube site > YouTube Studio.
Learn more about Upload MP3 to YouTube

Step 2. Add your videos to the timeline
After getting to the editor, all your YouTube videos will appear. If you want to add a clip from the pool of videos into the project, simply drag it onto the timeline or hit the plus icon in the top right hand corner of each clip. You can also add any YouTube videos that were uploaded with a “Creative Commons” license.
To do this, go to the CC tab, find a video and drag it to the timeline.

Looking for best YouTube video editor alternatives? Check this complete guide here >>

Step 3. Edit the videos as you like
With the YouTube video editor, you can quick fix your videos, add audio track of your video, add texts, use various filters and more. Below is a detailed guide on how to use YouTube video Editor.
#1 Trim/Cut/Split video
To cut or split your video, hover over the target clip and hit the scissor icon to cut the clip into pieces. You can also cursor over the edge of your video in the timeline and drag the handle to shorten or trim your video.
#2 Change video settings
YouTube Video Editor also provides the “Quick fixes” function which does a quick analysis of the video and tweaks its color, brightness, and contrast settings automatically.
You can just double click the video to enter the “Quick fixes” tab and easily change brightness and contrast, add slow motion and pan zoom effect, and stabilize, audio fix or rotate video.
#3 Add filters
You can also add stunning video filters provided by this editor. To get access this function, double click the video and switch to the “Filter” tab.
#4 Add text to video
To add text to video, go to the “Text” tab, tick “Enable text” and enter the text to the text column. Then customize the font, size, color, position of the text as you like.

Key features:
• Import from any devices and cams, including GoPro and drones. All formats supported. Сurrently the only free video editor that allows users to export in a new H265/HEVC codec, something essential for those working with 4K and HD.
• Everything for hassle-free basic editing: cut, crop and merge files, add titles and favorite music
• Visual effects, advanced color correction and trendy Instagram-like filters
• All multimedia processing done from one app: video editing capabilities reinforced by a video converter, a screen capture, a video capture, a disc burner and a YouTube uploader
• Non-linear editing: edit several files with simultaneously
• Easy export to social networks: special profiles for YouTube, Facebook, Vimeo, Twitter and Instagram
• High quality export – no conversion quality loss, double export speed even of HD files due to hardware acceleration
• Stabilization tool will turn shaky or jittery footage into a more stable video automatically.
• Essential toolset for professional video editing: blending modes, Mask tool, advanced multiple-color Chroma Key
#5 Add music to video
YouTube also allows you to swap out the audio with one of its licensed tracks. To do this, go back to the main interface of the editor and click the Audio tab. Then select a song from the library and either drag it to the soundtrack timeline or press the plus sign to the right of each title.

Note: You should note that some are songs are subject to licensing agreements, which means YouTube will automatically add advertisements to the video clip.
Another short coming is that you can’t edit the audio track at all. If a song is longer than your video, you can do nothing but let it play from the beginning until your video stops.
#6 Add transitions to video
If several video clips have been added to the timeline, you need transition to make the whole project smoother. To add transition, go to the Transition tab and choose from 16 transition effects.
 PCDJ Karaoki is the complete professional karaoke software designed for KJs and karaoke venues. Karaoki includes an advanced automatic singer rotation list with singer history, key control, news ticker, next singers screen, a song book exporter and printer, a jukebox background music player and many other features designed so you can host karaoke shows faster and easier!
YouTube Video Editor is really easy to use, but it only provides some basic video editing functions and is really easy to crash when dealing with large file. If you want to make your video more professional, try Wondershare Filmora .
This desktop video editing tool can help you easily complete video editing tasks.
Download it now to have a try!
Download Mac Version ](https://tools.techidaily.com/wondershare/filmora/download/ )
Richard Bennett
Richard Bennett is a writer and a lover of all things video.
Follow @Richard Bennett
Richard Bennett
Mar 27, 2024• Proven solutions
Note: From 20th September 2017 users will no longer be able to use the complimentary editing suite. Check the best YouTube video editor alternatives from this complete guide. Now, it is back again.
Video editing usually requires a fair amount of technical knowledge and professional software. But YouTube has introduced its new YouTube Video Editor. It’s deceptively simple compared to the traditional desktop editing programs.
If you haven’t tried the YouTube editor , it’s time to get started.
It’s easy to learn and the guide below will give you an introduction for editing videos on YouTube.
You May Also Like:
Royalty free music for YouTube Videos >>
Best Screen Recorders for YouTube >>
YouTube Video Dimensions/Size: Guide for Upload Settings >>
The Best Video Editors for YouTube >>

How to edit a YouTube video with Filmora
If you want to have more controls on editing YouTube video, here we recommend using Filmora .
You can use it to trim/cut/split YouTube videos with handy tools. It also offer more than 50 royal free music to use. Various video filters and effects are available to make your videos amazing. The best part is you can apply animated text/titles to videos like a pro. After editing, you can directly upload videos to YouTube.
Now, download it now to have a try!
Download Mac Version ](https://tools.techidaily.com/wondershare/filmora/download/ )

How to Use YouTube Video Editor to Edit Video on YouTube
Step 1. Get access to YouTube Video Editor
Sign in to your YouTube (or Google) account. To get access to YouTube Video Editor, you can go directly to YouTube studio (video editor) . Or click avatar icon in your YouTube site > YouTube Studio.
Learn more about Upload MP3 to YouTube
 Video Converter Factory Pro
Step 2. Add your videos to the timeline
After getting to the editor, all your YouTube videos will appear. If you want to add a clip from the pool of videos into the project, simply drag it onto the timeline or hit the plus icon in the top right hand corner of each clip. You can also add any YouTube videos that were uploaded with a “Creative Commons” license.
To do this, go to the CC tab, find a video and drag it to the timeline.
Looking for best YouTube video editor alternatives? Check this complete guide here >>
Step 3. Edit the videos as you like
With the YouTube video editor, you can quick fix your videos, add audio track of your video, add texts, use various filters and more. Below is a detailed guide on how to use YouTube video Editor.
#1 Trim/Cut/Split video
To cut or split your video, hover over the target clip and hit the scissor icon to cut the clip into pieces. You can also cursor over the edge of your video in the timeline and drag the handle to shorten or trim your video.

#2 Change video settings
YouTube Video Editor also provides the “Quick fixes” function which does a quick analysis of the video and tweaks its color, brightness, and contrast settings automatically.
You can just double click the video to enter the “Quick fixes” tab and easily change brightness and contrast, add slow motion and pan zoom effect, and stabilize, audio fix or rotate video.
#3 Add filters
You can also add stunning video filters provided by this editor. To get access this function, double click the video and switch to the “Filter” tab.
#4 Add text to video
To add text to video, go to the “Text” tab, tick “Enable text” and enter the text to the text column. Then customize the font, size, color, position of the text as you like.
 Epubor Audible Converter for Win: Download and convert Audible AAXC/AA/AAX to MP3 with 100% original quality preserved.
#5 Add music to video
YouTube also allows you to swap out the audio with one of its licensed tracks. To do this, go back to the main interface of the editor and click the Audio tab. Then select a song from the library and either drag it to the soundtrack timeline or press the plus sign to the right of each title.

Note: You should note that some are songs are subject to licensing agreements, which means YouTube will automatically add advertisements to the video clip.
Another short coming is that you can’t edit the audio track at all. If a song is longer than your video, you can do nothing but let it play from the beginning until your video stops.
#6 Add transitions to video
If several video clips have been added to the timeline, you need transition to make the whole project smoother. To add transition, go to the Transition tab and choose from 16 transition effects.
 ZoneAlarm Pro Antivirus + Firewall NextGen
YouTube Video Editor is really easy to use, but it only provides some basic video editing functions and is really easy to crash when dealing with large file. If you want to make your video more professional, try Wondershare Filmora .
This desktop video editing tool can help you easily complete video editing tasks.
Download it now to have a try!

Download Mac Version ](https://tools.techidaily.com/wondershare/filmora/download/ )
Richard Bennett
Richard Bennett is a writer and a lover of all things video.
Follow @Richard Bennett
- Title: [Updated] Smooth Transition of Online Videos to TV Screens
- Author: Kenneth
- Created at : 2024-08-01 00:39:37
- Updated at : 2024-08-02 00:39:37
- Link: https://facebook-video-footage.techidaily.com/updated-smooth-transition-of-online-videos-to-tv-screens/
- License: This work is licensed under CC BY-NC-SA 4.0.