![[Updated] Expert Techniques for Professionalizing Mobile-Based YouTube Thumbnails](https://thmb.techidaily.com/502b1cdc938497dc65859bd4dea7388cbc83b5388aae8627911832c708fd7626.jpg)
"[Updated] Expert Techniques for Professionalizing Mobile-Based YouTube Thumbnails"
Expert Techniques for Professionalizing Mobile-Based YouTube Thumbnails
As a content creator, you know the importance of a visually appealing thumbnail for YouTube videos. It gives your viewers a sneak peek of what they can expect from your video and helps it stand out in the crowded world of YouTube.
When creating your thumbnail, it’s important to remember that the recommended size is 1280 x 720 pixels and a minimum width of 640 pixels. With these dimensions in mind, let’s dive into how you can easily create stunning thumbnails for your YouTube videos using your mobile phone.

 TubeDigger - online video downloader from mostly any site
Method 1. Make a YouTube Thumbnail on iPhone With the iPhone Photos App
One way to create a thumbnail for your YouTube video on your iPhone is to use the built-in Photos app. The Photos app comes pre-installed on all iPhones and offers a range of editing tools you can use to create a thumbnail.
The Photos app on your iPhone offers a range of features that you can use to create a custom thumbnail for your YouTube video. Here are some of the features you can use:
- Crop: The crop tool allows you to resize and reposition your thumbnail image by trimming away any unnecessary parts of the image.
- Rotate: The rotate tool lets you adjust the orientation of your thumbnail image. You can rotate the image clockwise or counterclockwise to achieve the desired angle.
- Adjust lighting and color: The lighting and color tools allow you to adjust the brightness, contrast, saturation, and other aspects of the thumbnail image to enhance its overall appearance.
- Add text: You can use the text tool to add words or phrases to your thumbnail image. This can be a great way to include a call-to-action or to highlight a key feature of your video.
- Add filters and stickers: The Photos app includes a range of filters and stickers that you can use to give your thumbnail image a unique look. You can experiment with filters and stickers to find the perfect one for your thumbnail.
To create a thumbnail using the Photos app on your iPhone, follow these steps:
Step1 Open the Photos app and find the image you want to use as your thumbnail. Tap on the image to open it.

Step2 Tap the Edit button in the top right corner of the screen. Use the crop and rotate tools to adjust the perspective and the aspect ratio of 16:9.

Step3 Tap the Filters button to access the filter effects. Scroll through the available filters and tap on one to apply it to your thumbnail image.
 Screensaver Factory, Create stunning professional screensavers within minutes. Create screensavers for yourself, for marketing or unlimited royalty-free commercial distribution. Make screensavers from images, video and swf flash, add background music and smooth sprite and transition effects. Screensaver Factory is very easy to use, and it enables you to make self-installing screensaver files and CDs for easy setup and distribution. Screensaver Factory is the most advanced software of its kind.
Step4 To write or draw on the image, tap the Markup button. This will open a toolbar with a variety of drawing and text tools. Use these tools to add your personal touch to the thumbnail.


Step5 When you’re satisfied with your thumbnail, tap Done in the top right corner of the screen.


Pros
- Convenient
- Easy to use
- Versatile
Cons
- Limited customization option
- Lower image quality
This method is best for users looking for a quick and easy way to create a thumbnail on the go and doesn’t need many customization options. It’s also a good option for users needing computer or graphic design software access. If you’re looking for more advanced customization options or higher image quality, consider using other methods or software.
Method 2. Make YouTube Thumbnails on Android/iPhone With Third-Party Apps
In addition to using the built-in Photos app on your iPhone or Android device, there are also many third-party apps that you can use to create YouTube thumbnails. Some popular options include Canva, Adobe Spark, and FotoJet. These apps offer a wider range of customization options and design templates, making it easy to create professional-looking thumbnails even if you have yet to gain graphic design experience.
One popular third-party app for creating YouTube thumbnails on both iPhone and Android devices is PixelLab. PixelLab is a powerful graphic design app with many features and tools for creating custom thumbnails. With PixelLab, you can add text, shapes, and stickers to your thumbnail image and adjust the image’s color, lighting, and other aspects to get the perfect look. You can also import your images or graphics for your thumbnail design.
Here are the steps to create a thumbnail using PixelLab on your Android or iOS device:
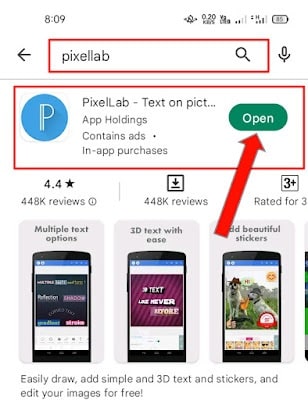
Step1 Open the Play Store and search for PixelLab. Install the app.
![]()
Step2 Tap the “+” icon to add an image from your gallery.
![]()
Step3 Edit the image using the available tools, such as cropping, rotating, and adjusting the color and lighting.

![]()
Step4 Add text to the image and customize it to your liking.

![]()
Step5 Change the resolution of the image to 1280 x 720 pixels.
 dotConnect for Oracle is an ADO.NET data provider for Oracle with Entity Framework Support.
![]()
Step6 Save the image to your gallery by exporting it.

![]()
Pros
- More customization options
- Advanced editing tools
- High image quality
Cons
- Requires a separate app download
- It may require a learning curve
This method is best for users looking for more advanced customization options and higher image quality for their YouTube thumbnails. It’s also a good option for users with experience with graphic design software and who are comfortable using advanced editing tools. If you’re looking for a quick and easy way to create a thumbnail and only need a few customization options, consider using the built-in Photos app or other simpler methods.
How To Add Thumbnails to YouTube Videos on Mobile
Once you’ve created your thumbnail image, it’s time to add it to your YouTube video. Adding a thumbnail to your YouTube video on your mobile device is a simple process that only requires a few steps.
Here’s how to do it on your mobile device:
Step1 Open the YouTube app on your mobile device and sign in to your account.

Step2 Tap on the My Videos tab to view a list of your uploaded videos.

Step3 Tap on the video and tap the “Edit“ button in the top right corner of the screen.

Step4 Tap the Custom thumbnail button and upload the image you want to use from your photo library.

Step5 Tap Save in the top right corner to upload the thumbnail to your video.
 Any DRM Removal for Mac: Remove DRM from Adobe, Kindle, Sony eReader, Kobo, etc, read your ebooks anywhere.
That’s it! Your new thumbnail will now be displayed on your YouTube video, helping it stand out and attract more views. You can repeat this process for other videos if you want to add a custom thumbnail.
It May Interest You – Make YouTube Thumbnails on Windows/Mac
While it’s convenient to create YouTube thumbnails on your mobile device, there may be times when you need to create a thumbnail on your Windows or Mac computer.
For example, if you need to create a thumbnail with a higher resolution or more advanced customization options, you may find it easier to do so on a computer. Additionally, a computer may be more efficient if you’re working on a larger thumbnail project and need to create multiple thumbnails simultaneously.
One popular tool for creating YouTube thumbnails on a Windows or Mac computer is Filmora. Wondershare Filmora is a powerful video editing software that allows you to easily edit and enhance your YouTube videos and create custom thumbnails for your videos.
Free Download For Win 7 or later(64-bit)
Free Download For macOS 10.14 or later
With Filmora, you can add text, graphics, and special effects to your thumbnail image and import and edit multiple images. Filmora is a great tool for creating professional-looking YouTube thumbnails on your Windows or Mac computer.
To create a thumbnail using Filmora on your Windows or Mac computer, follow these steps:
Step1 Launch Filmora, add the picture to the timeline and select the AI Portrait option in the Effects panel to cut out the subject from the background.

Step2 Scale up and reposition the photo.

Step3 Add a new background to the track below the picture. Use the other editing tools in Filmora to customize the image as desired, such as adding text, graphics, and special effects.

Step4 When you are done editing the thumbnail, take a snapshot by clicking the camera icon.

Step5 Locate the thumbnail in your local drive.

For more detailed instructions and a visual guide, you can watch the following video tutorial:
Add a video
This video will show you how to use Filmora to create a custom thumbnail for your YouTube video, step by step.
People Also Ask
Here are some common questions that people have when it comes to creating YouTube thumbnails on mobile.
Q1. What App Do Youtubers Use To Make Thumbnails?
There are many different apps and tools that YouTubers use to create thumbnails for their videos. The best app for creating YouTube thumbnails will depend on your needs and skill level.
If you’re looking for a quick and easy way to create a thumbnail on your mobile device, start with the built-in Photos app or a third-party app like Canva. If you need more advanced customization options or are comfortable with graphic design software, consider using Adobe Photoshop or another tool.
Q2. What Is YouTube Thumbnail Size?
The recommended size for YouTube thumbnails is 1280 x 720 pixels. This size balances quality and file size, ensuring that your thumbnail looks sharp and loads quickly. It’s also important to note that YouTube thumbnails are displayed at different sizes depending on the device and context in which they are viewed.
For example, a thumbnail may be displayed at a larger size when it’s shown as the main thumbnail for a video but smaller when it’s shown in a list of related videos.
Q3. What Thumbnail Gets the Most Clicks?
There is no one-size-fits-all answer to this question, as the thumbnail that gets the most clicks can vary depending on the topic of your video, your target audience, and other factors.
However, the key to getting clicks on your thumbnail is to make it visually appealing and relevant to your video. Experiment with different thumbnail designs and track which ones get the most clicks to help you identify what works best for your channel.

Conclusion
Many tools are available for creating YouTube thumbnails, including the built-in Photos app on mobile devices and third-party apps like Pixelab. One particularly powerful option is Filmora, a video editing software with features for creating custom thumbnails, such as adding text, graphics, and special effects.
Whether you create your thumbnails on your mobile device or your computer, use a high-quality image and make the thumbnail relevant to your video to increase the chances of it getting clicked.
This method is best for users looking for a quick and easy way to create a thumbnail on the go and doesn’t need many customization options. It’s also a good option for users needing computer or graphic design software access. If you’re looking for more advanced customization options or higher image quality, consider using other methods or software.
Method 2. Make YouTube Thumbnails on Android/iPhone With Third-Party Apps
In addition to using the built-in Photos app on your iPhone or Android device, there are also many third-party apps that you can use to create YouTube thumbnails. Some popular options include Canva, Adobe Spark, and FotoJet. These apps offer a wider range of customization options and design templates, making it easy to create professional-looking thumbnails even if you have yet to gain graphic design experience.
One popular third-party app for creating YouTube thumbnails on both iPhone and Android devices is PixelLab. PixelLab is a powerful graphic design app with many features and tools for creating custom thumbnails. With PixelLab, you can add text, shapes, and stickers to your thumbnail image and adjust the image’s color, lighting, and other aspects to get the perfect look. You can also import your images or graphics for your thumbnail design.
Here are the steps to create a thumbnail using PixelLab on your Android or iOS device:
Step1 Open the Play Store and search for PixelLab. Install the app.
Parental Control Software
Step2 Tap the “+” icon to add an image from your gallery.
 OtsAV DJ Pro
![]()
Step3 Edit the image using the available tools, such as cropping, rotating, and adjusting the color and lighting.
![]()
Step4 Add text to the image and customize it to your liking.
![]()
Step5 Change the resolution of the image to 1280 x 720 pixels.
![]()
Step6 Save the image to your gallery by exporting it.
![]()
Pros
- More customization options
- Advanced editing tools
- High image quality
Cons
- Requires a separate app download
- It may require a learning curve
This method is best for users looking for more advanced customization options and higher image quality for their YouTube thumbnails. It’s also a good option for users with experience with graphic design software and who are comfortable using advanced editing tools. If you’re looking for a quick and easy way to create a thumbnail and only need a few customization options, consider using the built-in Photos app or other simpler methods.
How To Add Thumbnails to YouTube Videos on Mobile
Once you’ve created your thumbnail image, it’s time to add it to your YouTube video. Adding a thumbnail to your YouTube video on your mobile device is a simple process that only requires a few steps.
Here’s how to do it on your mobile device:
Step1 Open the YouTube app on your mobile device and sign in to your account.

Key features:
• Import from any devices and cams, including GoPro and drones. All formats supported. Сurrently the only free video editor that allows users to export in a new H265/HEVC codec, something essential for those working with 4K and HD.
• Everything for hassle-free basic editing: cut, crop and merge files, add titles and favorite music
• Visual effects, advanced color correction and trendy Instagram-like filters
• All multimedia processing done from one app: video editing capabilities reinforced by a video converter, a screen capture, a video capture, a disc burner and a YouTube uploader
• Non-linear editing: edit several files with simultaneously
• Easy export to social networks: special profiles for YouTube, Facebook, Vimeo, Twitter and Instagram
• High quality export – no conversion quality loss, double export speed even of HD files due to hardware acceleration
• Stabilization tool will turn shaky or jittery footage into a more stable video automatically.
• Essential toolset for professional video editing: blending modes, Mask tool, advanced multiple-color Chroma Key
Step2 Tap on the My Videos tab to view a list of your uploaded videos.
Step3 Tap on the video and tap the “Edit“ button in the top right corner of the screen.
Step4 Tap the Custom thumbnail button and upload the image you want to use from your photo library.
Step5 Tap Save in the top right corner to upload the thumbnail to your video.
 Power Tools add-on for Google Sheets, Lifetime subscription
That’s it! Your new thumbnail will now be displayed on your YouTube video, helping it stand out and attract more views. You can repeat this process for other videos if you want to add a custom thumbnail.
It May Interest You – Make YouTube Thumbnails on Windows/Mac
While it’s convenient to create YouTube thumbnails on your mobile device, there may be times when you need to create a thumbnail on your Windows or Mac computer.
For example, if you need to create a thumbnail with a higher resolution or more advanced customization options, you may find it easier to do so on a computer. Additionally, a computer may be more efficient if you’re working on a larger thumbnail project and need to create multiple thumbnails simultaneously.
One popular tool for creating YouTube thumbnails on a Windows or Mac computer is Filmora. Wondershare Filmora is a powerful video editing software that allows you to easily edit and enhance your YouTube videos and create custom thumbnails for your videos.
Free Download For Win 7 or later(64-bit)
Free Download For macOS 10.14 or later
With Filmora, you can add text, graphics, and special effects to your thumbnail image and import and edit multiple images. Filmora is a great tool for creating professional-looking YouTube thumbnails on your Windows or Mac computer.
To create a thumbnail using Filmora on your Windows or Mac computer, follow these steps:
Step1 Launch Filmora, add the picture to the timeline and select the AI Portrait option in the Effects panel to cut out the subject from the background.
Step2 Scale up and reposition the photo.
 The BootIt Collection covers multi-booting, partitioning, and disk imaging on traditional PC’s using the standard BIOS and newer PC’s using UEFI. The collection includes BootIt Bare Metal (BIBM) for standard BIOS systems and BootIt UEFI (BIU) for UEFI system.
Step3 Add a new background to the track below the picture. Use the other editing tools in Filmora to customize the image as desired, such as adding text, graphics, and special effects.
Step4 When you are done editing the thumbnail, take a snapshot by clicking the camera icon.
Step5 Locate the thumbnail in your local drive.

For more detailed instructions and a visual guide, you can watch the following video tutorial:
Add a video
This video will show you how to use Filmora to create a custom thumbnail for your YouTube video, step by step.
People Also Ask
Here are some common questions that people have when it comes to creating YouTube thumbnails on mobile.
Q1. What App Do Youtubers Use To Make Thumbnails?
There are many different apps and tools that YouTubers use to create thumbnails for their videos. The best app for creating YouTube thumbnails will depend on your needs and skill level.
If you’re looking for a quick and easy way to create a thumbnail on your mobile device, start with the built-in Photos app or a third-party app like Canva. If you need more advanced customization options or are comfortable with graphic design software, consider using Adobe Photoshop or another tool.
Q2. What Is YouTube Thumbnail Size?
The recommended size for YouTube thumbnails is 1280 x 720 pixels. This size balances quality and file size, ensuring that your thumbnail looks sharp and loads quickly. It’s also important to note that YouTube thumbnails are displayed at different sizes depending on the device and context in which they are viewed.
For example, a thumbnail may be displayed at a larger size when it’s shown as the main thumbnail for a video but smaller when it’s shown in a list of related videos.

Q3. What Thumbnail Gets the Most Clicks?
There is no one-size-fits-all answer to this question, as the thumbnail that gets the most clicks can vary depending on the topic of your video, your target audience, and other factors.
However, the key to getting clicks on your thumbnail is to make it visually appealing and relevant to your video. Experiment with different thumbnail designs and track which ones get the most clicks to help you identify what works best for your channel.

Conclusion
Many tools are available for creating YouTube thumbnails, including the built-in Photos app on mobile devices and third-party apps like Pixelab. One particularly powerful option is Filmora, a video editing software with features for creating custom thumbnails, such as adding text, graphics, and special effects.
Whether you create your thumbnails on your mobile device or your computer, use a high-quality image and make the thumbnail relevant to your video to increase the chances of it getting clicked.
Vimeo and YouTube: A Compreayer of Their Core Philosophies
Vimeo vs YouTube: Which is Better?

Ollie Mattison
Mar 27, 2024• Proven solutions
Lots of people nowadays use videos to share with people all around the world. Two of the main platforms are YouTube and Vimeo. This article tells you the difference between both so that you can decide which the best platform is for you. Whether you are a marketer, video producer or gamer you will find the information useful to find your target audience easily.
Also read:
Vimeo Basic, Vimeo Plus or Vimeo Pro: Which is Right for You?
Please watch the video below for more information:
 DEX 3 RE is Easy-To-Use DJ Mixing Software for MAC and Windows Designed for Today’s Versatile DJ.
Mix from your own library of music, iTunes or use the Pulselocker subsciprtion service for in-app access to over 44 million songs. Use with over 85 supported DJ controllers or mix with a keyboard and mouse.
DEX 3 RE is everything you need without the clutter - the perfect 2-deck mixing software solution for mobile DJs or hard-core hobbiests.
PCDJ DEX 3 RE (DJ Software for Win & MAC - Product Activation For 3 Machines)
Detailed View of YouTube and Vimeo
1 Communities
YouTube: When it comes to users YouTube comes out on top with over a billion views each and every month. You are able to interact with your viewers by using the comments and people are able to follow you so that they are notified of new videos and comments. As there is already a huge following on YouTube it’s easy to get a good following if you have great content. It’s harder to control public content which is a downside to using YouTube and there is very little customer support. With the comments being moderated rarely it can cause a distraction from your video. Businesses tend to internally block YouTube video’s which means you won’t get the viewings from people on their lunch breaks.


Vimeo: With higher quality content and no advertisements video owners can quickly build a valid following and gain comments from people that are contributing high value information. You have more detailed analytics which makes it easier to see where you are going wrong should you not have the following you want and you are able to use your own domain. With Google owning YouTube you are unlikely to get the same exposure you would, however the followers tend to be valid giving you a real idea of where you are going right or wrong. Because of the higher quality followers you are less likely to get negative or abusive comments when you use Vimeo, however it is a paid subscription with each tier giving you more space to upload.
2 Membership
YouTube: YouTube on the other hand is free for all to use because the main focus is getting their equity through advertisements. There is however the option to take out a subscription which is known as YouTube Red. This lets you watch as many video’s as you want without having to view the ads and also gets you the ability to download so you don’t have to go online to view your favourite videos, a music app and original programming facilities.
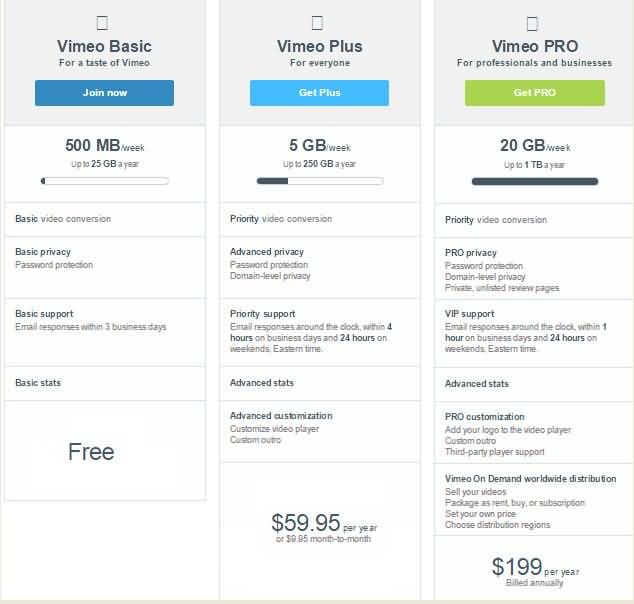
Vimeo: There are 4 different membership options with Vimeo allowing you to tailor it to your needs; there is the basic, plus, pro and business. The higher the cost, the greater level of support and storage capacity you will get. There is a free membership available but you will only be able to use up to 500MB each week.

3 Advertising
YouTube: What makes YouTube free is the fact they get their money from the advertisements they put not only on their sites but before video’s that people have to watch a set amount of seconds for before they can view their video of choice. This is great news if you are a marketer as it will allow you to reach out to viewers on video’s that are relevant to your brand/product/service, however for those that are viewing the sheer amount of ads can be off-putting.

Vimeo: As a paid subscription service and even the limited free package, you won’t have to view or show viewers ads, which means that your videos are more likely to be seen in their entirety not abandoned due to advertisements.
4 Updating video
YouTube: If you upload videos to YouTube you do not have the same benefits as the only way to amend a video is to take it down, delete it and re-upload a new one. This unfortunately takes with it any statistics such as views that you have gained. If you do choose YouTube for your videos then do make sure you check everything vigorously before you upload it as there’s no way to change it.
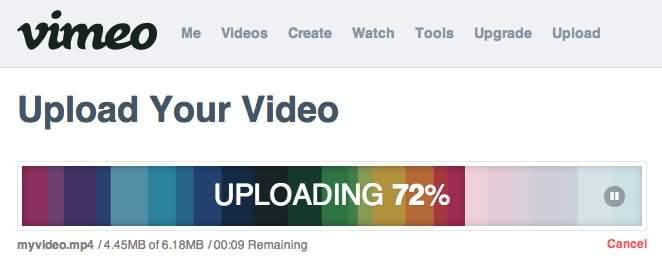
Vimeo: Occasionally an uploaded video may need some changes made. This could be due to changes to the offer you have or you have noticed something else that needs amending. With Vimeo if you need to update a video you can do so without losing the statistics it has already gained, which is great news if you notice an error later down the line or need to add or take something away.
Conclusion
When it comes down to making the final decision between using YouTube or Vimeo you will need to look at the type of audience you want to attract. With Vimeo you are more likely to attract creators and film makers, whereas with YouTube you will have a bigger audience to target which gives you a better chance of a higher rank on search engines.

Ollie Mattison
Ollie Mattison is a writer and a lover of all things video.
Follow @Ollie Mattison
Ollie Mattison
Mar 27, 2024• Proven solutions
Lots of people nowadays use videos to share with people all around the world. Two of the main platforms are YouTube and Vimeo. This article tells you the difference between both so that you can decide which the best platform is for you. Whether you are a marketer, video producer or gamer you will find the information useful to find your target audience easily.
Also read:
Vimeo Basic, Vimeo Plus or Vimeo Pro: Which is Right for You?
Please watch the video below for more information:
Detailed View of YouTube and Vimeo
1 Communities
YouTube: When it comes to users YouTube comes out on top with over a billion views each and every month. You are able to interact with your viewers by using the comments and people are able to follow you so that they are notified of new videos and comments. As there is already a huge following on YouTube it’s easy to get a good following if you have great content. It’s harder to control public content which is a downside to using YouTube and there is very little customer support. With the comments being moderated rarely it can cause a distraction from your video. Businesses tend to internally block YouTube video’s which means you won’t get the viewings from people on their lunch breaks.
Vimeo: With higher quality content and no advertisements video owners can quickly build a valid following and gain comments from people that are contributing high value information. You have more detailed analytics which makes it easier to see where you are going wrong should you not have the following you want and you are able to use your own domain. With Google owning YouTube you are unlikely to get the same exposure you would, however the followers tend to be valid giving you a real idea of where you are going right or wrong. Because of the higher quality followers you are less likely to get negative or abusive comments when you use Vimeo, however it is a paid subscription with each tier giving you more space to upload.
2 Membership
YouTube: YouTube on the other hand is free for all to use because the main focus is getting their equity through advertisements. There is however the option to take out a subscription which is known as YouTube Red. This lets you watch as many video’s as you want without having to view the ads and also gets you the ability to download so you don’t have to go online to view your favourite videos, a music app and original programming facilities.
Vimeo: There are 4 different membership options with Vimeo allowing you to tailor it to your needs; there is the basic, plus, pro and business. The higher the cost, the greater level of support and storage capacity you will get. There is a free membership available but you will only be able to use up to 500MB each week.
3 Advertising
YouTube: What makes YouTube free is the fact they get their money from the advertisements they put not only on their sites but before video’s that people have to watch a set amount of seconds for before they can view their video of choice. This is great news if you are a marketer as it will allow you to reach out to viewers on video’s that are relevant to your brand/product/service, however for those that are viewing the sheer amount of ads can be off-putting.
Vimeo: As a paid subscription service and even the limited free package, you won’t have to view or show viewers ads, which means that your videos are more likely to be seen in their entirety not abandoned due to advertisements.
4 Updating video
YouTube: If you upload videos to YouTube you do not have the same benefits as the only way to amend a video is to take it down, delete it and re-upload a new one. This unfortunately takes with it any statistics such as views that you have gained. If you do choose YouTube for your videos then do make sure you check everything vigorously before you upload it as there’s no way to change it.
Vimeo: Occasionally an uploaded video may need some changes made. This could be due to changes to the offer you have or you have noticed something else that needs amending. With Vimeo if you need to update a video you can do so without losing the statistics it has already gained, which is great news if you notice an error later down the line or need to add or take something away.

Conclusion
When it comes down to making the final decision between using YouTube or Vimeo you will need to look at the type of audience you want to attract. With Vimeo you are more likely to attract creators and film makers, whereas with YouTube you will have a bigger audience to target which gives you a better chance of a higher rank on search engines.
Ollie Mattison
Ollie Mattison is a writer and a lover of all things video.
Follow @Ollie Mattison
Ollie Mattison
Mar 27, 2024• Proven solutions
Lots of people nowadays use videos to share with people all around the world. Two of the main platforms are YouTube and Vimeo. This article tells you the difference between both so that you can decide which the best platform is for you. Whether you are a marketer, video producer or gamer you will find the information useful to find your target audience easily.
Also read:
Vimeo Basic, Vimeo Plus or Vimeo Pro: Which is Right for You?
Please watch the video below for more information:
Detailed View of YouTube and Vimeo
1 Communities
YouTube: When it comes to users YouTube comes out on top with over a billion views each and every month. You are able to interact with your viewers by using the comments and people are able to follow you so that they are notified of new videos and comments. As there is already a huge following on YouTube it’s easy to get a good following if you have great content. It’s harder to control public content which is a downside to using YouTube and there is very little customer support. With the comments being moderated rarely it can cause a distraction from your video. Businesses tend to internally block YouTube video’s which means you won’t get the viewings from people on their lunch breaks.
Vimeo: With higher quality content and no advertisements video owners can quickly build a valid following and gain comments from people that are contributing high value information. You have more detailed analytics which makes it easier to see where you are going wrong should you not have the following you want and you are able to use your own domain. With Google owning YouTube you are unlikely to get the same exposure you would, however the followers tend to be valid giving you a real idea of where you are going right or wrong. Because of the higher quality followers you are less likely to get negative or abusive comments when you use Vimeo, however it is a paid subscription with each tier giving you more space to upload.
2 Membership
YouTube: YouTube on the other hand is free for all to use because the main focus is getting their equity through advertisements. There is however the option to take out a subscription which is known as YouTube Red. This lets you watch as many video’s as you want without having to view the ads and also gets you the ability to download so you don’t have to go online to view your favourite videos, a music app and original programming facilities.
Vimeo: There are 4 different membership options with Vimeo allowing you to tailor it to your needs; there is the basic, plus, pro and business. The higher the cost, the greater level of support and storage capacity you will get. There is a free membership available but you will only be able to use up to 500MB each week.
3 Advertising
YouTube: What makes YouTube free is the fact they get their money from the advertisements they put not only on their sites but before video’s that people have to watch a set amount of seconds for before they can view their video of choice. This is great news if you are a marketer as it will allow you to reach out to viewers on video’s that are relevant to your brand/product/service, however for those that are viewing the sheer amount of ads can be off-putting.
Vimeo: As a paid subscription service and even the limited free package, you won’t have to view or show viewers ads, which means that your videos are more likely to be seen in their entirety not abandoned due to advertisements.
4 Updating video
YouTube: If you upload videos to YouTube you do not have the same benefits as the only way to amend a video is to take it down, delete it and re-upload a new one. This unfortunately takes with it any statistics such as views that you have gained. If you do choose YouTube for your videos then do make sure you check everything vigorously before you upload it as there’s no way to change it.
Vimeo: Occasionally an uploaded video may need some changes made. This could be due to changes to the offer you have or you have noticed something else that needs amending. With Vimeo if you need to update a video you can do so without losing the statistics it has already gained, which is great news if you notice an error later down the line or need to add or take something away.
Conclusion
When it comes down to making the final decision between using YouTube or Vimeo you will need to look at the type of audience you want to attract. With Vimeo you are more likely to attract creators and film makers, whereas with YouTube you will have a bigger audience to target which gives you a better chance of a higher rank on search engines.
 SwifDoo PDF 2-Year Plan
Ollie Mattison
Ollie Mattison is a writer and a lover of all things video.
Follow @Ollie Mattison
Ollie Mattison
Mar 27, 2024• Proven solutions
Lots of people nowadays use videos to share with people all around the world. Two of the main platforms are YouTube and Vimeo. This article tells you the difference between both so that you can decide which the best platform is for you. Whether you are a marketer, video producer or gamer you will find the information useful to find your target audience easily.
Also read:
Vimeo Basic, Vimeo Plus or Vimeo Pro: Which is Right for You?
Please watch the video below for more information:
 Forex Robotron Basic Package
Detailed View of YouTube and Vimeo
1 Communities
YouTube: When it comes to users YouTube comes out on top with over a billion views each and every month. You are able to interact with your viewers by using the comments and people are able to follow you so that they are notified of new videos and comments. As there is already a huge following on YouTube it’s easy to get a good following if you have great content. It’s harder to control public content which is a downside to using YouTube and there is very little customer support. With the comments being moderated rarely it can cause a distraction from your video. Businesses tend to internally block YouTube video’s which means you won’t get the viewings from people on their lunch breaks.
Vimeo: With higher quality content and no advertisements video owners can quickly build a valid following and gain comments from people that are contributing high value information. You have more detailed analytics which makes it easier to see where you are going wrong should you not have the following you want and you are able to use your own domain. With Google owning YouTube you are unlikely to get the same exposure you would, however the followers tend to be valid giving you a real idea of where you are going right or wrong. Because of the higher quality followers you are less likely to get negative or abusive comments when you use Vimeo, however it is a paid subscription with each tier giving you more space to upload.
2 Membership
YouTube: YouTube on the other hand is free for all to use because the main focus is getting their equity through advertisements. There is however the option to take out a subscription which is known as YouTube Red. This lets you watch as many video’s as you want without having to view the ads and also gets you the ability to download so you don’t have to go online to view your favourite videos, a music app and original programming facilities.
Vimeo: There are 4 different membership options with Vimeo allowing you to tailor it to your needs; there is the basic, plus, pro and business. The higher the cost, the greater level of support and storage capacity you will get. There is a free membership available but you will only be able to use up to 500MB each week.
3 Advertising
YouTube: What makes YouTube free is the fact they get their money from the advertisements they put not only on their sites but before video’s that people have to watch a set amount of seconds for before they can view their video of choice. This is great news if you are a marketer as it will allow you to reach out to viewers on video’s that are relevant to your brand/product/service, however for those that are viewing the sheer amount of ads can be off-putting.
Vimeo: As a paid subscription service and even the limited free package, you won’t have to view or show viewers ads, which means that your videos are more likely to be seen in their entirety not abandoned due to advertisements.
4 Updating video
YouTube: If you upload videos to YouTube you do not have the same benefits as the only way to amend a video is to take it down, delete it and re-upload a new one. This unfortunately takes with it any statistics such as views that you have gained. If you do choose YouTube for your videos then do make sure you check everything vigorously before you upload it as there’s no way to change it.
Vimeo: Occasionally an uploaded video may need some changes made. This could be due to changes to the offer you have or you have noticed something else that needs amending. With Vimeo if you need to update a video you can do so without losing the statistics it has already gained, which is great news if you notice an error later down the line or need to add or take something away.
Conclusion
When it comes down to making the final decision between using YouTube or Vimeo you will need to look at the type of audience you want to attract. With Vimeo you are more likely to attract creators and film makers, whereas with YouTube you will have a bigger audience to target which gives you a better chance of a higher rank on search engines.
Ollie Mattison
Ollie Mattison is a writer and a lover of all things video.
Follow @Ollie Mattison
- Title: [Updated] Expert Techniques for Professionalizing Mobile-Based YouTube Thumbnails
- Author: Kenneth
- Created at : 2024-07-31 22:02:29
- Updated at : 2024-08-01 22:02:29
- Link: https://facebook-video-footage.techidaily.com/updated-expert-techniques-for-professionalizing-mobile-based-youtube-thumbnails/
- License: This work is licensed under CC BY-NC-SA 4.0.