![[Updated] 2024 Approved Elevate Video Playback Embrace the Power of AV1 in YouTube](https://thmb.techidaily.com/e90a41374ab8bcea029035e600ef5fff009cee16ec9e8eead9f3969598aefde0.jpg)
"[Updated] 2024 Approved Elevate Video Playback Embrace the Power of AV1 in YouTube"
Elevate Video Playback: Embrace the Power of AV1 in YouTube
Do you notice that many YouTube videos have been streamed in AV1? YouTube AV1 just happened suddenly a few years ago. This article will inform you about all the things you want to know about AV1 Youtube settings. I will let you know the tutorial to turn in AV1 settings on YouTube and the reason why should choose AV1 along with the others, and some more things about AV1.


Part 1: How to turn on AV1 settings on YouTube?
Do you wonder how to turn on AV1 settings on YouTube? For your information, AV1 is a video codec that is developed by a consortium of companies. It offers you advanced compression, enabling you to do smoother HD streaming and data savings for the video. Google also has already implemented AV1 use on YouTube. To turn on AV1 settings on YouTube, here are the steps:
Step1Go to playback and performance
 Glarysoft File Recovery Pro Annually - Helps to recover your lost file/data, even permanently deleted data.
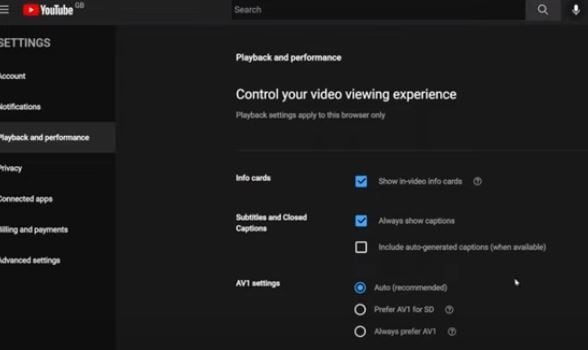
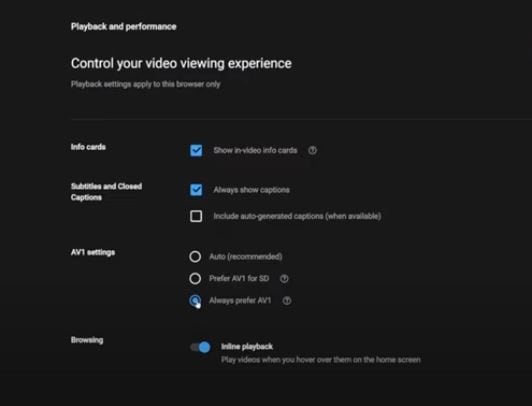
- To turn on the AV1 settings, go to your YouTube account, after that click “Playback and Performance”.
- In the AV1 settings. Besides “Auto (Recommended)”, there are other two options, which are “Prefer AV1 for SD” and also “Always prefer SD”.
- “Always Prefer AV1” uses the codec whenever it is available for a video while “Prefer AV1 for SD” limits it to SD videos. There are two options to avoid low-performance devices when AV1 videos are played on YouTube. You can select “Always Prefer AV1” to see if your device performance is good enough when you play videos on YouTube that support AV1.
Step2Test if the AV1 settings are already enabled in your video
You may ask how to confirm your YouTube videos are playing with AV1 Codec. Well, you can search playlist on YouTube with the keywords “4K, 5K, and 8K videos with the new AV1 Codec “. You can test it by playing one of the videos. You have to right-click on the media player and then select “Stats for nerd”. If it shows the av01 codec there, then the AV1 settings are enabled already.
 Simple and intuitive video editing
Part 2: Why choose AV1 over VP9 and other formats?
Now, do you need a reason why you should choose AV1 compared to VP9 and the others? As you know, there is also another video codec like VP9. There are also the others such as VVC, and many more. So what is the superiority of AV1 over the others? I will let you know why you should choose AV1 in this part.
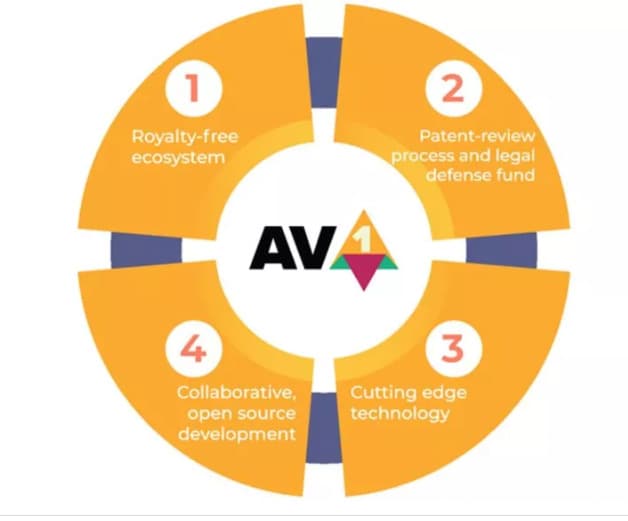
The main thing is, as mentioned before, AV1 is developed by a consortium of companies founded in 2015. It is supported by The Alliance for Open Media (AOMedia) such as Amazon, Facebook, Google, Microsoft, and Netflix, and also by web browser developers and semiconductor firms. Aomedia made it clear the algorithm is free-to-use. It means that there are no greedy negotiators that will be dependent on the developers.
Also, these days, with a format that provides a much smaller workload for internet providers. Their today focus is, that AV1 can reach the quality but can get the job done with 20% more efficiency. Then, with AV1 encoding, a “standard” 4K movie will be much more accessible than it is now. These are some more reasons why you should choose AV1.
1. Royalty-free
As mentioned before, AV1 is royalty-free. AV1 is such a next-generation of royalty video codec. It means that it is not just free to use, but also free of charge, obligations, or even liability. It is an open and royalty-free video codec that the video platform will not charge to pay royalties to the Moving Picture Experts Group (MPEG), the developer of video codecs.

When it comes to the group that will ask for the royalty, MPEG is not the only one. There are also other patent groups and companies that can ask for it. Aomedia integrated Google, Mozilla, and Cisco, while they were busy creating their new video codec. However, the three companies joined together to create one codec to beat them all.
2. Better performance
It is said that the AV1 codec is 30% more efficient. According to the tests conducted by Moscow State University, AV1 can outperform AV1 by about 28% in the efficiency of encoding and decoding. As per the performance graph from the Graphics & Media Lab Video Group, MSU below, AV1 can offer the exactly same quality as X264 at 55% of the average bitrate.
 DEX 3 RE is Easy-To-Use DJ Mixing Software for MAC and Windows Designed for Today’s Versatile DJ.
Mix from your own library of music, iTunes or use the Pulselocker subsciprtion service for in-app access to over 44 million songs. Use with over 85 supported DJ controllers or mix with a keyboard and mouse.
DEX 3 RE is everything you need without the clutter - the perfect 2-deck mixing software solution for mobile DJs or hard-core hobbiests.
PCDJ DEX 3 RE (DJ Software for Win & MAC - Product Activation For 3 Machines)
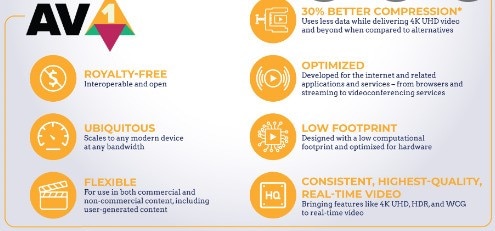
AV1 is designed so exclusively to function better than all the other codecs in the market. It is an open-sourced codec with simple patent licensing, and the integration manages to save, as mentioned, up to 30% of the bandwidth for the exactly same image quality. In other words, with AV1, distributors can send streams much faster and cheaper and we can enjoy higher definitions in the same bandwidth.

3. AV2 to come in the future
AV1 is undoubtedly superior if we compare it to other available video codecs and the exploration of the codec technology AV2 has already begun. This is such an early performance evaluation. There is some interesting part of the exploration development of AV2, such as multiple line selection for Intra prediction can make you select not just neighboring row/column for directional prediction. The same tool also exists in VVC.
There are also three essential improvements, which are simplifying the existing feature (also complete removal) and picking the tool used by VVC/H.266 (It is lack originality but so much work on it) and improvement periodically improvement of an existing tool, it is too few and also not original. We haven’t known yet when AV2 will be done completely though, maybe there still be some more essential improvements.

WPS Office Premium ( File Recovery, Photo Scanning, Convert PDF)–Yearly
Part 3: What’s the best video editor for YouTubers with AV1 format?
When we talk about YouTube, it feels incomplete if we don’t talk about the video editor. So, what is the best video editing software for YouTubers with AV1 format? Yes, it is Filmora . It is such a great video editing software that allows you to import and edit many video file formats. Filmora also allows users to export AV1 MP4 format video and then can directly upload it to YouTube.

Filmora gives some ways to export your videos. Here are the five ways. You can also customize the export settings then you can save them to reuse the same settings next time. The first is you can export your project file and video to the local computer. It supports export as MP4, AVI, WMV, AV1, MOV, GoPro Cineform, F4V, MKV, TS, and 3GP.
After that, you can export your video to any device you want, such as iPhone, iPad, Apple TV, Apple TV 4K, iPod, Samsung Galaxy, Smart Phone, Android Generic, Google Pixel, Xbox One, PlayStation 4, PSP, and Smart TV. Then you can upload it to YouTube, Filmora provides you to export your video to Youtube directly. All you need to do is logging your Youtube account and export.
Free Download For Win 7 or later(64-bit)
Free Download For macOS 10.14 or later
Part 4: FAQ: Does YouTube use AV1 or VP9?
For today, YouTube encodes all the videos with the VP9 codec, but for some reason displays for low view count videos. AV1 usage also had been pushed to very low view counts. When it comes to cost or quality tradeoffs, AV1 took about 18 times longer to encode than x264.
Financial Fortitude for YouTubers: Beyond Basic Earnings
How To Get Paid on YouTube - From AdSense to your Bank Account


Richard Bennett
Oct 26, 2023• Proven solutions
YouTube is more than a video sharing social network; here’s how to get paid on YouTube. Having an active YouTube channel with decent monthly views can earn you income through advertising. If your channel is set up properly, Google can place ads over your YouTube videos and you can earn money based on how many people see or click on (depends on the ad) those ads while watching your videos.
- The Requirements for YouTube Monetization
- How to Enable Monetization for Your YouTube Channel
- Linking Your Bank Account to Your AdSense Account
- Receiving Payments
Many vloggers receive direct bank deposits of their ad-based revenues every month. In this article, we’ll show you how to monetize your YouTube Channel and how to receive payments to your bank account.
Making Your YouTube Videos Better with Filmora
If you want to earn more money with YouTube videos, your video should be stand out. To achieve that, you should use a powerful video editing software as well. Here, I recommend Wondershare Filmora video editor . As one of the most widely used video editing software among YouTubers, Filmora provides lots of templates and effects which allows you to edit faster and better.
 CollageIt Pro

Part 1: The Requirements for YouTube Monetization
Meeting the minimum requirement for YouTube monetization is probably the hardest part of this whole process. About a month ago, you had to have 10,000 lifetime views on your YouTube channel to qualify for monetization. However, earlier this year, Google changed their eligibility requirements and made them even tougher.
As of February 20, 2018, YouTube channels need to have accumulated 4000 hours of ‘watch time’ over the past 12 months and no less than 1000 subscribers to qualify for monetization. If you do not meet these requirements you cannot join the YouTube Partner Program and monetize your YouTube channel.
So, the first step to successful monetization on YouTube is to actually grow your channel. You need to create videos that will attract viewers and engage your audience. You also need to get people to subscribe because this is really what will grow your YouTube channel over time.

Part 2: How To Enable Monetization for Your YouTube Channel
Here’s the step-by-step process for monetizing your YouTube Channel, for those who are qualified.
- Log in to your YouTube account.
- Find your account icon in the top right corner. Click it to find the ‘Creator Studio’ button.
- Click the ‘Creator Studio’ button.
- Click the ‘Channel’ option in the left side menu.
- You’ll see a drop-down menu under ‘Channel’. Click on ‘Status and Features’. This is actually the first option on the menu. It should open by default once you click the ‘Channel’ button.
- Look through the ‘Status and Features’ page and click the ‘Enable’ button beside monetization.

- Clicking the ‘Enable’ button should lead you to another page where the guidelines for monetization are explained. Take the time to read through the guidelines and understand the dos and don’ts of YouTube monetization.
- Once you’ve looked through the guidelines, click the ‘Enable my account’ button to proceed. This will lead you to a page where you’ll be prompted to join the YouTube Partner Program.
- Read through the YouTube Partner Program terms, check the appropriate boxes, and click the ‘accept’ button.
- You’ll be prompted to link an AdSense account.
- Connect an existing AdSense account if you have one or create a new one.
- Once you’re done linking an AdSense account, you’ll be redirected to YouTube. There, select the type of ads you want to run under ‘Monetization Preferences’.
- Click the submit button and wait to find out if your account is approved for monetization.
According to YouTube, it can take up to a week for a decision to be reached on your application.
YouTube will not review your monetization application until you’ve met their eligibility criteria. Even then, your application may be declined if your videos do not follow the community guidelines (i.e. channels which simply repost content from other channels will not be monetized).
Not all videos can be monetized. While there are legal ways to create videos consisting of imagery and footage belonging to others, be aware that such videos are not always eligible for monetization. YouTube will only monetize videos that you own. So, posting videos which do not belong to you or which include copyrighted content can cause your monetization application to be declined.
Part 3: Linking Your Bank Account To Your AdSense Account
AdSense offers a variety of payment options including mailed checks and Western Union transfers. However, these options may not be available to you depending on where you’re based. AdSense does make payments through electronic wire transfer (EFT – Electronic funds transfer) to virtually every country in the world, and this is the preferred payment option for most people.
To have your earnings deposited directly into your account through EFT, you’ll need to link your bank account to your AdSense account.
Here’s a step-by-step guide for linking your bank account to your AdSense account.
- Log in to AdSense via: www.google.com/adsense/start
- Click the ‘Settings’ button in the left panel menu
- Under ‘Settings’, click ‘Payments’.
- On the ‘Payments’ page, click ‘Manage payment options’.
- Click ‘Add payment method’.
- Next, you’ll be prompted to add your bank account details. In general, you will be asked to provide the following:
- Name on the account / account holder’s name
- Bank account number
- Bank name
- Bank SWIFT code
- Depending on where you are based, additional information may be required.
- Ensure that the name on your AdSense account matches the name on the bank account you provide. To edit your AdSense name, click the ‘Manage settings’ button also on the Payments page.
Part 4: Receiving Payments
To get paid by AdSense, you need to reach the $100 threshold. You may wish to set a higher threshold but as a rule, earnings below the $100 will not be processed for payment (you will still receive the money, it will just keep adding up until it gets to $100 and then you’ll be paid).
Also, bear in mind that AdSense follows a monthly payment cycle. This means that a month’s earnings (assuming they meet the threshold requirement) will be paid next month. Usually, direct deposit payments will be processed between the 21st and 26th of every month. That said, it can take up to 10 days for electronic wire payments to be received.
In addition to reaching the payment threshold, be sure that you have no payment hold on your AdSense account. A payment hold can cause your earnings to be withheld even if it has reached the payment threshold.
To avoid a payment hold, be sure to provide the necessary tax information, verify your identity and your address, make sure the bank account linked to your AdSense is verified, and make sure you have not violated any of YouTube’s guidelines and community rules.
Conclusion
Depending on your vlogging skills and the nature of your content (some types of videos get more attention than others), it can take a while for you to be eligible for monetization. And even when you’ve successfully monetized your channel, getting enough views to reach the payment threshold can be tough.
Don’t let this discourage you from working towards earning income from your YouTube channel. Just focus on creating a YouTube channel people will want to watch. That’s how to get paid on YouTube - be sticking with your channel long enough for it to grow.
Richard Bennett
Richard Bennett is a writer and a lover of all things video.
Follow @Richard Bennett
Richard Bennett
Oct 26, 2023• Proven solutions
YouTube is more than a video sharing social network; here’s how to get paid on YouTube. Having an active YouTube channel with decent monthly views can earn you income through advertising. If your channel is set up properly, Google can place ads over your YouTube videos and you can earn money based on how many people see or click on (depends on the ad) those ads while watching your videos.
- The Requirements for YouTube Monetization
- How to Enable Monetization for Your YouTube Channel
- Linking Your Bank Account to Your AdSense Account
- Receiving Payments
Many vloggers receive direct bank deposits of their ad-based revenues every month. In this article, we’ll show you how to monetize your YouTube Channel and how to receive payments to your bank account.
 dotConnect for Oracle is an ADO.NET data provider for Oracle with Entity Framework Support.
Making Your YouTube Videos Better with Filmora
If you want to earn more money with YouTube videos, your video should be stand out. To achieve that, you should use a powerful video editing software as well. Here, I recommend Wondershare Filmora video editor . As one of the most widely used video editing software among YouTubers, Filmora provides lots of templates and effects which allows you to edit faster and better.
Part 1: The Requirements for YouTube Monetization
Meeting the minimum requirement for YouTube monetization is probably the hardest part of this whole process. About a month ago, you had to have 10,000 lifetime views on your YouTube channel to qualify for monetization. However, earlier this year, Google changed their eligibility requirements and made them even tougher.
As of February 20, 2018, YouTube channels need to have accumulated 4000 hours of ‘watch time’ over the past 12 months and no less than 1000 subscribers to qualify for monetization. If you do not meet these requirements you cannot join the YouTube Partner Program and monetize your YouTube channel.
So, the first step to successful monetization on YouTube is to actually grow your channel. You need to create videos that will attract viewers and engage your audience. You also need to get people to subscribe because this is really what will grow your YouTube channel over time.
Part 2: How To Enable Monetization for Your YouTube Channel
Here’s the step-by-step process for monetizing your YouTube Channel, for those who are qualified.
- Log in to your YouTube account.
- Find your account icon in the top right corner. Click it to find the ‘Creator Studio’ button.
- Click the ‘Creator Studio’ button.
- Click the ‘Channel’ option in the left side menu.
- You’ll see a drop-down menu under ‘Channel’. Click on ‘Status and Features’. This is actually the first option on the menu. It should open by default once you click the ‘Channel’ button.
- Look through the ‘Status and Features’ page and click the ‘Enable’ button beside monetization.

- Clicking the ‘Enable’ button should lead you to another page where the guidelines for monetization are explained. Take the time to read through the guidelines and understand the dos and don’ts of YouTube monetization.
- Once you’ve looked through the guidelines, click the ‘Enable my account’ button to proceed. This will lead you to a page where you’ll be prompted to join the YouTube Partner Program.
- Read through the YouTube Partner Program terms, check the appropriate boxes, and click the ‘accept’ button.
- You’ll be prompted to link an AdSense account.
- Connect an existing AdSense account if you have one or create a new one.
- Once you’re done linking an AdSense account, you’ll be redirected to YouTube. There, select the type of ads you want to run under ‘Monetization Preferences’.
- Click the submit button and wait to find out if your account is approved for monetization.
According to YouTube, it can take up to a week for a decision to be reached on your application.
YouTube will not review your monetization application until you’ve met their eligibility criteria. Even then, your application may be declined if your videos do not follow the community guidelines (i.e. channels which simply repost content from other channels will not be monetized).
Not all videos can be monetized. While there are legal ways to create videos consisting of imagery and footage belonging to others, be aware that such videos are not always eligible for monetization. YouTube will only monetize videos that you own. So, posting videos which do not belong to you or which include copyrighted content can cause your monetization application to be declined.

Part 3: Linking Your Bank Account To Your AdSense Account
AdSense offers a variety of payment options including mailed checks and Western Union transfers. However, these options may not be available to you depending on where you’re based. AdSense does make payments through electronic wire transfer (EFT – Electronic funds transfer) to virtually every country in the world, and this is the preferred payment option for most people.
To have your earnings deposited directly into your account through EFT, you’ll need to link your bank account to your AdSense account.
Here’s a step-by-step guide for linking your bank account to your AdSense account.
- Log in to AdSense via: www.google.com/adsense/start
- Click the ‘Settings’ button in the left panel menu
- Under ‘Settings’, click ‘Payments’.
- On the ‘Payments’ page, click ‘Manage payment options’.
- Click ‘Add payment method’.
- Next, you’ll be prompted to add your bank account details. In general, you will be asked to provide the following:
- Name on the account / account holder’s name
- Bank account number
- Bank name
- Bank SWIFT code
- Depending on where you are based, additional information may be required.
- Ensure that the name on your AdSense account matches the name on the bank account you provide. To edit your AdSense name, click the ‘Manage settings’ button also on the Payments page.
Part 4: Receiving Payments
To get paid by AdSense, you need to reach the $100 threshold. You may wish to set a higher threshold but as a rule, earnings below the $100 will not be processed for payment (you will still receive the money, it will just keep adding up until it gets to $100 and then you’ll be paid).
Also, bear in mind that AdSense follows a monthly payment cycle. This means that a month’s earnings (assuming they meet the threshold requirement) will be paid next month. Usually, direct deposit payments will be processed between the 21st and 26th of every month. That said, it can take up to 10 days for electronic wire payments to be received.
In addition to reaching the payment threshold, be sure that you have no payment hold on your AdSense account. A payment hold can cause your earnings to be withheld even if it has reached the payment threshold.
To avoid a payment hold, be sure to provide the necessary tax information, verify your identity and your address, make sure the bank account linked to your AdSense is verified, and make sure you have not violated any of YouTube’s guidelines and community rules.
Conclusion
Depending on your vlogging skills and the nature of your content (some types of videos get more attention than others), it can take a while for you to be eligible for monetization. And even when you’ve successfully monetized your channel, getting enough views to reach the payment threshold can be tough.
Don’t let this discourage you from working towards earning income from your YouTube channel. Just focus on creating a YouTube channel people will want to watch. That’s how to get paid on YouTube - be sticking with your channel long enough for it to grow.
Richard Bennett
Richard Bennett is a writer and a lover of all things video.
Follow @Richard Bennett
Richard Bennett
Oct 26, 2023• Proven solutions
YouTube is more than a video sharing social network; here’s how to get paid on YouTube. Having an active YouTube channel with decent monthly views can earn you income through advertising. If your channel is set up properly, Google can place ads over your YouTube videos and you can earn money based on how many people see or click on (depends on the ad) those ads while watching your videos.
- The Requirements for YouTube Monetization
- How to Enable Monetization for Your YouTube Channel
- Linking Your Bank Account to Your AdSense Account
- Receiving Payments
Many vloggers receive direct bank deposits of their ad-based revenues every month. In this article, we’ll show you how to monetize your YouTube Channel and how to receive payments to your bank account.
Making Your YouTube Videos Better with Filmora
If you want to earn more money with YouTube videos, your video should be stand out. To achieve that, you should use a powerful video editing software as well. Here, I recommend Wondershare Filmora video editor . As one of the most widely used video editing software among YouTubers, Filmora provides lots of templates and effects which allows you to edit faster and better.
Part 1: The Requirements for YouTube Monetization
Meeting the minimum requirement for YouTube monetization is probably the hardest part of this whole process. About a month ago, you had to have 10,000 lifetime views on your YouTube channel to qualify for monetization. However, earlier this year, Google changed their eligibility requirements and made them even tougher.
As of February 20, 2018, YouTube channels need to have accumulated 4000 hours of ‘watch time’ over the past 12 months and no less than 1000 subscribers to qualify for monetization. If you do not meet these requirements you cannot join the YouTube Partner Program and monetize your YouTube channel.
So, the first step to successful monetization on YouTube is to actually grow your channel. You need to create videos that will attract viewers and engage your audience. You also need to get people to subscribe because this is really what will grow your YouTube channel over time.
Part 2: How To Enable Monetization for Your YouTube Channel
Here’s the step-by-step process for monetizing your YouTube Channel, for those who are qualified.
- Log in to your YouTube account.
- Find your account icon in the top right corner. Click it to find the ‘Creator Studio’ button.
- Click the ‘Creator Studio’ button.
- Click the ‘Channel’ option in the left side menu.
- You’ll see a drop-down menu under ‘Channel’. Click on ‘Status and Features’. This is actually the first option on the menu. It should open by default once you click the ‘Channel’ button.
- Look through the ‘Status and Features’ page and click the ‘Enable’ button beside monetization.
 OtsAV Radio Webcaster
- Clicking the ‘Enable’ button should lead you to another page where the guidelines for monetization are explained. Take the time to read through the guidelines and understand the dos and don’ts of YouTube monetization.
- Once you’ve looked through the guidelines, click the ‘Enable my account’ button to proceed. This will lead you to a page where you’ll be prompted to join the YouTube Partner Program.
- Read through the YouTube Partner Program terms, check the appropriate boxes, and click the ‘accept’ button.
- You’ll be prompted to link an AdSense account.
- Connect an existing AdSense account if you have one or create a new one.
- Once you’re done linking an AdSense account, you’ll be redirected to YouTube. There, select the type of ads you want to run under ‘Monetization Preferences’.
- Click the submit button and wait to find out if your account is approved for monetization.
According to YouTube, it can take up to a week for a decision to be reached on your application.
YouTube will not review your monetization application until you’ve met their eligibility criteria. Even then, your application may be declined if your videos do not follow the community guidelines (i.e. channels which simply repost content from other channels will not be monetized).
Not all videos can be monetized. While there are legal ways to create videos consisting of imagery and footage belonging to others, be aware that such videos are not always eligible for monetization. YouTube will only monetize videos that you own. So, posting videos which do not belong to you or which include copyrighted content can cause your monetization application to be declined.
Part 3: Linking Your Bank Account To Your AdSense Account
AdSense offers a variety of payment options including mailed checks and Western Union transfers. However, these options may not be available to you depending on where you’re based. AdSense does make payments through electronic wire transfer (EFT – Electronic funds transfer) to virtually every country in the world, and this is the preferred payment option for most people.
To have your earnings deposited directly into your account through EFT, you’ll need to link your bank account to your AdSense account.
Here’s a step-by-step guide for linking your bank account to your AdSense account.
- Log in to AdSense via: www.google.com/adsense/start
- Click the ‘Settings’ button in the left panel menu
- Under ‘Settings’, click ‘Payments’.
- On the ‘Payments’ page, click ‘Manage payment options’.
- Click ‘Add payment method’.
- Next, you’ll be prompted to add your bank account details. In general, you will be asked to provide the following:
- Name on the account / account holder’s name
- Bank account number
- Bank name
- Bank SWIFT code
- Depending on where you are based, additional information may be required.
- Ensure that the name on your AdSense account matches the name on the bank account you provide. To edit your AdSense name, click the ‘Manage settings’ button also on the Payments page.
Part 4: Receiving Payments
To get paid by AdSense, you need to reach the $100 threshold. You may wish to set a higher threshold but as a rule, earnings below the $100 will not be processed for payment (you will still receive the money, it will just keep adding up until it gets to $100 and then you’ll be paid).
Also, bear in mind that AdSense follows a monthly payment cycle. This means that a month’s earnings (assuming they meet the threshold requirement) will be paid next month. Usually, direct deposit payments will be processed between the 21st and 26th of every month. That said, it can take up to 10 days for electronic wire payments to be received.
In addition to reaching the payment threshold, be sure that you have no payment hold on your AdSense account. A payment hold can cause your earnings to be withheld even if it has reached the payment threshold.
To avoid a payment hold, be sure to provide the necessary tax information, verify your identity and your address, make sure the bank account linked to your AdSense is verified, and make sure you have not violated any of YouTube’s guidelines and community rules.
Conclusion
Depending on your vlogging skills and the nature of your content (some types of videos get more attention than others), it can take a while for you to be eligible for monetization. And even when you’ve successfully monetized your channel, getting enough views to reach the payment threshold can be tough.
Don’t let this discourage you from working towards earning income from your YouTube channel. Just focus on creating a YouTube channel people will want to watch. That’s how to get paid on YouTube - be sticking with your channel long enough for it to grow.
Richard Bennett
Richard Bennett is a writer and a lover of all things video.
Follow @Richard Bennett
Richard Bennett
Oct 26, 2023• Proven solutions
YouTube is more than a video sharing social network; here’s how to get paid on YouTube. Having an active YouTube channel with decent monthly views can earn you income through advertising. If your channel is set up properly, Google can place ads over your YouTube videos and you can earn money based on how many people see or click on (depends on the ad) those ads while watching your videos.
- The Requirements for YouTube Monetization
- How to Enable Monetization for Your YouTube Channel
- Linking Your Bank Account to Your AdSense Account
- Receiving Payments
Many vloggers receive direct bank deposits of their ad-based revenues every month. In this article, we’ll show you how to monetize your YouTube Channel and how to receive payments to your bank account.
 Power Tools add-on for Google Sheets, 12-month subscription
Making Your YouTube Videos Better with Filmora
If you want to earn more money with YouTube videos, your video should be stand out. To achieve that, you should use a powerful video editing software as well. Here, I recommend Wondershare Filmora video editor . As one of the most widely used video editing software among YouTubers, Filmora provides lots of templates and effects which allows you to edit faster and better.

Part 1: The Requirements for YouTube Monetization
Meeting the minimum requirement for YouTube monetization is probably the hardest part of this whole process. About a month ago, you had to have 10,000 lifetime views on your YouTube channel to qualify for monetization. However, earlier this year, Google changed their eligibility requirements and made them even tougher.
As of February 20, 2018, YouTube channels need to have accumulated 4000 hours of ‘watch time’ over the past 12 months and no less than 1000 subscribers to qualify for monetization. If you do not meet these requirements you cannot join the YouTube Partner Program and monetize your YouTube channel.
So, the first step to successful monetization on YouTube is to actually grow your channel. You need to create videos that will attract viewers and engage your audience. You also need to get people to subscribe because this is really what will grow your YouTube channel over time.
Part 2: How To Enable Monetization for Your YouTube Channel
Here’s the step-by-step process for monetizing your YouTube Channel, for those who are qualified.
- Log in to your YouTube account.
- Find your account icon in the top right corner. Click it to find the ‘Creator Studio’ button.
- Click the ‘Creator Studio’ button.
- Click the ‘Channel’ option in the left side menu.
- You’ll see a drop-down menu under ‘Channel’. Click on ‘Status and Features’. This is actually the first option on the menu. It should open by default once you click the ‘Channel’ button.
- Look through the ‘Status and Features’ page and click the ‘Enable’ button beside monetization.
- Clicking the ‘Enable’ button should lead you to another page where the guidelines for monetization are explained. Take the time to read through the guidelines and understand the dos and don’ts of YouTube monetization.
- Once you’ve looked through the guidelines, click the ‘Enable my account’ button to proceed. This will lead you to a page where you’ll be prompted to join the YouTube Partner Program.
- Read through the YouTube Partner Program terms, check the appropriate boxes, and click the ‘accept’ button.
- You’ll be prompted to link an AdSense account.
- Connect an existing AdSense account if you have one or create a new one.
- Once you’re done linking an AdSense account, you’ll be redirected to YouTube. There, select the type of ads you want to run under ‘Monetization Preferences’.
- Click the submit button and wait to find out if your account is approved for monetization.
According to YouTube, it can take up to a week for a decision to be reached on your application.
YouTube will not review your monetization application until you’ve met their eligibility criteria. Even then, your application may be declined if your videos do not follow the community guidelines (i.e. channels which simply repost content from other channels will not be monetized).
Not all videos can be monetized. While there are legal ways to create videos consisting of imagery and footage belonging to others, be aware that such videos are not always eligible for monetization. YouTube will only monetize videos that you own. So, posting videos which do not belong to you or which include copyrighted content can cause your monetization application to be declined.
Part 3: Linking Your Bank Account To Your AdSense Account
AdSense offers a variety of payment options including mailed checks and Western Union transfers. However, these options may not be available to you depending on where you’re based. AdSense does make payments through electronic wire transfer (EFT – Electronic funds transfer) to virtually every country in the world, and this is the preferred payment option for most people.
To have your earnings deposited directly into your account through EFT, you’ll need to link your bank account to your AdSense account.
Here’s a step-by-step guide for linking your bank account to your AdSense account.
- Log in to AdSense via: www.google.com/adsense/start
- Click the ‘Settings’ button in the left panel menu
- Under ‘Settings’, click ‘Payments’.
- On the ‘Payments’ page, click ‘Manage payment options’.
- Click ‘Add payment method’.
- Next, you’ll be prompted to add your bank account details. In general, you will be asked to provide the following:
- Name on the account / account holder’s name
- Bank account number
- Bank name
- Bank SWIFT code
- Depending on where you are based, additional information may be required.
- Ensure that the name on your AdSense account matches the name on the bank account you provide. To edit your AdSense name, click the ‘Manage settings’ button also on the Payments page.
 Project Manager - Asset Browser for 3Ds Max
Part 4: Receiving Payments
To get paid by AdSense, you need to reach the $100 threshold. You may wish to set a higher threshold but as a rule, earnings below the $100 will not be processed for payment (you will still receive the money, it will just keep adding up until it gets to $100 and then you’ll be paid).
Also, bear in mind that AdSense follows a monthly payment cycle. This means that a month’s earnings (assuming they meet the threshold requirement) will be paid next month. Usually, direct deposit payments will be processed between the 21st and 26th of every month. That said, it can take up to 10 days for electronic wire payments to be received.
In addition to reaching the payment threshold, be sure that you have no payment hold on your AdSense account. A payment hold can cause your earnings to be withheld even if it has reached the payment threshold.
To avoid a payment hold, be sure to provide the necessary tax information, verify your identity and your address, make sure the bank account linked to your AdSense is verified, and make sure you have not violated any of YouTube’s guidelines and community rules.
Conclusion
Depending on your vlogging skills and the nature of your content (some types of videos get more attention than others), it can take a while for you to be eligible for monetization. And even when you’ve successfully monetized your channel, getting enough views to reach the payment threshold can be tough.
Don’t let this discourage you from working towards earning income from your YouTube channel. Just focus on creating a YouTube channel people will want to watch. That’s how to get paid on YouTube - be sticking with your channel long enough for it to grow.
 Glarysoft File Recovery Pro - Helps to recover your lost file/data, even permanently deleted data.
Richard Bennett
Richard Bennett is a writer and a lover of all things video.
Follow @Richard Bennett
- Title: [Updated] 2024 Approved Elevate Video Playback Embrace the Power of AV1 in YouTube
- Author: Kenneth
- Created at : 2024-08-01 01:03:48
- Updated at : 2024-08-02 01:03:48
- Link: https://facebook-video-footage.techidaily.com/updated-2024-approved-elevate-video-playback-embrace-the-power-of-av1-in-youtube/
- License: This work is licensed under CC BY-NC-SA 4.0.