
Top 5 Snug Scenarios for Your Snowy Youtube Sessions for 2024
Top 5 Snug Scenarios for Your Snowy Youtube Sessions
There’s something special about wintertime that makes us all want to get as cozy and as warm as possible. When you’re a YouTube creator, you should definitely take advantage of this desire and use a YouTube background video designed specifically with this in mind.
In this guide, we’ll go over how to get or make such a background and show you five incredible examples you can use now.
YouTube Video Background Creating realistic video scenes at your will is easy to complete with Filmora green screen removal.
Create Video Backgrounds Create Video Backgrounds Learn Green Screen


What Is a YouTube Video Background?
A YouTube video background is a simple image or video that sits in place at the back of your videos. It’s just a simple background that can greatly impact your brand, presence, and style as a creator.
Even something as small as your YouTube video thumbnail background can strongly impact your results.
Obviously, choosing the right custom YouTube background is important. And, now that it’s winter, this requires a special approach.
Why Are Seasonal Backgrounds Effective?
There are several important reasons why a seasonal YouTube video background or photo, and other elements are very effective and engage us more.
The main reasons include:
- Creates a meaningful connection;
- Boosts engagement with fellow winter lovers;
- Builds a better brand;
- Enhances everyone’s mood, especially during the holidays.
So, whenever you can and whenever there is an opportunity, don’t be afraid to use a seasonal YouTube video background download.
Factors to Consider When Choosing a Background for YouTube Videos
Now, before we dive into the examples themselves and the tutorial on how to make the best backgrounds yourself, here are several factors you must consider before proceeding.
 DEX 3 RE is Easy-To-Use DJ Mixing Software for MAC and Windows Designed for Today’s Versatile DJ.
Mix from your own library of music, iTunes or use the Pulselocker subsciprtion service for in-app access to over 44 million songs. Use with over 85 supported DJ controllers or mix with a keyboard and mouse.
DEX 3 RE is everything you need without the clutter - the perfect 2-deck mixing software solution for mobile DJs or hard-core hobbiests.
PCDJ DEX 3 RE (DJ Software for Win & MAC - Product Activation For 3 Machines)
Content Relevance
As a video creator, you must ensure to be consistent with your elements. This includes your background tune for YouTube videos. For example, if you’re talking about books in your video, including a bookshelf in the winter background makes all the difference.
Audience Appeal
If you already have an audience, regardless of its size, you should definitely consider what they like and don’t like. You should then leverage this information to create highly appealing content for them and adjust your background scenery accordingly.
Lighting and Visibility
Another thing you must ensure is to keep your background simple and not too distracting. Remember, even though you have the best background for YouTube videos, you still need to realize that it’s not the main focus of the video. It’s just there to make it better.

Personal Branding
If you want to improve your brand identity and get your name known by more people, incorporate your logo, name, or something similar in the background. It will have a small but meaningful impact, and it’s easy to do.
Editing
If you plan to shoot a YouTube live background and not some stock images or videos, then you must make sure it has enough headroom for editing later on. The best option here is to use a green screen background for YouTube videos.
 Forex Robotron Gold Package
5 Winter YouTube Background Ideas
It’s finally time to have a look at some examples of highly effective and engaging YouTube video backgrounds for the winter season.
Enjoy!
- Snowy Landscape

- Festive Holiday Decor

- Cozy Indoor Settings

- Winter Cityscapes

- Animated Winter Scenes


How to Create or Source Winter Backgrounds
If you want to make your own winter backgrounds or simply edit the ones you have, the most effective way is to use a beginner-friendly video editing platform, such as Filmora .
Free Download For Win 7 or later(64-bit)
Free Download For macOS 10.14 or later
This type of platform has all the necessary tools, templates, and presets for professionals to use but all of it is packed in a very easy-to-use interface that anyone can get the hang of.
Just follow these steps and you’ll have the perfect winter background for YouTube in no time.
Step 1
Download and install the Filmora video editing tool.
Step 2
Run the program and click on “New Project”. No need to create an account for this.


Step 3
Click on “Stock Media” and then type in “winter” in the Search Bar.

Step 4
Select your favorite background clip and drag it down to the Timeline.
That’s it! You won’t believe how many video clips you can use, all of which are extremely high-quality. As a result, you’ll have a professional video for free.
Now, if you want, you can freely edit these backgrounds as you wish. You can mess around with them as much as you want, use various tools to edit, and make the perfect result.
And don’t worry, if you mess up the background and don’t know how to restore it, just delete it from the timeline and drag it again from the Stock Media tab. It will be as good as new.
Once you’re done, simply export it and you’re done.
Integrating Your Background Into Videos
Finally, once you have the perfect YouTube studio background, it’s time to glue it to your video and upload this masterpiece.
In order to do this, you will need to use a video editing platform once again. This is not optional as there is no other way to merge these clips.
Luckily, you now have Filmora downloaded and can easily make it happen.
So, here’s how to combine everything.
Step 1
Start up a New Project in Filmora.
Step 2
Click on “My Media” and then click in the middle of the small box to upload your background and your video clips.


Step 3
After uploading all the files, simply drag everything in a separate Track down on the Timeline.
Step 4
Export and upload to YouTube. That’s it!

Summary
You’re now ready to make some outstanding Winter YouTube videos and bless everyone with amazing scenery and backgrounds that will make their hearts warm up. Not only do you have infinite backgrounds to choose from, you also know how to perfectly blend them in any of your videos.
Enjoy!
Create Video Backgrounds Create Video Backgrounds Learn Green Screen
What Is a YouTube Video Background?
A YouTube video background is a simple image or video that sits in place at the back of your videos. It’s just a simple background that can greatly impact your brand, presence, and style as a creator.
Even something as small as your YouTube video thumbnail background can strongly impact your results.
Obviously, choosing the right custom YouTube background is important. And, now that it’s winter, this requires a special approach.
Why Are Seasonal Backgrounds Effective?
There are several important reasons why a seasonal YouTube video background or photo, and other elements are very effective and engage us more.
The main reasons include:
- Creates a meaningful connection;
- Boosts engagement with fellow winter lovers;
- Builds a better brand;
- Enhances everyone’s mood, especially during the holidays.
So, whenever you can and whenever there is an opportunity, don’t be afraid to use a seasonal YouTube video background download.
Factors to Consider When Choosing a Background for YouTube Videos
Now, before we dive into the examples themselves and the tutorial on how to make the best backgrounds yourself, here are several factors you must consider before proceeding.

Content Relevance
As a video creator, you must ensure to be consistent with your elements. This includes your background tune for YouTube videos. For example, if you’re talking about books in your video, including a bookshelf in the winter background makes all the difference.
Audience Appeal
If you already have an audience, regardless of its size, you should definitely consider what they like and don’t like. You should then leverage this information to create highly appealing content for them and adjust your background scenery accordingly.
Lighting and Visibility
Another thing you must ensure is to keep your background simple and not too distracting. Remember, even though you have the best background for YouTube videos, you still need to realize that it’s not the main focus of the video. It’s just there to make it better.
 Epubor Audible Converter for Mac: Download and convert Audible AAXC/AA/AAX to MP3 with 100% original quality preserved.
Personal Branding
If you want to improve your brand identity and get your name known by more people, incorporate your logo, name, or something similar in the background. It will have a small but meaningful impact, and it’s easy to do.
Editing
If you plan to shoot a YouTube live background and not some stock images or videos, then you must make sure it has enough headroom for editing later on. The best option here is to use a green screen background for YouTube videos.
5 Winter YouTube Background Ideas
It’s finally time to have a look at some examples of highly effective and engaging YouTube video backgrounds for the winter season.
Enjoy!
- Snowy Landscape

- Festive Holiday Decor
- Cozy Indoor Settings
- Winter Cityscapes
- Animated Winter Scenes
How to Create or Source Winter Backgrounds
If you want to make your own winter backgrounds or simply edit the ones you have, the most effective way is to use a beginner-friendly video editing platform, such as Filmora .
Free Download For Win 7 or later(64-bit)
Free Download For macOS 10.14 or later
This type of platform has all the necessary tools, templates, and presets for professionals to use but all of it is packed in a very easy-to-use interface that anyone can get the hang of.
Just follow these steps and you’ll have the perfect winter background for YouTube in no time.
Step 1
Download and install the Filmora video editing tool.
Step 2
Run the program and click on “New Project”. No need to create an account for this.
Step 3
Click on “Stock Media” and then type in “winter” in the Search Bar.
Step 4
Select your favorite background clip and drag it down to the Timeline.
That’s it! You won’t believe how many video clips you can use, all of which are extremely high-quality. As a result, you’ll have a professional video for free.
Now, if you want, you can freely edit these backgrounds as you wish. You can mess around with them as much as you want, use various tools to edit, and make the perfect result.
And don’t worry, if you mess up the background and don’t know how to restore it, just delete it from the timeline and drag it again from the Stock Media tab. It will be as good as new.
Once you’re done, simply export it and you’re done.

Integrating Your Background Into Videos
Finally, once you have the perfect YouTube studio background, it’s time to glue it to your video and upload this masterpiece.
In order to do this, you will need to use a video editing platform once again. This is not optional as there is no other way to merge these clips.
Luckily, you now have Filmora downloaded and can easily make it happen.
So, here’s how to combine everything.
Step 1
Start up a New Project in Filmora.
Step 2
Click on “My Media” and then click in the middle of the small box to upload your background and your video clips.
Step 3
After uploading all the files, simply drag everything in a separate Track down on the Timeline.
Step 4
Export and upload to YouTube. That’s it!
Summary
You’re now ready to make some outstanding Winter YouTube videos and bless everyone with amazing scenery and backgrounds that will make their hearts warm up. Not only do you have infinite backgrounds to choose from, you also know how to perfectly blend them in any of your videos.
Enjoy!
How to Edit the Length of a Video on YouTube
How to Edit the Length of a Video on YouTube
 Screensaver Factory, Create stunning professional screensavers within minutes. Create screensavers for yourself, for marketing or unlimited royalty-free commercial distribution. Make screensavers from images, video and swf flash, add background music and smooth sprite and transition effects. Screensaver Factory is very easy to use, and it enables you to make self-installing screensaver files and CDs for easy setup and distribution. Screensaver Factory is the most advanced software of its kind.
Richard Bennett
Mar 27, 2024• Proven solutions
Apart from providing video hosting and sharing features, the YouTube platform also has an online editor which is going to provide you with the possibility to make changes and additions online without having to download any particular program. In this guide, we are going to show you how to make your video shorter or longer with YouTube online video editor.
A Better Alternative on How to Edit YouTube Video Length - Wondershare Filmora is a perfect alternative to edit every single clip frame by frame. Not just to shorten or lengthen the video. It offers quite a lot of opportunities. Watch the video below to know more:
 TubeDigger - online video downloader from mostly any site
 Download Mac Version ](https://tools.techidaily.com/wondershare/filmora/download/ )
For instance, the application is offering non-linear ripple video editing. This is going to allow you to combine multiple video clips and pin them together conveniently. What is more, you can also apply PIP and Green Screen professional effects with just a few clicks. Sure, the YouTube video editor is a perfect solution for those who don’t want to achieve professional quality, but if you do, Wondershare Filmora is without a doubt the far better alternative. This is something that’s going to enable you to edit and re-touch your videos as well as to size them appropriately. Instead of dragging two bars together, you will be able to touch every single frame and size it according to your own particular needs. This is going to result in flawless videos.
How to Edit YouTube Video Length Using the built-in Video Editor
The YouTube video editor is easy to use, and you can easily learn how to do all sorts of changes to your video. Let’s see the things that you need to go through in order to edit the length.
Note: From 20th September 2017 users will no longer be able to use the complimentary editing suite. Check the best YouTube video editor alternatives from this complete guide.
Step 1 Get to the video editor

In order to do so, you would have to go ahead and login into your account. Then, go to the “My Channel” panel and select the video that you want to cut. Once you’ve done this, click on the “Video manager” option and click on the “create” tab which should be located on the right side for the page. There, you will be able to find the “Video Editor”. Of course, you can also add “/editor” to YouTube’s URL, and you would be good to go.
Step 2 Import Your Video
Once you’ve done all of the above, you would have to drag your video in order to cut it’s time. Keep in mind that the videos are made out of a maximum of 50 clips. The site is going to save every single video that you upload as a particular clip which could be properly combined with the rest in order to make one larger video. This is important.
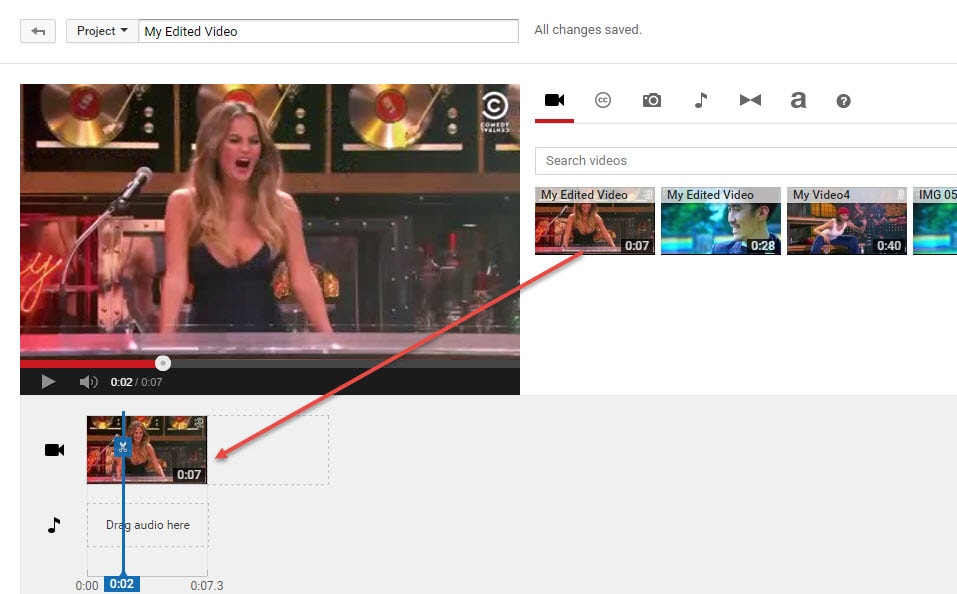
Step 3 Edit the Length
This is the part where you actually get to edit the length of your video. In order to do so effectively, you have to drag the bar at either end of your clip towards the other end in order to shorten the clip conveniently.
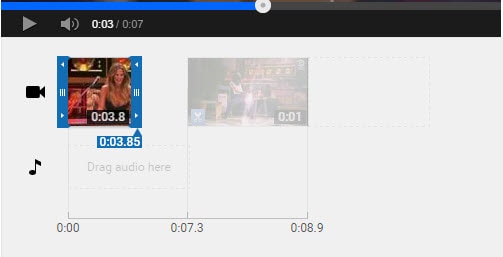
What is more, if you want to increase the length, you have to drag the bar to the opposite end – outwards. There is going to be an indicator which is going to appear at the bottom of the clip, and it’s going to show you the overall duration of the file, and it’s going to adjust itself as you slide the bars accordingly.
Step 4 Save the Clip
Of course, you would have to save the clip in order for the changes to reflect. Even though this might seem like a particularly obvious thing to do, you would be surprise to find out that a lot of people get everything done and then discard the changes by forgetting to save them and their effort goes to waste.
Richard Bennett
Richard Bennett is a writer and a lover of all things video.
Follow @Richard Bennett
Richard Bennett
Mar 27, 2024• Proven solutions
Apart from providing video hosting and sharing features, the YouTube platform also has an online editor which is going to provide you with the possibility to make changes and additions online without having to download any particular program. In this guide, we are going to show you how to make your video shorter or longer with YouTube online video editor.
A Better Alternative on How to Edit YouTube Video Length - Wondershare Filmora is a perfect alternative to edit every single clip frame by frame. Not just to shorten or lengthen the video. It offers quite a lot of opportunities. Watch the video below to know more:
Download Mac Version ](https://tools.techidaily.com/wondershare/filmora/download/ )
For instance, the application is offering non-linear ripple video editing. This is going to allow you to combine multiple video clips and pin them together conveniently. What is more, you can also apply PIP and Green Screen professional effects with just a few clicks. Sure, the YouTube video editor is a perfect solution for those who don’t want to achieve professional quality, but if you do, Wondershare Filmora is without a doubt the far better alternative. This is something that’s going to enable you to edit and re-touch your videos as well as to size them appropriately. Instead of dragging two bars together, you will be able to touch every single frame and size it according to your own particular needs. This is going to result in flawless videos.
How to Edit YouTube Video Length Using the built-in Video Editor
The YouTube video editor is easy to use, and you can easily learn how to do all sorts of changes to your video. Let’s see the things that you need to go through in order to edit the length.
Note: From 20th September 2017 users will no longer be able to use the complimentary editing suite. Check the best YouTube video editor alternatives from this complete guide.
Step 1 Get to the video editor
In order to do so, you would have to go ahead and login into your account. Then, go to the “My Channel” panel and select the video that you want to cut. Once you’ve done this, click on the “Video manager” option and click on the “create” tab which should be located on the right side for the page. There, you will be able to find the “Video Editor”. Of course, you can also add “/editor” to YouTube’s URL, and you would be good to go.
Step 2 Import Your Video
Once you’ve done all of the above, you would have to drag your video in order to cut it’s time. Keep in mind that the videos are made out of a maximum of 50 clips. The site is going to save every single video that you upload as a particular clip which could be properly combined with the rest in order to make one larger video. This is important.
Step 3 Edit the Length
This is the part where you actually get to edit the length of your video. In order to do so effectively, you have to drag the bar at either end of your clip towards the other end in order to shorten the clip conveniently.
What is more, if you want to increase the length, you have to drag the bar to the opposite end – outwards. There is going to be an indicator which is going to appear at the bottom of the clip, and it’s going to show you the overall duration of the file, and it’s going to adjust itself as you slide the bars accordingly.
Step 4 Save the Clip
Of course, you would have to save the clip in order for the changes to reflect. Even though this might seem like a particularly obvious thing to do, you would be surprise to find out that a lot of people get everything done and then discard the changes by forgetting to save them and their effort goes to waste.
 Video Converter Factory Pro
Richard Bennett
Richard Bennett is a writer and a lover of all things video.
Follow @Richard Bennett
Richard Bennett
Mar 27, 2024• Proven solutions
Apart from providing video hosting and sharing features, the YouTube platform also has an online editor which is going to provide you with the possibility to make changes and additions online without having to download any particular program. In this guide, we are going to show you how to make your video shorter or longer with YouTube online video editor.
A Better Alternative on How to Edit YouTube Video Length - Wondershare Filmora is a perfect alternative to edit every single clip frame by frame. Not just to shorten or lengthen the video. It offers quite a lot of opportunities. Watch the video below to know more:
Download Mac Version ](https://tools.techidaily.com/wondershare/filmora/download/ )
For instance, the application is offering non-linear ripple video editing. This is going to allow you to combine multiple video clips and pin them together conveniently. What is more, you can also apply PIP and Green Screen professional effects with just a few clicks. Sure, the YouTube video editor is a perfect solution for those who don’t want to achieve professional quality, but if you do, Wondershare Filmora is without a doubt the far better alternative. This is something that’s going to enable you to edit and re-touch your videos as well as to size them appropriately. Instead of dragging two bars together, you will be able to touch every single frame and size it according to your own particular needs. This is going to result in flawless videos.
How to Edit YouTube Video Length Using the built-in Video Editor
The YouTube video editor is easy to use, and you can easily learn how to do all sorts of changes to your video. Let’s see the things that you need to go through in order to edit the length.
Note: From 20th September 2017 users will no longer be able to use the complimentary editing suite. Check the best YouTube video editor alternatives from this complete guide.
Step 1 Get to the video editor
 ZoneAlarm Pro Antivirus + Firewall NextGen
In order to do so, you would have to go ahead and login into your account. Then, go to the “My Channel” panel and select the video that you want to cut. Once you’ve done this, click on the “Video manager” option and click on the “create” tab which should be located on the right side for the page. There, you will be able to find the “Video Editor”. Of course, you can also add “/editor” to YouTube’s URL, and you would be good to go.
Step 2 Import Your Video
Once you’ve done all of the above, you would have to drag your video in order to cut it’s time. Keep in mind that the videos are made out of a maximum of 50 clips. The site is going to save every single video that you upload as a particular clip which could be properly combined with the rest in order to make one larger video. This is important.

Step 3 Edit the Length
This is the part where you actually get to edit the length of your video. In order to do so effectively, you have to drag the bar at either end of your clip towards the other end in order to shorten the clip conveniently.
What is more, if you want to increase the length, you have to drag the bar to the opposite end – outwards. There is going to be an indicator which is going to appear at the bottom of the clip, and it’s going to show you the overall duration of the file, and it’s going to adjust itself as you slide the bars accordingly.
Step 4 Save the Clip
Of course, you would have to save the clip in order for the changes to reflect. Even though this might seem like a particularly obvious thing to do, you would be surprise to find out that a lot of people get everything done and then discard the changes by forgetting to save them and their effort goes to waste.
Richard Bennett
Richard Bennett is a writer and a lover of all things video.
Follow @Richard Bennett
Richard Bennett
Mar 27, 2024• Proven solutions
Apart from providing video hosting and sharing features, the YouTube platform also has an online editor which is going to provide you with the possibility to make changes and additions online without having to download any particular program. In this guide, we are going to show you how to make your video shorter or longer with YouTube online video editor.
A Better Alternative on How to Edit YouTube Video Length - Wondershare Filmora is a perfect alternative to edit every single clip frame by frame. Not just to shorten or lengthen the video. It offers quite a lot of opportunities. Watch the video below to know more:
Download Mac Version ](https://tools.techidaily.com/wondershare/filmora/download/ )
For instance, the application is offering non-linear ripple video editing. This is going to allow you to combine multiple video clips and pin them together conveniently. What is more, you can also apply PIP and Green Screen professional effects with just a few clicks. Sure, the YouTube video editor is a perfect solution for those who don’t want to achieve professional quality, but if you do, Wondershare Filmora is without a doubt the far better alternative. This is something that’s going to enable you to edit and re-touch your videos as well as to size them appropriately. Instead of dragging two bars together, you will be able to touch every single frame and size it according to your own particular needs. This is going to result in flawless videos.
How to Edit YouTube Video Length Using the built-in Video Editor
The YouTube video editor is easy to use, and you can easily learn how to do all sorts of changes to your video. Let’s see the things that you need to go through in order to edit the length.
Note: From 20th September 2017 users will no longer be able to use the complimentary editing suite. Check the best YouTube video editor alternatives from this complete guide.
Step 1 Get to the video editor
In order to do so, you would have to go ahead and login into your account. Then, go to the “My Channel” panel and select the video that you want to cut. Once you’ve done this, click on the “Video manager” option and click on the “create” tab which should be located on the right side for the page. There, you will be able to find the “Video Editor”. Of course, you can also add “/editor” to YouTube’s URL, and you would be good to go.
Step 2 Import Your Video
Once you’ve done all of the above, you would have to drag your video in order to cut it’s time. Keep in mind that the videos are made out of a maximum of 50 clips. The site is going to save every single video that you upload as a particular clip which could be properly combined with the rest in order to make one larger video. This is important.
Step 3 Edit the Length
This is the part where you actually get to edit the length of your video. In order to do so effectively, you have to drag the bar at either end of your clip towards the other end in order to shorten the clip conveniently.
What is more, if you want to increase the length, you have to drag the bar to the opposite end – outwards. There is going to be an indicator which is going to appear at the bottom of the clip, and it’s going to show you the overall duration of the file, and it’s going to adjust itself as you slide the bars accordingly.
Step 4 Save the Clip
Of course, you would have to save the clip in order for the changes to reflect. Even though this might seem like a particularly obvious thing to do, you would be surprise to find out that a lot of people get everything done and then discard the changes by forgetting to save them and their effort goes to waste.
Richard Bennett
Richard Bennett is a writer and a lover of all things video.
Follow @Richard Bennett
- Title: Top 5 Snug Scenarios for Your Snowy Youtube Sessions for 2024
- Author: Kenneth
- Created at : 2024-07-31 21:08:08
- Updated at : 2024-08-01 21:08:08
- Link: https://facebook-video-footage.techidaily.com/top-5-snug-scenarios-for-your-snowy-youtube-sessions-for-2024/
- License: This work is licensed under CC BY-NC-SA 4.0.