![[New] Triple Tactic for Tracking YouTube Income A Step-by-Step Approach](https://thmb.techidaily.com/e4680a85088d1a2f44c589b1c74f41a831760d9eaf6ae422f8b959a2a9262d12.jpg)
"[New] Triple Tactic for Tracking YouTube Income A Step-by-Step Approach"
Triple Tactic for Tracking YouTube Income: A Step-by-Step Approach
There have been lots of user queries similar to the one above about how to check YouTube income lately. Honestly, YouTube has made it easy for users to track their revenue analytics on the platform, thus making it easy for creators to track how much they make and other revenue data.
So, if you don’t know how to check YouTube income, don’t worry, this article will teach you the simple steps to check your YouTube. Plus, you’ll find out how your YouTube earnings are calculated. Just stick with us.

Part 1: Follow the steps below to check your YouTube earnings
The process of checking YouTube income is pretty straightforward. So, regardless of what device you’re using to check, we’ve briefly explained the step-by-step instructions to carry out your YouTube income check within a few clicks.
 Power Tools add-on for Google Sheets, Lifetime subscription
Check on a computer
To check YouTube income on your PC or Mac, you just have to do the following;
Step1 Open the browser app on your computer and sign in to your YouTube Studio .
Step2 Click Analytics from the left side of the screen.


Step3 On the Analytics screen, select Revenue from the top side of the screen to check your YouTube income.
There, you’ll find your YouTube income and other necessary data that you might need.
Check on a Mobile Device
The process of checking YouTube income on an Android or iOS device is also straightforward, and you can use either the YouTube app or the YouTube Studio app to perform the operation. The steps below explain the procedure;
YouTube App
Step1 Make sure you have the latest version of the YouTube app on your phone. If not, you can install it from Google Play Store or App Store.

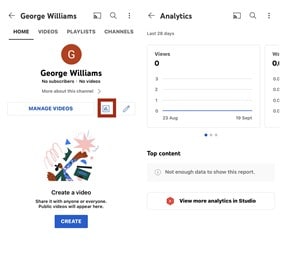
Step2 Log in to your YouTube account and tap on the Profile icon at the top side. Then, select Your Channel.

Step3 Tap the Analytics icon from the middle menu. Your YouTube channel income and other data will be displayed on your phone screen.
YouTube Studio App
Step1 Launch the YouTube Studio app on your Android or iPhone.

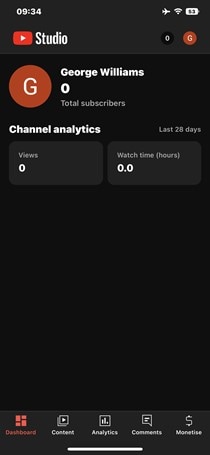
Step2 Tap Analytics from the bottom menu and select Revenue from the top of the screen.
 Glarysoft File Recovery Pro - Helps to recover your lost file/data, even permanently deleted data.

The information that you’ll find in the YouTube revenue analytics includes the following;
- RPM (Revenue Per Mile); This is the metric that displays how much a creator has earned per 1000 video views.
- Playback-based CPM; This shows the average gross revenue per 1000 playbacks where an AD or more is displayed.
- Monthly Estimated Revenue; This report shows how much a YouTuber has earned from his/her channel in the last six months.
- Revenue Sources: Just as the name suggests, this shows you the data of how much is earned from each revenue source used on your YouTube channel.
- Transaction Revenue; The transaction revenue metric is a breakdown of how much a creator has earned from membership and merch.
- Top Earnings; It shows the data of the video with the highest estimated revenue.
- Ad Type; This displays the percentage of revenue earned from the different types of ads.
Part 2: How your YouTube earnings are calculated
Having known how to check YouTube income, if you’re still wondering how your earnings are calculated, here, we’ve discussed all the necessary information you need to know about how YouTube earnings are calculated.
YouTube earnings are calculated based on different factors. From CPC to CPM, estimated gross earnings per view, and more. Keep reading to find out more about how these factors affect your YouTube earnings;
CPM (Cost Per Mile): CPM is the amount an advertiser pays for every one thousand views of their ads. This means if an advertiser is paying you $10CPM, you’ll earn $10 on every 1000 views of their ads.
CPC (Cost Per Click): Most people think CPC is the same as CPM, but no they are not. Cost Per Click is the amount an advertiser pays for every viewer that clicks on their ads. If an advertiser is willing to pay $10, then you’ll earn $10 on every ad click.
Estimated Gross Earning Per Subscriber: You’ll notice whenever you watch a YouTube video, the creator always emphasizes you click the Subscribe button to get a notification on every new video he/she uploads. Well, they do this because the more subscribers they get, the more likely their videos appear in search results.
Also, if you have a huge Subscriber base, your videos tend to get more views, thereby increasing ad views, ad clicks, and your earnings.
All the factors explained above will determine how your YouTube earnings are calculated. However, keep in mind that you’ll receive only 55% of the total dollar advertisers pays while YouTube keeps the remaining 45%. If you get an average of $5 from an advertiser on every 1000 ad view, you’ll earn $5 x 55% which is approximately $2.75.
You can also calculate your YouTube channel total earnings by using the YouTube calculator .

Part 3: How do you increase your YouTube earnings?
1. Post quality videos
If your video is of low quality, then viewers might not find it interesting. For this reason, it’s important you post quality videos, and you need the Wondershare Filmora software for such an operation.
Filmora is one of the best video editing software that is trusted by millions of users globally because of its high efficiency. It supports lots of advanced tools that anyone can utilize to edit and spice up their videos. From adding transitions to applying effects, and more. It even offers a high-quality built-in preset that users can utilize for free to give their video the best quality they can ever think of.
Free Download For Win 7 or later(64-bit)
Free Download For macOS 10.14 or later
Step1 Install Filmora software on your computer.
Step2 Use the Import button to upload the video you created for your YouTube channel. You can also drag-n-drop it to the interface of the software.
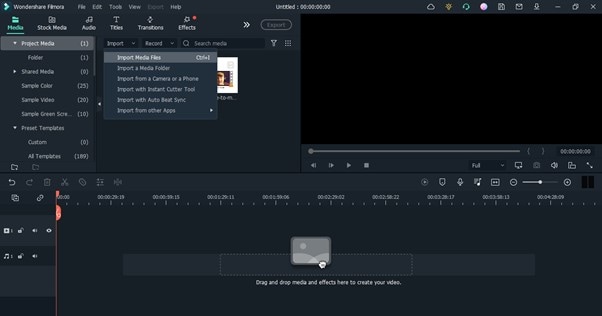
Step3 Drag-n-drop the video you uploaded to the Timeline.


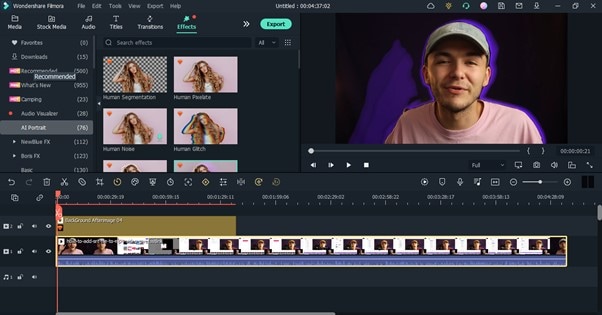
Step4 To remove unwanted background from your video, click Effects from the top side of the screen. Select AI Portrait from the left side of the screen and select a preferred AI Portrait effect that you’ll like to use in the video.

Step5 Next, drag-n-dop the chosen AI Portrait effect to the timeline. After that, adjust the AI Portrait effect from the timeline. You can also add multiple effects by dragging and dropping them to the timeline.
Step6 Double-click the AI Portrait effect from the Timeline. From the pop-up that appears, adjust the settings according to your requirements.

Step7 You can add Subscribe watermark by clicking the >> icon at the top of the screen, then select Element.

Choose the ‘Social Media Show Element 07’ Effects. Drag-n-drop the selected effect to the Timeline.

Step8 Preview the edited video. If you’re satisfied with the output, click the Export button at the top bar and choose Burn DVD from the drop-down list.

Step9 Enter file name in the box next to Label. Then, navigate to Folder Path and choose where you want the file to be saved. Afterward, click Export to Finish.

2. Upload videos regularly
Starting a YouTube channel can be quite hard from start, but make it a priority to upload at least two quality videos every week. Yes, the more quality videos you post, the more you attract the viewer to like your videos, and the higher your chances of getting new subscribers, thereby increasing your YouTube earnings.
3. Promote your Videos
Promoting your YouTube videos is a great way to increase your YouTube earnings. Once you post a new video on YouTube, you can share it to your other social media profiles or websites to increase views and attract new folks to watch the video. The more views you get the more money you’ll make.
Part 4: Hot FAQs on YouTube channel earnings check
Let’s take a look at some frequently asked questions from users like you.
1. Is monetizing on YouTube different from Google AdSense?
YouTube monetization involves making money from videos you upload on your YouTube channel. And Google AdSense is a means of monetizing your YouTube channel.
2. Why should you consider monetizing on YouTube creator?
Monetizing YouTube as a creator is a great way to earn passive income just by uploading videos. Research shows that an average YouTuber has the potential of earning $10,000 in revenue per year.
3. Which category is best for YouTube earnings?
The average CPM you earn from videos you upload on YouTube all depends on the niche of your video. The following are the best 5 categories best for YouTube earnings in 2022;
Make Money Online - $13.52
Social Media Marketing - $12.41
Finance & Investing - $12.25
Educational Videos - $9.89
Photography & Film Making - $7.31
Final Words
Checking YouTube income is not a big deal. This article has covered every necessary detail you need to know about checking your YouTube income on a PC or mobile phone. Also, if you don’t understand how YouTube earnings are calculated, we touched on that, and don’t hesitate to employ the tips discussed to increase your YouTube earnings.
Free Download For Win 7 or later(64-bit)
Free Download For macOS 10.14 or later
Part 1: Follow the steps below to check your YouTube earnings
The process of checking YouTube income is pretty straightforward. So, regardless of what device you’re using to check, we’ve briefly explained the step-by-step instructions to carry out your YouTube income check within a few clicks.
Check on a computer
To check YouTube income on your PC or Mac, you just have to do the following;
Step1 Open the browser app on your computer and sign in to your YouTube Studio .
Step2 Click Analytics from the left side of the screen.
Step3 On the Analytics screen, select Revenue from the top side of the screen to check your YouTube income.
There, you’ll find your YouTube income and other necessary data that you might need.

Check on a Mobile Device
The process of checking YouTube income on an Android or iOS device is also straightforward, and you can use either the YouTube app or the YouTube Studio app to perform the operation. The steps below explain the procedure;
YouTube App
Step1 Make sure you have the latest version of the YouTube app on your phone. If not, you can install it from Google Play Store or App Store.
Step2 Log in to your YouTube account and tap on the Profile icon at the top side. Then, select Your Channel.
Step3 Tap the Analytics icon from the middle menu. Your YouTube channel income and other data will be displayed on your phone screen.
YouTube Studio App
Step1 Launch the YouTube Studio app on your Android or iPhone.
Step2 Tap Analytics from the bottom menu and select Revenue from the top of the screen.
The information that you’ll find in the YouTube revenue analytics includes the following;
- RPM (Revenue Per Mile); This is the metric that displays how much a creator has earned per 1000 video views.
- Playback-based CPM; This shows the average gross revenue per 1000 playbacks where an AD or more is displayed.
- Monthly Estimated Revenue; This report shows how much a YouTuber has earned from his/her channel in the last six months.
- Revenue Sources: Just as the name suggests, this shows you the data of how much is earned from each revenue source used on your YouTube channel.
- Transaction Revenue; The transaction revenue metric is a breakdown of how much a creator has earned from membership and merch.
- Top Earnings; It shows the data of the video with the highest estimated revenue.
- Ad Type; This displays the percentage of revenue earned from the different types of ads.
Part 2: How your YouTube earnings are calculated
Having known how to check YouTube income, if you’re still wondering how your earnings are calculated, here, we’ve discussed all the necessary information you need to know about how YouTube earnings are calculated.
YouTube earnings are calculated based on different factors. From CPC to CPM, estimated gross earnings per view, and more. Keep reading to find out more about how these factors affect your YouTube earnings;
CPM (Cost Per Mile): CPM is the amount an advertiser pays for every one thousand views of their ads. This means if an advertiser is paying you $10CPM, you’ll earn $10 on every 1000 views of their ads.
CPC (Cost Per Click): Most people think CPC is the same as CPM, but no they are not. Cost Per Click is the amount an advertiser pays for every viewer that clicks on their ads. If an advertiser is willing to pay $10, then you’ll earn $10 on every ad click.
Estimated Gross Earning Per Subscriber: You’ll notice whenever you watch a YouTube video, the creator always emphasizes you click the Subscribe button to get a notification on every new video he/she uploads. Well, they do this because the more subscribers they get, the more likely their videos appear in search results.
Also, if you have a huge Subscriber base, your videos tend to get more views, thereby increasing ad views, ad clicks, and your earnings.
All the factors explained above will determine how your YouTube earnings are calculated. However, keep in mind that you’ll receive only 55% of the total dollar advertisers pays while YouTube keeps the remaining 45%. If you get an average of $5 from an advertiser on every 1000 ad view, you’ll earn $5 x 55% which is approximately $2.75.
You can also calculate your YouTube channel total earnings by using the YouTube calculator .

 OtsAV Radio Webcaster
Part 3: How do you increase your YouTube earnings?
1. Post quality videos
If your video is of low quality, then viewers might not find it interesting. For this reason, it’s important you post quality videos, and you need the Wondershare Filmora software for such an operation.
Filmora is one of the best video editing software that is trusted by millions of users globally because of its high efficiency. It supports lots of advanced tools that anyone can utilize to edit and spice up their videos. From adding transitions to applying effects, and more. It even offers a high-quality built-in preset that users can utilize for free to give their video the best quality they can ever think of.
Free Download For Win 7 or later(64-bit)
Free Download For macOS 10.14 or later
Step1 Install Filmora software on your computer.
Step2 Use the Import button to upload the video you created for your YouTube channel. You can also drag-n-drop it to the interface of the software.

WPS Office Premium ( File Recovery, Photo Scanning, Convert PDF)–Yearly
Step3 Drag-n-drop the video you uploaded to the Timeline.

Step4 To remove unwanted background from your video, click Effects from the top side of the screen. Select AI Portrait from the left side of the screen and select a preferred AI Portrait effect that you’ll like to use in the video.
Step5 Next, drag-n-dop the chosen AI Portrait effect to the timeline. After that, adjust the AI Portrait effect from the timeline. You can also add multiple effects by dragging and dropping them to the timeline.
Step6 Double-click the AI Portrait effect from the Timeline. From the pop-up that appears, adjust the settings according to your requirements.

Step7 You can add Subscribe watermark by clicking the >> icon at the top of the screen, then select Element.

Choose the ‘Social Media Show Element 07’ Effects. Drag-n-drop the selected effect to the Timeline.
Step8 Preview the edited video. If you’re satisfied with the output, click the Export button at the top bar and choose Burn DVD from the drop-down list.
Step9 Enter file name in the box next to Label. Then, navigate to Folder Path and choose where you want the file to be saved. Afterward, click Export to Finish.
 OtsAV DJ Pro
2. Upload videos regularly
Starting a YouTube channel can be quite hard from start, but make it a priority to upload at least two quality videos every week. Yes, the more quality videos you post, the more you attract the viewer to like your videos, and the higher your chances of getting new subscribers, thereby increasing your YouTube earnings.
3. Promote your Videos
Promoting your YouTube videos is a great way to increase your YouTube earnings. Once you post a new video on YouTube, you can share it to your other social media profiles or websites to increase views and attract new folks to watch the video. The more views you get the more money you’ll make.
Part 4: Hot FAQs on YouTube channel earnings check
Let’s take a look at some frequently asked questions from users like you.
1. Is monetizing on YouTube different from Google AdSense?
YouTube monetization involves making money from videos you upload on your YouTube channel. And Google AdSense is a means of monetizing your YouTube channel.
2. Why should you consider monetizing on YouTube creator?
Monetizing YouTube as a creator is a great way to earn passive income just by uploading videos. Research shows that an average YouTuber has the potential of earning $10,000 in revenue per year.
3. Which category is best for YouTube earnings?
The average CPM you earn from videos you upload on YouTube all depends on the niche of your video. The following are the best 5 categories best for YouTube earnings in 2022;
Make Money Online - $13.52
Social Media Marketing - $12.41
Finance & Investing - $12.25
Educational Videos - $9.89
Photography & Film Making - $7.31
Final Words
Checking YouTube income is not a big deal. This article has covered every necessary detail you need to know about checking your YouTube income on a PC or mobile phone. Also, if you don’t understand how YouTube earnings are calculated, we touched on that, and don’t hesitate to employ the tips discussed to increase your YouTube earnings.
Free Download For Win 7 or later(64-bit)
Free Download For macOS 10.14 or later
The Ultimate Guide to Professional-Quality Audio without a Microphone
How to Record Good Audio Without a Microphone?

Richard Bennett
Oct 26, 2023• Proven solutions
Audio quality is more important than video quality on YouTube. You’ve probably heard that before – viewers might forgive sub-par video quality if they’re interested in what you’re saying, but if it’s hard to understand what you’re saying they’ll click away.
Getting an external mic (even a $10 one-off Amazon ) is one of the best ways to improve your videos. That said, maybe your budget is $0. Or, maybe you just don’t happen to have a mic now and don’t want to wait to make videos. It could even be that you just don’t want to bother with an external mic.
Luckily, there are a lot of easy, free, things you can do to protect the quality of your audio recording even if you’re not using an external mic. Here are a few tips:
- 1. Keep Your Camera Close
- 2. Shoot Somewhere Quiet
- 3. Pick a Good Room
- 4. Protect your Built-In Mic from Wind
- 5. Use a Free Audio App
- 6. Do a Sound Check
1. Keep Your Camera Close (like, really close)
The biggest problem with the mic built into any camera or phone is just that, since it’s with the camera, it’s usually too far away from you. Built-in mics can record decent audio up close, but usually, your camera will be set up farther away from you than an external mic would be.
For example, your camera’s mic might be just as good as a clip-on LAV, but that LAV is right by your mouth and the camera is a couple of big steps away.
Moving your camera/smartphone physically closer to you will make it hard to include anything besides your head and shoulders in your shot, but it will get you significantly better audio.
2.Shoot Somewhere Quiet
The best way to limit the amount of background noise you pick up in your sound recording is to shoot somewhere where there’s no background noise. That probably seems really basic, but it’s something a lot of people just don’t do. It’s easy to default to recording in your home office, even though it’s right next to the kitchen where your family is bustling around, or in your bedroom even though there’s a busy street right outside your window.
Sometimes the best thing you can do for your audio is simply to scout out a quiet room in your house where the sound recording conditions are better. Speaking of recording conditions…
3. Pick a Good Room
There’s more that goes into picking a good room than how quiet it is. If you try to record in a room that’s too big your voice might sound to distant, and if you try to record in a room that’s too small your audio will be too echo-y. You need a room that’s just right.
You should also pay attention to what’s in the room you’re recording in. Avoid hard, reflective, surfaces like appliances and mirrors which your voice will bounce off of. The same conditions that make you sound great when you sing in the shower will – like recording in a small space -make your voiceover unpleasantly echo-y.
Look for a room that has a lot of soft things in it, like beds and sofas.
4. Protect your Built-In Mic from Wind
If you shoot outside, then the wind passing over your built-in mic will do terrible things to your audio. You can do a lot to counter-act this problem by physically blocking the wind.
There are a few ways to do this. If you’re doing hand-held shots you can partially cover your camera or phone’s mic with your finger. You don’t want to completely cover it/press down or your audio will be muffled. What you’re trying to do is create a barrier blocking out the wind.
On movie sets, they block out wind by covering the microphones with big fuzzy things called ‘dead cats’. You can also block out wind noise by attaching something fuzzy to your microphone. If your camera’s built-in mic is on front of it then you just need something big and fluffy you can loop around the lens. You can use a piece of a boa, a fuzzy novelty scrunchie – you can even murder a fuzzy stuffed animal! Do you have an old coat with a fuzz around the hood? That fuzz would do nicely.
The pompom used in this video cost $2, but you might already have something that would work!
If your built-in mic is on top of your camera you can get something called a ‘micromuff’. A micromuff is essentially a circular or rectangular piece of velcro with long strands of fluff on top. It’s open in the middle so it doesn’t actually cover your mic, but the surrounding fuzz blocks out the wind.

You use the adhesive backing to attach the base velcro to your camera. The other side of the velcro has your fluff attached to the back.
The only thing about a micromuff is that it costs about $30, and if you’re going to spend $30 on audio equipment then you could just buy yourself an inexpensive LAV mic. I only bring up the micromuff because it’s a very simple design you can probably DIY – you just need velcro with adhesive backing and any of the fluff-sources we just discussed.
5. Use a Free Audio App
If you’re recording on a smartphone, you can download a free app that will let you make adjustments to your audio as you record it. With the right app, you can adjust your gain (volume is how you control ‘output’ audio, and gain is for ‘input’ audio. By turning up your gain, you can make your mic more sensitive), tempo, and more. A lot of the time, your audio recording app will also let you edit your audio afterward.
Even if you’re not recording video from your smartphone, it might be a good idea to use your phone as your mic and record a separate audio file. You’ll be able to use an app to fine-tune your recording, and you can set your phone up closer to you the way you would an external mic while keeping your camera back a bit farther.
Free audio apps: Hi-Q MP3 Voice Recorder (Android), RecForge II (Android), Smart Voice Recorder (Android), Audio Memos (iOS), and Recorder Plus (iOS).
6. Do a Sound Check
Once you think you’ve got good audio set up – test it! You don’t want to do a whole video and find out when you play it back that your audio doesn’t sound good.
Do you have any of your own audio tips to pass on? Leave them in the comments!
This topic was suggested by RS Beauty over in the forums. Thanks for the idea!
Polish Your YouTube Videos with Filmora
As one of the most widely used video editing software in YouTube video editing, Filmora allows you to record voiceover and edit the recorded audio with mixer, equalizer and provides lots of templates and effects with an intuitive interface, which saves much time. Download the free trial version and get started now.


Richard Bennett
Richard Bennett is a writer and a lover of all things video.
Follow @Richard Bennett
Richard Bennett
Oct 26, 2023• Proven solutions
Audio quality is more important than video quality on YouTube. You’ve probably heard that before – viewers might forgive sub-par video quality if they’re interested in what you’re saying, but if it’s hard to understand what you’re saying they’ll click away.
Getting an external mic (even a $10 one-off Amazon ) is one of the best ways to improve your videos. That said, maybe your budget is $0. Or, maybe you just don’t happen to have a mic now and don’t want to wait to make videos. It could even be that you just don’t want to bother with an external mic.
Luckily, there are a lot of easy, free, things you can do to protect the quality of your audio recording even if you’re not using an external mic. Here are a few tips:
- 1. Keep Your Camera Close
- 2. Shoot Somewhere Quiet
- 3. Pick a Good Room
- 4. Protect your Built-In Mic from Wind
- 5. Use a Free Audio App
- 6. Do a Sound Check
1. Keep Your Camera Close (like, really close)
The biggest problem with the mic built into any camera or phone is just that, since it’s with the camera, it’s usually too far away from you. Built-in mics can record decent audio up close, but usually, your camera will be set up farther away from you than an external mic would be.
For example, your camera’s mic might be just as good as a clip-on LAV, but that LAV is right by your mouth and the camera is a couple of big steps away.
Moving your camera/smartphone physically closer to you will make it hard to include anything besides your head and shoulders in your shot, but it will get you significantly better audio.
2.Shoot Somewhere Quiet
The best way to limit the amount of background noise you pick up in your sound recording is to shoot somewhere where there’s no background noise. That probably seems really basic, but it’s something a lot of people just don’t do. It’s easy to default to recording in your home office, even though it’s right next to the kitchen where your family is bustling around, or in your bedroom even though there’s a busy street right outside your window.
Sometimes the best thing you can do for your audio is simply to scout out a quiet room in your house where the sound recording conditions are better. Speaking of recording conditions…
3. Pick a Good Room
There’s more that goes into picking a good room than how quiet it is. If you try to record in a room that’s too big your voice might sound to distant, and if you try to record in a room that’s too small your audio will be too echo-y. You need a room that’s just right.
You should also pay attention to what’s in the room you’re recording in. Avoid hard, reflective, surfaces like appliances and mirrors which your voice will bounce off of. The same conditions that make you sound great when you sing in the shower will – like recording in a small space -make your voiceover unpleasantly echo-y.
Look for a room that has a lot of soft things in it, like beds and sofas.
4. Protect your Built-In Mic from Wind
If you shoot outside, then the wind passing over your built-in mic will do terrible things to your audio. You can do a lot to counter-act this problem by physically blocking the wind.
There are a few ways to do this. If you’re doing hand-held shots you can partially cover your camera or phone’s mic with your finger. You don’t want to completely cover it/press down or your audio will be muffled. What you’re trying to do is create a barrier blocking out the wind.
On movie sets, they block out wind by covering the microphones with big fuzzy things called ‘dead cats’. You can also block out wind noise by attaching something fuzzy to your microphone. If your camera’s built-in mic is on front of it then you just need something big and fluffy you can loop around the lens. You can use a piece of a boa, a fuzzy novelty scrunchie – you can even murder a fuzzy stuffed animal! Do you have an old coat with a fuzz around the hood? That fuzz would do nicely.
The pompom used in this video cost $2, but you might already have something that would work!
If your built-in mic is on top of your camera you can get something called a ‘micromuff’. A micromuff is essentially a circular or rectangular piece of velcro with long strands of fluff on top. It’s open in the middle so it doesn’t actually cover your mic, but the surrounding fuzz blocks out the wind.

You use the adhesive backing to attach the base velcro to your camera. The other side of the velcro has your fluff attached to the back.
The only thing about a micromuff is that it costs about $30, and if you’re going to spend $30 on audio equipment then you could just buy yourself an inexpensive LAV mic. I only bring up the micromuff because it’s a very simple design you can probably DIY – you just need velcro with adhesive backing and any of the fluff-sources we just discussed.
5. Use a Free Audio App
If you’re recording on a smartphone, you can download a free app that will let you make adjustments to your audio as you record it. With the right app, you can adjust your gain (volume is how you control ‘output’ audio, and gain is for ‘input’ audio. By turning up your gain, you can make your mic more sensitive), tempo, and more. A lot of the time, your audio recording app will also let you edit your audio afterward.
Even if you’re not recording video from your smartphone, it might be a good idea to use your phone as your mic and record a separate audio file. You’ll be able to use an app to fine-tune your recording, and you can set your phone up closer to you the way you would an external mic while keeping your camera back a bit farther.
Free audio apps: Hi-Q MP3 Voice Recorder (Android), RecForge II (Android), Smart Voice Recorder (Android), Audio Memos (iOS), and Recorder Plus (iOS).
6. Do a Sound Check
Once you think you’ve got good audio set up – test it! You don’t want to do a whole video and find out when you play it back that your audio doesn’t sound good.
Do you have any of your own audio tips to pass on? Leave them in the comments!
This topic was suggested by RS Beauty over in the forums. Thanks for the idea!
 vMix HD - Software based live production. vMix HD includes everything in vMix Basic HD plus 1000 inputs, Video List, 4 Overlay Channels, and 1 vMix Call
Polish Your YouTube Videos with Filmora
As one of the most widely used video editing software in YouTube video editing, Filmora allows you to record voiceover and edit the recorded audio with mixer, equalizer and provides lots of templates and effects with an intuitive interface, which saves much time. Download the free trial version and get started now.
 ZoneAlarm Pro Antivirus + Firewall NextGen
Richard Bennett
Richard Bennett is a writer and a lover of all things video.
Follow @Richard Bennett
Richard Bennett
Oct 26, 2023• Proven solutions
Audio quality is more important than video quality on YouTube. You’ve probably heard that before – viewers might forgive sub-par video quality if they’re interested in what you’re saying, but if it’s hard to understand what you’re saying they’ll click away.
Getting an external mic (even a $10 one-off Amazon ) is one of the best ways to improve your videos. That said, maybe your budget is $0. Or, maybe you just don’t happen to have a mic now and don’t want to wait to make videos. It could even be that you just don’t want to bother with an external mic.
Luckily, there are a lot of easy, free, things you can do to protect the quality of your audio recording even if you’re not using an external mic. Here are a few tips:
- 1. Keep Your Camera Close
- 2. Shoot Somewhere Quiet
- 3. Pick a Good Room
- 4. Protect your Built-In Mic from Wind
- 5. Use a Free Audio App
- 6. Do a Sound Check
1. Keep Your Camera Close (like, really close)
The biggest problem with the mic built into any camera or phone is just that, since it’s with the camera, it’s usually too far away from you. Built-in mics can record decent audio up close, but usually, your camera will be set up farther away from you than an external mic would be.
For example, your camera’s mic might be just as good as a clip-on LAV, but that LAV is right by your mouth and the camera is a couple of big steps away.
Moving your camera/smartphone physically closer to you will make it hard to include anything besides your head and shoulders in your shot, but it will get you significantly better audio.
2.Shoot Somewhere Quiet
The best way to limit the amount of background noise you pick up in your sound recording is to shoot somewhere where there’s no background noise. That probably seems really basic, but it’s something a lot of people just don’t do. It’s easy to default to recording in your home office, even though it’s right next to the kitchen where your family is bustling around, or in your bedroom even though there’s a busy street right outside your window.
Sometimes the best thing you can do for your audio is simply to scout out a quiet room in your house where the sound recording conditions are better. Speaking of recording conditions…
3. Pick a Good Room
There’s more that goes into picking a good room than how quiet it is. If you try to record in a room that’s too big your voice might sound to distant, and if you try to record in a room that’s too small your audio will be too echo-y. You need a room that’s just right.
You should also pay attention to what’s in the room you’re recording in. Avoid hard, reflective, surfaces like appliances and mirrors which your voice will bounce off of. The same conditions that make you sound great when you sing in the shower will – like recording in a small space -make your voiceover unpleasantly echo-y.
Look for a room that has a lot of soft things in it, like beds and sofas.
4. Protect your Built-In Mic from Wind
If you shoot outside, then the wind passing over your built-in mic will do terrible things to your audio. You can do a lot to counter-act this problem by physically blocking the wind.
There are a few ways to do this. If you’re doing hand-held shots you can partially cover your camera or phone’s mic with your finger. You don’t want to completely cover it/press down or your audio will be muffled. What you’re trying to do is create a barrier blocking out the wind.
On movie sets, they block out wind by covering the microphones with big fuzzy things called ‘dead cats’. You can also block out wind noise by attaching something fuzzy to your microphone. If your camera’s built-in mic is on front of it then you just need something big and fluffy you can loop around the lens. You can use a piece of a boa, a fuzzy novelty scrunchie – you can even murder a fuzzy stuffed animal! Do you have an old coat with a fuzz around the hood? That fuzz would do nicely.
The pompom used in this video cost $2, but you might already have something that would work!
If your built-in mic is on top of your camera you can get something called a ‘micromuff’. A micromuff is essentially a circular or rectangular piece of velcro with long strands of fluff on top. It’s open in the middle so it doesn’t actually cover your mic, but the surrounding fuzz blocks out the wind.
You use the adhesive backing to attach the base velcro to your camera. The other side of the velcro has your fluff attached to the back.
The only thing about a micromuff is that it costs about $30, and if you’re going to spend $30 on audio equipment then you could just buy yourself an inexpensive LAV mic. I only bring up the micromuff because it’s a very simple design you can probably DIY – you just need velcro with adhesive backing and any of the fluff-sources we just discussed.
5. Use a Free Audio App
If you’re recording on a smartphone, you can download a free app that will let you make adjustments to your audio as you record it. With the right app, you can adjust your gain (volume is how you control ‘output’ audio, and gain is for ‘input’ audio. By turning up your gain, you can make your mic more sensitive), tempo, and more. A lot of the time, your audio recording app will also let you edit your audio afterward.
Even if you’re not recording video from your smartphone, it might be a good idea to use your phone as your mic and record a separate audio file. You’ll be able to use an app to fine-tune your recording, and you can set your phone up closer to you the way you would an external mic while keeping your camera back a bit farther.
Free audio apps: Hi-Q MP3 Voice Recorder (Android), RecForge II (Android), Smart Voice Recorder (Android), Audio Memos (iOS), and Recorder Plus (iOS).
6. Do a Sound Check
Once you think you’ve got good audio set up – test it! You don’t want to do a whole video and find out when you play it back that your audio doesn’t sound good.
Do you have any of your own audio tips to pass on? Leave them in the comments!
This topic was suggested by RS Beauty over in the forums. Thanks for the idea!
Polish Your YouTube Videos with Filmora
As one of the most widely used video editing software in YouTube video editing, Filmora allows you to record voiceover and edit the recorded audio with mixer, equalizer and provides lots of templates and effects with an intuitive interface, which saves much time. Download the free trial version and get started now.
Richard Bennett
Richard Bennett is a writer and a lover of all things video.
Follow @Richard Bennett
Richard Bennett
Oct 26, 2023• Proven solutions
Audio quality is more important than video quality on YouTube. You’ve probably heard that before – viewers might forgive sub-par video quality if they’re interested in what you’re saying, but if it’s hard to understand what you’re saying they’ll click away.
Getting an external mic (even a $10 one-off Amazon ) is one of the best ways to improve your videos. That said, maybe your budget is $0. Or, maybe you just don’t happen to have a mic now and don’t want to wait to make videos. It could even be that you just don’t want to bother with an external mic.
Luckily, there are a lot of easy, free, things you can do to protect the quality of your audio recording even if you’re not using an external mic. Here are a few tips:
- 1. Keep Your Camera Close
- 2. Shoot Somewhere Quiet
- 3. Pick a Good Room
- 4. Protect your Built-In Mic from Wind
- 5. Use a Free Audio App
- 6. Do a Sound Check
 PCDJ DEX 3 for Windows & MAC is the total entertainment DJ software solution, offering audio, video, and karaoke mixing ability. Automatic beat-sync, smart looping, 4 decks, DJ MIDI controller support, Karaoke Streaming and much more.
1. Keep Your Camera Close (like, really close)
The biggest problem with the mic built into any camera or phone is just that, since it’s with the camera, it’s usually too far away from you. Built-in mics can record decent audio up close, but usually, your camera will be set up farther away from you than an external mic would be.
For example, your camera’s mic might be just as good as a clip-on LAV, but that LAV is right by your mouth and the camera is a couple of big steps away.
Moving your camera/smartphone physically closer to you will make it hard to include anything besides your head and shoulders in your shot, but it will get you significantly better audio.
 Software Update Pro - Check and update software installed on your computer.
2.Shoot Somewhere Quiet
The best way to limit the amount of background noise you pick up in your sound recording is to shoot somewhere where there’s no background noise. That probably seems really basic, but it’s something a lot of people just don’t do. It’s easy to default to recording in your home office, even though it’s right next to the kitchen where your family is bustling around, or in your bedroom even though there’s a busy street right outside your window.
Sometimes the best thing you can do for your audio is simply to scout out a quiet room in your house where the sound recording conditions are better. Speaking of recording conditions…
3. Pick a Good Room
There’s more that goes into picking a good room than how quiet it is. If you try to record in a room that’s too big your voice might sound to distant, and if you try to record in a room that’s too small your audio will be too echo-y. You need a room that’s just right.
You should also pay attention to what’s in the room you’re recording in. Avoid hard, reflective, surfaces like appliances and mirrors which your voice will bounce off of. The same conditions that make you sound great when you sing in the shower will – like recording in a small space -make your voiceover unpleasantly echo-y.
Look for a room that has a lot of soft things in it, like beds and sofas.
4. Protect your Built-In Mic from Wind
If you shoot outside, then the wind passing over your built-in mic will do terrible things to your audio. You can do a lot to counter-act this problem by physically blocking the wind.
There are a few ways to do this. If you’re doing hand-held shots you can partially cover your camera or phone’s mic with your finger. You don’t want to completely cover it/press down or your audio will be muffled. What you’re trying to do is create a barrier blocking out the wind.
On movie sets, they block out wind by covering the microphones with big fuzzy things called ‘dead cats’. You can also block out wind noise by attaching something fuzzy to your microphone. If your camera’s built-in mic is on front of it then you just need something big and fluffy you can loop around the lens. You can use a piece of a boa, a fuzzy novelty scrunchie – you can even murder a fuzzy stuffed animal! Do you have an old coat with a fuzz around the hood? That fuzz would do nicely.
The pompom used in this video cost $2, but you might already have something that would work!
If your built-in mic is on top of your camera you can get something called a ‘micromuff’. A micromuff is essentially a circular or rectangular piece of velcro with long strands of fluff on top. It’s open in the middle so it doesn’t actually cover your mic, but the surrounding fuzz blocks out the wind.
 Epubor Audible Converter for Mac: Download and convert Audible AAXC/AA/AAX to MP3 with 100% original quality preserved.
You use the adhesive backing to attach the base velcro to your camera. The other side of the velcro has your fluff attached to the back.
The only thing about a micromuff is that it costs about $30, and if you’re going to spend $30 on audio equipment then you could just buy yourself an inexpensive LAV mic. I only bring up the micromuff because it’s a very simple design you can probably DIY – you just need velcro with adhesive backing and any of the fluff-sources we just discussed.

5. Use a Free Audio App
If you’re recording on a smartphone, you can download a free app that will let you make adjustments to your audio as you record it. With the right app, you can adjust your gain (volume is how you control ‘output’ audio, and gain is for ‘input’ audio. By turning up your gain, you can make your mic more sensitive), tempo, and more. A lot of the time, your audio recording app will also let you edit your audio afterward.
Even if you’re not recording video from your smartphone, it might be a good idea to use your phone as your mic and record a separate audio file. You’ll be able to use an app to fine-tune your recording, and you can set your phone up closer to you the way you would an external mic while keeping your camera back a bit farther.
Free audio apps: Hi-Q MP3 Voice Recorder (Android), RecForge II (Android), Smart Voice Recorder (Android), Audio Memos (iOS), and Recorder Plus (iOS).
6. Do a Sound Check
Once you think you’ve got good audio set up – test it! You don’t want to do a whole video and find out when you play it back that your audio doesn’t sound good.
Do you have any of your own audio tips to pass on? Leave them in the comments!
This topic was suggested by RS Beauty over in the forums. Thanks for the idea!
Polish Your YouTube Videos with Filmora
As one of the most widely used video editing software in YouTube video editing, Filmora allows you to record voiceover and edit the recorded audio with mixer, equalizer and provides lots of templates and effects with an intuitive interface, which saves much time. Download the free trial version and get started now.


Richard Bennett
Richard Bennett is a writer and a lover of all things video.
Follow @Richard Bennett
- Title: [New] Triple Tactic for Tracking YouTube Income A Step-by-Step Approach
- Author: Kenneth
- Created at : 2024-07-31 22:55:51
- Updated at : 2024-08-01 22:55:51
- Link: https://facebook-video-footage.techidaily.com/new-triple-tactic-for-tracking-youtube-income-a-step-by-step-approach/
- License: This work is licensed under CC BY-NC-SA 4.0.