![[New] Instantly Accessible Music Mixes Assembling YouTube Playlists Web/Mobile Style](https://thmb.techidaily.com/7232672881e7d137d3952f765be2610288c45b29a2009d979134d6c02c0bbdb8.jpg)
"[New] Instantly Accessible Music Mixes Assembling YouTube Playlists Web/Mobile Style"
Instantly Accessible Music Mixes: Assembling YouTube Playlists Web/Mobile Style
YouTube is one of the biggest video-sharing websites where you can find unlimited videos of your favorite songs in various genres for free. However, due to the thousands of channels on YouTube, remember a soundtrack you once liked.
To tackle this issue, you must create a playlist containing only those you prefer to listen to.
So, if you are looking for information on creating a YouTube music playlist on your Windows or Mac PC, Android, or iPhone web browser, read this article and follow the steps carefully.

WPS Office Premium ( File Recovery, Photo Scanning, Convert PDF)–Yearly
How to Create a YouTube Music Playlist?
Are you one of those who want to listen to their favorite tracks while working out or carrying on their work-related tasks? If that’s the case, a YouTube Playlist might come in handy as you don’t have to search again and again for your songs on your device.
How To Create a YouTube Music Playlist on the Web?
If you are using a Windows or Mac computer and want to create a YouTube music playlist on a web browser, follow the below steps:
Step1 In the first step, turn on your PC, launch a web browser from the desktop or Dock, and head to theYouTube website. Next, Sign into your account with your Google email ID if you are not already logged in.

 CollageIt Pro
![]()
Note: It is only possible to create a YouTube music playlist by signing into your account.
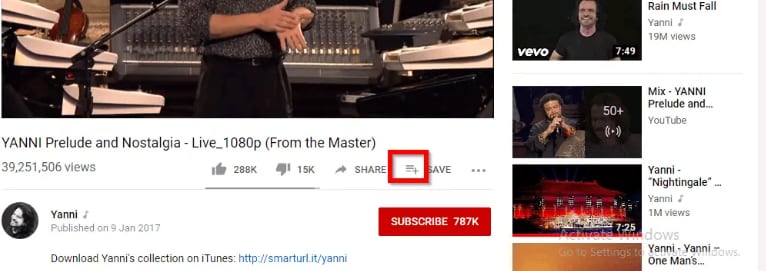
Step2 When you have signed in, look for your favorite track on the YouTube live feed page or search for it in the search bar at the top of the screen. Once you have found the song, click on it to play it, click the three horizontal dots at the bottom right-hand side of the video, and select the “Save” option from the small pop-up.
Parental Control Software
Step3
- Now, select the “Create a new playlist”
- Type in the name of your playlist.
- Choose to make it Public, Unlisted, or Private.

The differences between the three options are:
- A Public playlist is a list of videos that any random person can see, access, or use it.
- An Unlisted playlist can be shared with others by using its link to access it.
- A Private playlist cannot be seen, accessed or used by anyone except you.
Finally, click the “Create” button, and your YouTube music playlist will be saved automatically.
Step4 Repeat the second and third steps to save all the other songs you wish to add to the same playlist. Once done, head back to the main YouTube feed page, click “Library,” and scroll to the middle of the page in the right pane to access and play the music playlist at your will.


![]()
Note: You can always edit your YouTube music playlist by changing its name, privacy, and description or adding and removing any tracks. It is also possible to delete any of your playlists or create and save multiple playlists on your device’s web browser.

How to Create a YouTube Music playlist on iPhone?
To create a YouTube music playlist on your iPhone, follow these quick steps.:
Step1 Download and launch the YouTube Music app on your iPhone , sign into your account, and tap a song you want to add to your playlist. Next, tap on the music video once for the create a playlist option to pop up.

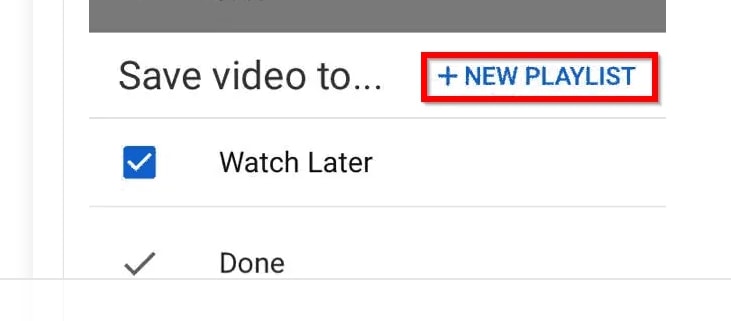
Step2 Now tap the three horizontal lines with the Plus icon, tap “+ NEW PLAYLIST” at the bottom right corner of the screen, and type in the name of the new music playlist.
Step3 In the next step, type in the name of your new playlist, select your privacy preferences, i.e., Private, Public, or unlisted, and tap “Create” to complete the process.
.png) Kanto Player Professional
Kanto Player Professional
Finally, close the video, tap “Library” at the bottom of the screen, scroll down and see your new YouTube music playlist.
How to Create a YouTube Music playlist on Android?
YouTube Music app interface for Android is different than for iPhone, so do the following steps to create a new playlist quickly.
Step1 Download and launch the YouTube Music app on your Android , sign into your account, and tap a song to open it. Next, tap on the music video once and tap the three horizontal lines with the Plus icon.
Then, tap “Create a new playlist” at the bottom right corner of the screen, and type in the name of the new music playlist.


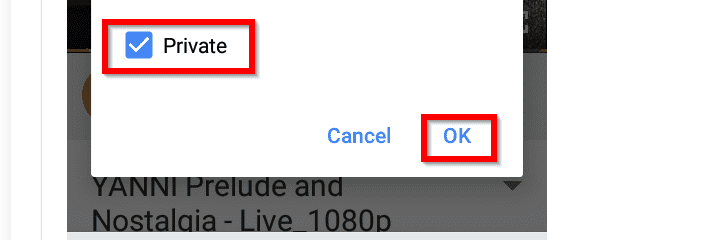
Step2 In the next step, choose your privacy preferences and tap “OK” to create the new YouTube music playlist.
Now tap to close the video, tap “Library” at the bottom of the screen, scroll down in the middle of the app and view your new YouTube music playlist.
![]()
Note: You may see an option to create a new channel during the YouTube music playlist process. If so, tap “Create Channel” to see the “+ NEW PLAYLIST” option on your iPhone and the “Create a new playlist” option on your Android YouTube app.
Bonus Video Tutorial: From a YouTube User to Creator - How To Make Music Video
You know how to create a YouTube playlist on the web or on your mobile. However, as you are a music lover and use YouTube frequently, are you interested in creating music videos by yourself? If yes, please watch the video below. It will show you how to make music videos with a user-friendly video editor, Filmora . We hope you can enjoy your YouTube music while exploring more creative possibilities:
Free Download For Win 7 or later(64-bit)
Free Download For macOS 10.14 or later
Conclusion
Listening to YouTube’s free music tracks is more fun when you do not have to go and forth to search for your favorite songs. You can enjoy the experience more when you have personalized playlists for situations like a long drive, studying, or working in an office.
So, in this article, we have discussed a step-by-step process for creating a YouTube music playlist on a web browser, Android, and iPhone, and hopefully, you can dance to your favorite beats without searching for them first on YouTube.
Step2 When you have signed in, look for your favorite track on the YouTube live feed page or search for it in the search bar at the top of the screen. Once you have found the song, click on it to play it, click the three horizontal dots at the bottom right-hand side of the video, and select the “Save” option from the small pop-up.

Step3
- Now, select the “Create a new playlist”
- Type in the name of your playlist.
- Choose to make it Public, Unlisted, or Private.
The differences between the three options are:
- A Public playlist is a list of videos that any random person can see, access, or use it.
- An Unlisted playlist can be shared with others by using its link to access it.
- A Private playlist cannot be seen, accessed or used by anyone except you.
Finally, click the “Create” button, and your YouTube music playlist will be saved automatically.
Step4 Repeat the second and third steps to save all the other songs you wish to add to the same playlist. Once done, head back to the main YouTube feed page, click “Library,” and scroll to the middle of the page in the right pane to access and play the music playlist at your will.
![]()
Note: You can always edit your YouTube music playlist by changing its name, privacy, and description or adding and removing any tracks. It is also possible to delete any of your playlists or create and save multiple playlists on your device’s web browser.
How to Create a YouTube Music playlist on iPhone?
To create a YouTube music playlist on your iPhone, follow these quick steps.:
Step1 Download and launch the YouTube Music app on your iPhone , sign into your account, and tap a song you want to add to your playlist. Next, tap on the music video once for the create a playlist option to pop up.
Step2 Now tap the three horizontal lines with the Plus icon, tap “+ NEW PLAYLIST” at the bottom right corner of the screen, and type in the name of the new music playlist.


Step3 In the next step, type in the name of your new playlist, select your privacy preferences, i.e., Private, Public, or unlisted, and tap “Create” to complete the process.
Finally, close the video, tap “Library” at the bottom of the screen, scroll down and see your new YouTube music playlist.
How to Create a YouTube Music playlist on Android?
YouTube Music app interface for Android is different than for iPhone, so do the following steps to create a new playlist quickly.
Step1 Download and launch the YouTube Music app on your Android , sign into your account, and tap a song to open it. Next, tap on the music video once and tap the three horizontal lines with the Plus icon.
Then, tap “Create a new playlist” at the bottom right corner of the screen, and type in the name of the new music playlist.

Step2 In the next step, choose your privacy preferences and tap “OK” to create the new YouTube music playlist.
Now tap to close the video, tap “Library” at the bottom of the screen, scroll down in the middle of the app and view your new YouTube music playlist.
![]()
Note: You may see an option to create a new channel during the YouTube music playlist process. If so, tap “Create Channel” to see the “+ NEW PLAYLIST” option on your iPhone and the “Create a new playlist” option on your Android YouTube app.
![]() FX PRO (Gold Robot + Silver Robot(Basic Package))
FX PRO (Gold Robot + Silver Robot(Basic Package))
Bonus Video Tutorial: From a YouTube User to Creator - How To Make Music Video
You know how to create a YouTube playlist on the web or on your mobile. However, as you are a music lover and use YouTube frequently, are you interested in creating music videos by yourself? If yes, please watch the video below. It will show you how to make music videos with a user-friendly video editor, Filmora . We hope you can enjoy your YouTube music while exploring more creative possibilities:
Free Download For Win 7 or later(64-bit)
Free Download For macOS 10.14 or later
Conclusion
Listening to YouTube’s free music tracks is more fun when you do not have to go and forth to search for your favorite songs. You can enjoy the experience more when you have personalized playlists for situations like a long drive, studying, or working in an office.
So, in this article, we have discussed a step-by-step process for creating a YouTube music playlist on a web browser, Android, and iPhone, and hopefully, you can dance to your favorite beats without searching for them first on YouTube.
Making a Mark: Advanced Strategies for YouTube Video Production
How to Edit Youtube Videos by the YouTube Video Editor

Richard Bennett
Mar 27, 2024• Proven solutions
Note: From 20th September 2017 users will no longer be able to use the complimentary editing suite. Check the best YouTube video editor alternatives from this complete guide. Now, it is back again.
Video editing usually requires a fair amount of technical knowledge and professional software. But YouTube has introduced its new YouTube Video Editor. It’s deceptively simple compared to the traditional desktop editing programs.
If you haven’t tried the YouTube editor , it’s time to get started.
It’s easy to learn and the guide below will give you an introduction for editing videos on YouTube.
You May Also Like:
Royalty free music for YouTube Videos >>
Best Screen Recorders for YouTube >>
YouTube Video Dimensions/Size: Guide for Upload Settings >>
The Best Video Editors for YouTube >>
 The Tube Sites Submitter is a fast and efficient tool for anyone who needs to upload videos quickly, easily and automatically to hundreds of tube sites in mere minutes .
 How to edit a YouTube video with Filmora
If you want to have more controls on editing YouTube video, here we recommend using Filmora .
You can use it to trim/cut/split YouTube videos with handy tools. It also offer more than 50 royal free music to use. Various video filters and effects are available to make your videos amazing. The best part is you can apply animated text/titles to videos like a pro. After editing, you can directly upload videos to YouTube.
Now, download it now to have a try!
 Download Mac Version ](https://tools.techidaily.com/wondershare/filmora/download/ )
 SwifDoo PDF Perpetual (1 PC) Free upgrade. No monthly fees ever.
How to Use YouTube Video Editor to Edit Video on YouTube
Step 1. Get access to YouTube Video Editor
Sign in to your YouTube (or Google) account. To get access to YouTube Video Editor, you can go directly to YouTube studio (video editor) . Or click avatar icon in your YouTube site > YouTube Studio.
Learn more about Upload MP3 to YouTube

Step 2. Add your videos to the timeline
After getting to the editor, all your YouTube videos will appear. If you want to add a clip from the pool of videos into the project, simply drag it onto the timeline or hit the plus icon in the top right hand corner of each clip. You can also add any YouTube videos that were uploaded with a “Creative Commons” license.
To do this, go to the CC tab, find a video and drag it to the timeline.

Looking for best YouTube video editor alternatives? Check this complete guide here >>
Step 3. Edit the videos as you like
With the YouTube video editor, you can quick fix your videos, add audio track of your video, add texts, use various filters and more. Below is a detailed guide on how to use YouTube video Editor.
#1 Trim/Cut/Split video
To cut or split your video, hover over the target clip and hit the scissor icon to cut the clip into pieces. You can also cursor over the edge of your video in the timeline and drag the handle to shorten or trim your video.
 KoolReport Pro is an advanced solution for creating data reports and dashboards in PHP. Equipped with all extended packages , KoolReport Pro is able to connect to various datasources, perform advanced data analysis, construct stunning charts and graphs and export your beautiful work to PDF, Excel, JPG or other formats. Plus, it includes powerful built-in reports such as pivot report and drill-down report which will save your time in building ones.
 It will help you to write dynamic data reports easily, to construct intuitive dashboards or to build a whole business intelligence cockpit.
KoolReport Pro package goes with Full Source Code, Royal Free, ONE (1) Year Priority Support, ONE (1) Year Free Upgrade and 30-Days Money Back Guarantee.
Developer License allows Single Developer to create Unlimited Reports, deploy on Unlimited Servers and able deliver the work to Unlimited Clients.

#2 Change video settings
YouTube Video Editor also provides the “Quick fixes” function which does a quick analysis of the video and tweaks its color, brightness, and contrast settings automatically.
You can just double click the video to enter the “Quick fixes” tab and easily change brightness and contrast, add slow motion and pan zoom effect, and stabilize, audio fix or rotate video.

#3 Add filters
You can also add stunning video filters provided by this editor. To get access this function, double click the video and switch to the “Filter” tab.

#4 Add text to video
To add text to video, go to the “Text” tab, tick “Enable text” and enter the text to the text column. Then customize the font, size, color, position of the text as you like.


#5 Add music to video
YouTube also allows you to swap out the audio with one of its licensed tracks. To do this, go back to the main interface of the editor and click the Audio tab. Then select a song from the library and either drag it to the soundtrack timeline or press the plus sign to the right of each title.

Note: You should note that some are songs are subject to licensing agreements, which means YouTube will automatically add advertisements to the video clip.
Another short coming is that you can’t edit the audio track at all. If a song is longer than your video, you can do nothing but let it play from the beginning until your video stops.
#6 Add transitions to video
If several video clips have been added to the timeline, you need transition to make the whole project smoother. To add transition, go to the Transition tab and choose from 16 transition effects.

YouTube Video Editor is really easy to use, but it only provides some basic video editing functions and is really easy to crash when dealing with large file. If you want to make your video more professional, try Wondershare Filmora .
This desktop video editing tool can help you easily complete video editing tasks.
Download it now to have a try!
Download Mac Version ](https://tools.techidaily.com/wondershare/filmora/download/ )
Richard Bennett
Richard Bennett is a writer and a lover of all things video.
Follow @Richard Bennett
Richard Bennett
Mar 27, 2024• Proven solutions
Note: From 20th September 2017 users will no longer be able to use the complimentary editing suite. Check the best YouTube video editor alternatives from this complete guide. Now, it is back again.
Video editing usually requires a fair amount of technical knowledge and professional software. But YouTube has introduced its new YouTube Video Editor. It’s deceptively simple compared to the traditional desktop editing programs.
If you haven’t tried the YouTube editor , it’s time to get started.
It’s easy to learn and the guide below will give you an introduction for editing videos on YouTube.
You May Also Like:
Royalty free music for YouTube Videos >>
Best Screen Recorders for YouTube >>
YouTube Video Dimensions/Size: Guide for Upload Settings >>
The Best Video Editors for YouTube >>
How to edit a YouTube video with Filmora
If you want to have more controls on editing YouTube video, here we recommend using Filmora .
You can use it to trim/cut/split YouTube videos with handy tools. It also offer more than 50 royal free music to use. Various video filters and effects are available to make your videos amazing. The best part is you can apply animated text/titles to videos like a pro. After editing, you can directly upload videos to YouTube.
Now, download it now to have a try!

Download Mac Version ](https://tools.techidaily.com/wondershare/filmora/download/ )
How to Use YouTube Video Editor to Edit Video on YouTube
Step 1. Get access to YouTube Video Editor
Sign in to your YouTube (or Google) account. To get access to YouTube Video Editor, you can go directly to YouTube studio (video editor) . Or click avatar icon in your YouTube site > YouTube Studio.
Learn more about Upload MP3 to YouTube
Step 2. Add your videos to the timeline
After getting to the editor, all your YouTube videos will appear. If you want to add a clip from the pool of videos into the project, simply drag it onto the timeline or hit the plus icon in the top right hand corner of each clip. You can also add any YouTube videos that were uploaded with a “Creative Commons” license.
To do this, go to the CC tab, find a video and drag it to the timeline.
Looking for best YouTube video editor alternatives? Check this complete guide here >>
Step 3. Edit the videos as you like
With the YouTube video editor, you can quick fix your videos, add audio track of your video, add texts, use various filters and more. Below is a detailed guide on how to use YouTube video Editor.
#1 Trim/Cut/Split video
To cut or split your video, hover over the target clip and hit the scissor icon to cut the clip into pieces. You can also cursor over the edge of your video in the timeline and drag the handle to shorten or trim your video.
#2 Change video settings
YouTube Video Editor also provides the “Quick fixes” function which does a quick analysis of the video and tweaks its color, brightness, and contrast settings automatically.
You can just double click the video to enter the “Quick fixes” tab and easily change brightness and contrast, add slow motion and pan zoom effect, and stabilize, audio fix or rotate video.
#3 Add filters
You can also add stunning video filters provided by this editor. To get access this function, double click the video and switch to the “Filter” tab.

#4 Add text to video
To add text to video, go to the “Text” tab, tick “Enable text” and enter the text to the text column. Then customize the font, size, color, position of the text as you like.
#5 Add music to video
YouTube also allows you to swap out the audio with one of its licensed tracks. To do this, go back to the main interface of the editor and click the Audio tab. Then select a song from the library and either drag it to the soundtrack timeline or press the plus sign to the right of each title.
 Easy and Safe Partition Software & Hard Disk Manager
Note: You should note that some are songs are subject to licensing agreements, which means YouTube will automatically add advertisements to the video clip.
Another short coming is that you can’t edit the audio track at all. If a song is longer than your video, you can do nothing but let it play from the beginning until your video stops.
#6 Add transitions to video
If several video clips have been added to the timeline, you need transition to make the whole project smoother. To add transition, go to the Transition tab and choose from 16 transition effects.

YouTube Video Editor is really easy to use, but it only provides some basic video editing functions and is really easy to crash when dealing with large file. If you want to make your video more professional, try Wondershare Filmora .
This desktop video editing tool can help you easily complete video editing tasks.
Download it now to have a try!
Download Mac Version ](https://tools.techidaily.com/wondershare/filmora/download/ )
Richard Bennett
Richard Bennett is a writer and a lover of all things video.
Follow @Richard Bennett
Richard Bennett
Mar 27, 2024• Proven solutions
Note: From 20th September 2017 users will no longer be able to use the complimentary editing suite. Check the best YouTube video editor alternatives from this complete guide. Now, it is back again.
Video editing usually requires a fair amount of technical knowledge and professional software. But YouTube has introduced its new YouTube Video Editor. It’s deceptively simple compared to the traditional desktop editing programs.
If you haven’t tried the YouTube editor , it’s time to get started.
It’s easy to learn and the guide below will give you an introduction for editing videos on YouTube.
You May Also Like:
Royalty free music for YouTube Videos >>
Best Screen Recorders for YouTube >>
YouTube Video Dimensions/Size: Guide for Upload Settings >>
The Best Video Editors for YouTube >>
How to edit a YouTube video with Filmora
If you want to have more controls on editing YouTube video, here we recommend using Filmora .
You can use it to trim/cut/split YouTube videos with handy tools. It also offer more than 50 royal free music to use. Various video filters and effects are available to make your videos amazing. The best part is you can apply animated text/titles to videos like a pro. After editing, you can directly upload videos to YouTube.
Now, download it now to have a try!
Download Mac Version ](https://tools.techidaily.com/wondershare/filmora/download/ )
 Forex Robotron Basic Package
How to Use YouTube Video Editor to Edit Video on YouTube
Step 1. Get access to YouTube Video Editor
Sign in to your YouTube (or Google) account. To get access to YouTube Video Editor, you can go directly to YouTube studio (video editor) . Or click avatar icon in your YouTube site > YouTube Studio.
Learn more about Upload MP3 to YouTube
Step 2. Add your videos to the timeline
After getting to the editor, all your YouTube videos will appear. If you want to add a clip from the pool of videos into the project, simply drag it onto the timeline or hit the plus icon in the top right hand corner of each clip. You can also add any YouTube videos that were uploaded with a “Creative Commons” license.
To do this, go to the CC tab, find a video and drag it to the timeline.
Looking for best YouTube video editor alternatives? Check this complete guide here >>
Step 3. Edit the videos as you like
With the YouTube video editor, you can quick fix your videos, add audio track of your video, add texts, use various filters and more. Below is a detailed guide on how to use YouTube video Editor.
#1 Trim/Cut/Split video
To cut or split your video, hover over the target clip and hit the scissor icon to cut the clip into pieces. You can also cursor over the edge of your video in the timeline and drag the handle to shorten or trim your video.
#2 Change video settings
YouTube Video Editor also provides the “Quick fixes” function which does a quick analysis of the video and tweaks its color, brightness, and contrast settings automatically.
You can just double click the video to enter the “Quick fixes” tab and easily change brightness and contrast, add slow motion and pan zoom effect, and stabilize, audio fix or rotate video.
#3 Add filters
You can also add stunning video filters provided by this editor. To get access this function, double click the video and switch to the “Filter” tab.
#4 Add text to video
To add text to video, go to the “Text” tab, tick “Enable text” and enter the text to the text column. Then customize the font, size, color, position of the text as you like.
#5 Add music to video
YouTube also allows you to swap out the audio with one of its licensed tracks. To do this, go back to the main interface of the editor and click the Audio tab. Then select a song from the library and either drag it to the soundtrack timeline or press the plus sign to the right of each title.
Note: You should note that some are songs are subject to licensing agreements, which means YouTube will automatically add advertisements to the video clip.
Another short coming is that you can’t edit the audio track at all. If a song is longer than your video, you can do nothing but let it play from the beginning until your video stops.
#6 Add transitions to video
If several video clips have been added to the timeline, you need transition to make the whole project smoother. To add transition, go to the Transition tab and choose from 16 transition effects.
YouTube Video Editor is really easy to use, but it only provides some basic video editing functions and is really easy to crash when dealing with large file. If you want to make your video more professional, try Wondershare Filmora .
This desktop video editing tool can help you easily complete video editing tasks.
Download it now to have a try!
Download Mac Version ](https://tools.techidaily.com/wondershare/filmora/download/ )
 SwifDoo PDF 2-Year Plan
Richard Bennett
Richard Bennett is a writer and a lover of all things video.
Follow @Richard Bennett
Richard Bennett
Mar 27, 2024• Proven solutions
Note: From 20th September 2017 users will no longer be able to use the complimentary editing suite. Check the best YouTube video editor alternatives from this complete guide. Now, it is back again.
Video editing usually requires a fair amount of technical knowledge and professional software. But YouTube has introduced its new YouTube Video Editor. It’s deceptively simple compared to the traditional desktop editing programs.
If you haven’t tried the YouTube editor , it’s time to get started.
It’s easy to learn and the guide below will give you an introduction for editing videos on YouTube.
You May Also Like:
Royalty free music for YouTube Videos >>
Best Screen Recorders for YouTube >>
YouTube Video Dimensions/Size: Guide for Upload Settings >>
The Best Video Editors for YouTube >>

How to edit a YouTube video with Filmora
If you want to have more controls on editing YouTube video, here we recommend using Filmora .
You can use it to trim/cut/split YouTube videos with handy tools. It also offer more than 50 royal free music to use. Various video filters and effects are available to make your videos amazing. The best part is you can apply animated text/titles to videos like a pro. After editing, you can directly upload videos to YouTube.
Now, download it now to have a try!
Download Mac Version ](https://tools.techidaily.com/wondershare/filmora/download/ )

How to Use YouTube Video Editor to Edit Video on YouTube
Step 1. Get access to YouTube Video Editor
Sign in to your YouTube (or Google) account. To get access to YouTube Video Editor, you can go directly to YouTube studio (video editor) . Or click avatar icon in your YouTube site > YouTube Studio.
Learn more about Upload MP3 to YouTube
Step 2. Add your videos to the timeline
After getting to the editor, all your YouTube videos will appear. If you want to add a clip from the pool of videos into the project, simply drag it onto the timeline or hit the plus icon in the top right hand corner of each clip. You can also add any YouTube videos that were uploaded with a “Creative Commons” license.
To do this, go to the CC tab, find a video and drag it to the timeline.
Looking for best YouTube video editor alternatives? Check this complete guide here >>
 Video Converter Factory Pro
Step 3. Edit the videos as you like
With the YouTube video editor, you can quick fix your videos, add audio track of your video, add texts, use various filters and more. Below is a detailed guide on how to use YouTube video Editor.
#1 Trim/Cut/Split video
To cut or split your video, hover over the target clip and hit the scissor icon to cut the clip into pieces. You can also cursor over the edge of your video in the timeline and drag the handle to shorten or trim your video.
#2 Change video settings
YouTube Video Editor also provides the “Quick fixes” function which does a quick analysis of the video and tweaks its color, brightness, and contrast settings automatically.
You can just double click the video to enter the “Quick fixes” tab and easily change brightness and contrast, add slow motion and pan zoom effect, and stabilize, audio fix or rotate video.
#3 Add filters
You can also add stunning video filters provided by this editor. To get access this function, double click the video and switch to the “Filter” tab.
#4 Add text to video
To add text to video, go to the “Text” tab, tick “Enable text” and enter the text to the text column. Then customize the font, size, color, position of the text as you like.
#5 Add music to video
YouTube also allows you to swap out the audio with one of its licensed tracks. To do this, go back to the main interface of the editor and click the Audio tab. Then select a song from the library and either drag it to the soundtrack timeline or press the plus sign to the right of each title.
Note: You should note that some are songs are subject to licensing agreements, which means YouTube will automatically add advertisements to the video clip.
Another short coming is that you can’t edit the audio track at all. If a song is longer than your video, you can do nothing but let it play from the beginning until your video stops.
#6 Add transitions to video
If several video clips have been added to the timeline, you need transition to make the whole project smoother. To add transition, go to the Transition tab and choose from 16 transition effects.
YouTube Video Editor is really easy to use, but it only provides some basic video editing functions and is really easy to crash when dealing with large file. If you want to make your video more professional, try Wondershare Filmora .
This desktop video editing tool can help you easily complete video editing tasks.
Download it now to have a try!
Download Mac Version ](https://tools.techidaily.com/wondershare/filmora/download/ )
Richard Bennett
Richard Bennett is a writer and a lover of all things video.
Follow @Richard Bennett
- Title: [New] Instantly Accessible Music Mixes Assembling YouTube Playlists Web/Mobile Style
- Author: Kenneth
- Created at : 2024-07-31 22:54:43
- Updated at : 2024-08-01 22:54:43
- Link: https://facebook-video-footage.techidaily.com/new-instantly-accessible-music-mixes-assembling-youtube-playlists-webmobile-style/
- License: This work is licensed under CC BY-NC-SA 4.0.