![[New] Endless Entertainment Loop YouTube Videos for Continuous TV Viewing for 2024](https://thmb.techidaily.com/6125c16091ce0e7f3e660bdf2f814f5a9cf410ddebad9670bd4cad45f7263474.jpg)
"[New] Endless Entertainment Loop YouTube Videos for Continuous TV Viewing for 2024"
Endless Entertainment Loop: YouTube Videos for Continuous TV Viewing
Loop is a YouTube video format that allows viewers to watch a continuous sequence of videos. Loop is similar to traditional YouTube videos, but it can be played on a TV screen like a traditional TV show. Loop is a great way to keep viewers engaged with your content. It’s like a one-stop shop for all your content needs. You can use it to promote your latest video series.
Why looping YouTube videos on a TV is a great idea? First, it can be a fun way to watch your favorite videos without having to worry about the time. Second, it can be a way to save money on your cable. By watching your favorite videos on loop, you can cut down on the number of times you need to watch them.
If you are watching a series of videos, for example, looping them can help you to remember what happened in each one. Secondly, it can help you to learn new information more easily. If you are watching a tutorial or a video about a new topic, looping can help you to remember the details better.
Free Download For Win 7 or later(64-bit)
Free Download For macOS 10.14 or later


Part 1: How to Create a Loop Video for YouTube
There is a lot of debate around whether or not creating a loop video is necessary for success on YouTube. Some people believe that it’s not necessary, while others believe that it is a must. The main benefit of creating a loop video is that it helps to keep your audience engaged. It also helps to create a sense of continuity between your videos.
Creating a loop video for your YouTube channel increases engagement because viewers can watch the video over and over again. This can lead to more clicks on your ads, which can lead to more revenue. It can also increase your subscribers and views. Maybe some people want to watch the same video multiple times in a row without having to keep pressing the play button on the remote.
Filmora is the best video loop editor:
If you need a powerful video editing tool that will let you create high-quality clips with multiple loops, look no further than Filmora . This software allows you to make various loops of your videos for use in social media, on your website or wherever desired. Plus, with Filmora, there is no limit on the number of loops you can create.
Loop video works well for corporate presentations, tutorials, explainer videos, and much more. You can create looping videos by choosing from one of Filmora’s many templates or creating your own. It’s easy to get started with looping video editing in Filmora! Some people want to watch a video while they do other things, like work on the computer.
Filmora is incredibly easy to use. You can quickly create videos by importing footage, editing and adding effects, and exporting your videos. Plus, the software has several built-in tools that let you customize your videos further. It has many features that make it an excellent choice for anyone looking to create high-quality videos quickly and easily.
How can we loop a video on Filmora? Follow these steps to create a looping video on Filmora:
Step 1 Download the Filmora and create a project
Free Download For Win 7 or later(64-bit)
Free Download For macOS 10.14 or later
You can download the Filmora for free. After installation of this software open it and click on Create New Project. Filmora is not only the video maker or editor, you can also add text and music to your videos, and share them on social media or with friends.

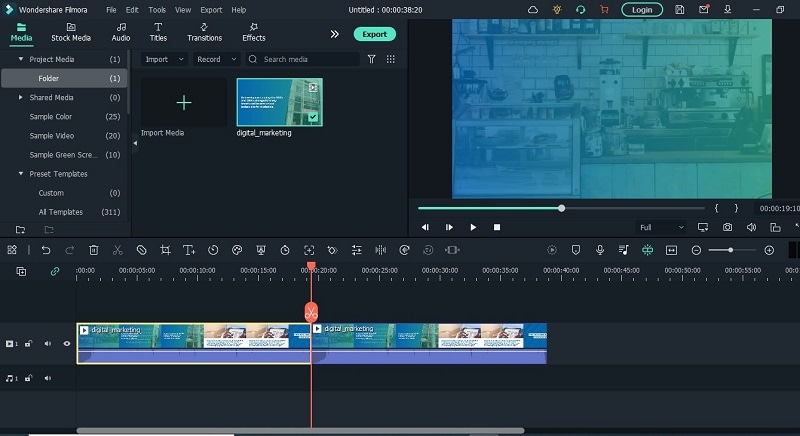
Step 2 Open the video and make copies
Open the video in your timeline. All you need to do is right-click on the video and click on copy. Then simply click or press Ctrl+V on your keyboard and do that for times. You can make as many copies as you want. Then you will have the same clip over and over again which creates the loop effect.
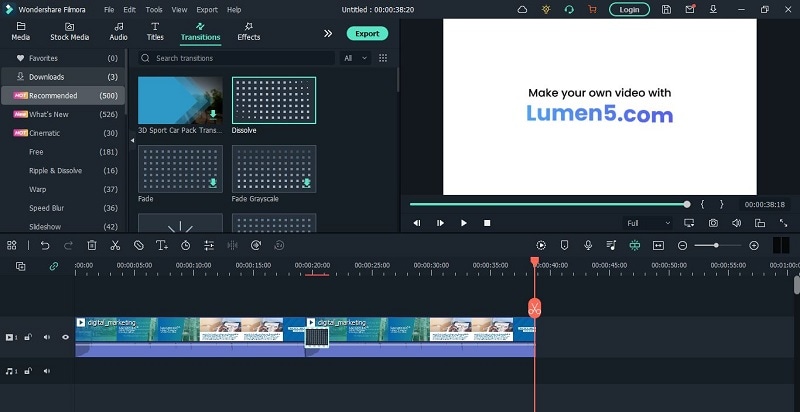
Step 3 Add Transition or any title in the video
After making copies of your video. Add some transitions in your video. Adding transitions to videos can help to keep your videos looking polished and professional. Not only do transitions add an extra layer of visual interest, but they can also help to underscore specific points in your video.
Benefits to create loop video on Filmora
There are many benefits to creating looping videos, especially when using a tool like Filmora. Loop videos are great for social media since they can be set to play on a loop and are viewable without sound. They’re also perfect for short attention spans since you can watch them over and over again without getting bored.
This can be useful for marketing purposes, as it can keep people interested in your video content. Additionally, looping can create a more engaging video experience for viewers, as it keeps them engaged by playing the same clip over and over again. You can easily add captions, and titles to your loop video.
When viewers can pause, rewind, and playback a video over and over again, they are more engaged with it. This increases the chances that they will watch the entire video, and may even share it with friends. You can create a sense of community and connection with your customers. And best of all? You can keep the magic going by adding sound effects and music!
Part 2: Loop a YouTube Video on TV from a Mobile
One of the great features of YouTube is that you can loop YouTube videos on your TV. This means that you can watch a video over and over again without having to fast forward through it. This is great for kids who are constantly asking to watch the same video over and over again. You can also use this feature to watch videos that you have missed.
There is something about relaxing music on the loop that can help to take the edge off. Whether it’s to help you wind down before bed, or to help you relax after a long day, there’s no doubt that looping YouTube on TV can be helpful. Whether you’re looking for something light and calming, or something to help you wind down after a long day, there’s sure to be something on YouTube that can fit the bill.
Let’s have a look at some steps that how to repeat YouTube videos on smart TV.
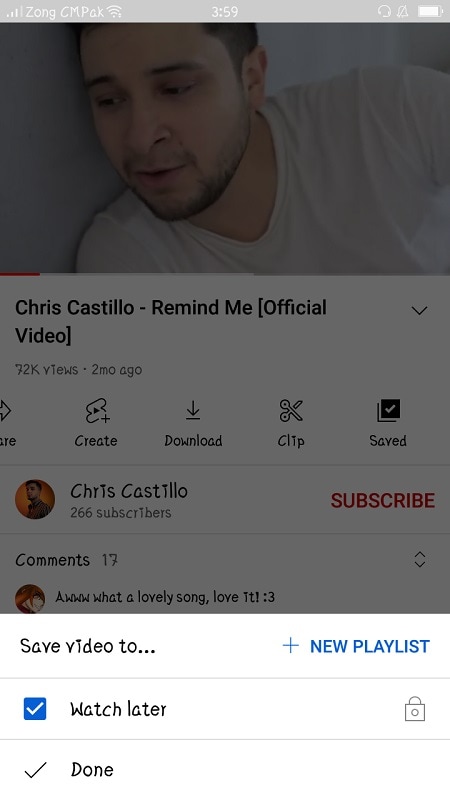
Step 1 Create a Playlist of one or multiple videos
The YouTube app is available on the google play store. You can easily download it from your mobile phones, android, etc. When you open a video on YouTube, several options will appear (like, share, subscribe). You can save the video in your existing playlist or you can create a new playlist.
Step 2 Go to the library and select the loop symbol
Click on library this will take you to a list of libraries that have YouTube collections. This can be a great way to find new material to watch, or to find old material that you may have missed. Play back the playlist that you want to loop on the smart TV.
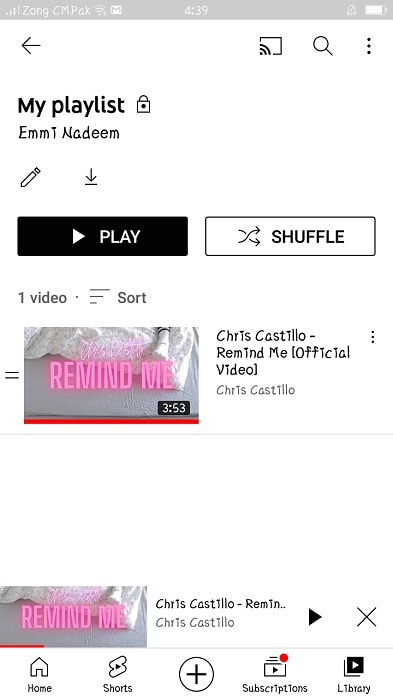
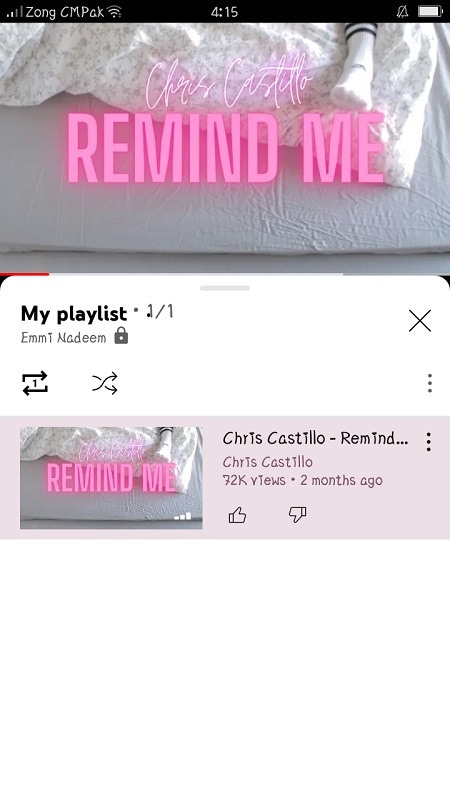
Step 3 Loop the playlist and send the list to the TV
Play the list and click on the loop symbol. At last, launch the YouTube video on your TV. The video will start playing in a loop. It can only be stopped from your mobile phone on which you start playing the list.
Why you might want to loop a YouTube video on a smart TV?
Some people want to watch a video over and over again without having to wait for it to load each time. Looping in a YouTube video can help you do this. Another reason to loop a YouTube video on your TV is if you want to watch it while you are doing something else. YouTube only loops the playlist.
Looping a YouTube video on your TV can also be useful if you have a lot of videos that you want to watch but don’t have enough time for. Looping YouTube videos on your television is a great way to keep your young ones entertained and engaged. Not only are they getting their daily dose of educational content, but they are also being kept enertained.
Wondershare Filmora Loop YouTube videos on PC and Mac with simple clicks.
Free Download Free Download Learn More

![]()
Conclusion
Looping YouTube videos on smart TV is an excellent way to watch the content you love, no matter where you are. While it may be true that loop YouTube videos on a smart TV are not imminent, there are some major benefits to be gained from implementing the new technology.
It’s easy to do, and it can be a great way to spend time with family members and friends. Looping YouTube videos on a smart TV is a great way to add some fun and excitement to your experience. The best part is, there are no limitations or restrictions you can loop as many videos as you want, and watch them in any order!
Free Download For Win 7 or later(64-bit)
Free Download For macOS 10.14 or later
Part 1: How to Create a Loop Video for YouTube
There is a lot of debate around whether or not creating a loop video is necessary for success on YouTube. Some people believe that it’s not necessary, while others believe that it is a must. The main benefit of creating a loop video is that it helps to keep your audience engaged. It also helps to create a sense of continuity between your videos.
Creating a loop video for your YouTube channel increases engagement because viewers can watch the video over and over again. This can lead to more clicks on your ads, which can lead to more revenue. It can also increase your subscribers and views. Maybe some people want to watch the same video multiple times in a row without having to keep pressing the play button on the remote.
Filmora is the best video loop editor:
If you need a powerful video editing tool that will let you create high-quality clips with multiple loops, look no further than Filmora . This software allows you to make various loops of your videos for use in social media, on your website or wherever desired. Plus, with Filmora, there is no limit on the number of loops you can create.
Loop video works well for corporate presentations, tutorials, explainer videos, and much more. You can create looping videos by choosing from one of Filmora’s many templates or creating your own. It’s easy to get started with looping video editing in Filmora! Some people want to watch a video while they do other things, like work on the computer.
Filmora is incredibly easy to use. You can quickly create videos by importing footage, editing and adding effects, and exporting your videos. Plus, the software has several built-in tools that let you customize your videos further. It has many features that make it an excellent choice for anyone looking to create high-quality videos quickly and easily.
How can we loop a video on Filmora? Follow these steps to create a looping video on Filmora:
Step 1 Download the Filmora and create a project
Free Download For Win 7 or later(64-bit)
Free Download For macOS 10.14 or later
You can download the Filmora for free. After installation of this software open it and click on Create New Project. Filmora is not only the video maker or editor, you can also add text and music to your videos, and share them on social media or with friends.
Step 2 Open the video and make copies
Open the video in your timeline. All you need to do is right-click on the video and click on copy. Then simply click or press Ctrl+V on your keyboard and do that for times. You can make as many copies as you want. Then you will have the same clip over and over again which creates the loop effect.
Step 3 Add Transition or any title in the video
After making copies of your video. Add some transitions in your video. Adding transitions to videos can help to keep your videos looking polished and professional. Not only do transitions add an extra layer of visual interest, but they can also help to underscore specific points in your video.
Benefits to create loop video on Filmora
There are many benefits to creating looping videos, especially when using a tool like Filmora. Loop videos are great for social media since they can be set to play on a loop and are viewable without sound. They’re also perfect for short attention spans since you can watch them over and over again without getting bored.
This can be useful for marketing purposes, as it can keep people interested in your video content. Additionally, looping can create a more engaging video experience for viewers, as it keeps them engaged by playing the same clip over and over again. You can easily add captions, and titles to your loop video.
When viewers can pause, rewind, and playback a video over and over again, they are more engaged with it. This increases the chances that they will watch the entire video, and may even share it with friends. You can create a sense of community and connection with your customers. And best of all? You can keep the magic going by adding sound effects and music!
Part 2: Loop a YouTube Video on TV from a Mobile
One of the great features of YouTube is that you can loop YouTube videos on your TV. This means that you can watch a video over and over again without having to fast forward through it. This is great for kids who are constantly asking to watch the same video over and over again. You can also use this feature to watch videos that you have missed.
There is something about relaxing music on the loop that can help to take the edge off. Whether it’s to help you wind down before bed, or to help you relax after a long day, there’s no doubt that looping YouTube on TV can be helpful. Whether you’re looking for something light and calming, or something to help you wind down after a long day, there’s sure to be something on YouTube that can fit the bill.
Let’s have a look at some steps that how to repeat YouTube videos on smart TV.
Step 1 Create a Playlist of one or multiple videos
The YouTube app is available on the google play store. You can easily download it from your mobile phones, android, etc. When you open a video on YouTube, several options will appear (like, share, subscribe). You can save the video in your existing playlist or you can create a new playlist.
Step 2 Go to the library and select the loop symbol
Click on library this will take you to a list of libraries that have YouTube collections. This can be a great way to find new material to watch, or to find old material that you may have missed. Play back the playlist that you want to loop on the smart TV.
Step 3 Loop the playlist and send the list to the TV
Play the list and click on the loop symbol. At last, launch the YouTube video on your TV. The video will start playing in a loop. It can only be stopped from your mobile phone on which you start playing the list.
Why you might want to loop a YouTube video on a smart TV?
Some people want to watch a video over and over again without having to wait for it to load each time. Looping in a YouTube video can help you do this. Another reason to loop a YouTube video on your TV is if you want to watch it while you are doing something else. YouTube only loops the playlist.
Looping a YouTube video on your TV can also be useful if you have a lot of videos that you want to watch but don’t have enough time for. Looping YouTube videos on your television is a great way to keep your young ones entertained and engaged. Not only are they getting their daily dose of educational content, but they are also being kept enertained.
Wondershare Filmora Loop YouTube videos on PC and Mac with simple clicks.
Free Download Free Download Learn More
![]()
Conclusion
Looping YouTube videos on smart TV is an excellent way to watch the content you love, no matter where you are. While it may be true that loop YouTube videos on a smart TV are not imminent, there are some major benefits to be gained from implementing the new technology.
It’s easy to do, and it can be a great way to spend time with family members and friends. Looping YouTube videos on a smart TV is a great way to add some fun and excitement to your experience. The best part is, there are no limitations or restrictions you can loop as many videos as you want, and watch them in any order!
Securing Your Spatial Content: Mastering the Art of 360-Degree Video Filming & Uploading
360 Video Editors: How to Upload 360 Video to YouTube

Richard Bennett
Mar 27, 2024• Proven solutions
360 degree videos have become incredibly popular on the Internet. Not only do they give people a complete look at a scene, but they also allow for a lot of artistic freedom. Those who are using VR-capable devices can get an even more immersive experience. It is why many content creators want to learn about the best 360 video editor they can use on their computers.
Here is a look at the 5 best 360 video converter and editor programs that you can use on your Windows or Mac computer.
Part 1: 5 Best 360 Video Editor for You
1. Movavi
Movavi is an affordable 360 degree video editor that makes it easy for you to create, edit and share these videos online. You can even add filters, titles and transitions to your videos, while soundtrack addition is also possible.
You can use the preview window in the program to see how your video will look if it is published as is. Plus you can use the software with both Windows and Mac, depending on the version that you download.
Pros:
- Works with all mainstream video formats
- Features support for 4K videos
- Includes color adjustment and picture in picture, even in 360 videos
- Speed adjustment capabilities

2. Premiere Pro
Adobe Premiere Pro CC is seen by many as the leading product that you can get if you want to edit high quality videos, including 360 degree content.
Any type of video format will be compatible. You should have no issues editing different segments of the content that you are creating, as Premiere Pro CC is known for having very efficient workflow screens.
Pros:
- Tools to adjust color, audio and graphics
- Works seamlessly with other Adobe apps
- Possible to create and edit content on the go using smartphones

3. After Effects
If you are attempting to add many unique graphics and transitions to your videos, then you will want to use Adobe After Effects. Most would recommend that be combined with Premiere Pro to get the best experience.
After Effects is ideal for adding introductions, end credits, transitions and other effects to the content that you have produced. You can use it to take the videos that you have created to the next level.
Pros:
- Support for movie titles, introductions, transitions and end credits
- Possible to animate logos and characters
- Works with Adobe Premiere Pro

4. Final Cut Pro X
Mac users who want to use their laptop or desktop to edit 360 videos will be happy to know that it is supported in Final Cut Pro X. It is one of the fastest and most powerful programs to use on a Mac, as it is completely optimized for the operating system and hardware.
It is possible to edit and playback 360 videos using a VR headset. It allows creators to not only put in great videos and edit them, but also see how they look after various adjustments.
Pros:
- Advanced color grading options
- Full HDR and 4K support
- View files with VR headset
- Optimized for Macs
- Includes free trial
Cons:
- Little bit expensive

5. Molanis VR
Molanis VR is ideal for anyone who wants to create 360 video that will look incredible when viewed through VR glasses. It is one of the most flexible software options, as it is inexpensive and includes many great features.
IT is possible to trim, cut and fade, include text and images, add effects and make other changes to videos on the fly. The software is intuitive to use, which is great for beginners who have not edited much in the past.
Pros:
- Support for 4K videos
- Options to add text, images and effects to videos
- Can manage color, correct horizon and stabilize 360 videos
- Includes a tree trial
Cons:
- Not as many tutorials on how to use the software compared to bigger brands

Part 2: How to Upload 360 Degree Videos to YouTube
It is possible to add 360 degree videos onto YouTube . Using YouTube to promote such content is sensible, as it is one of the largest streaming video platforms in the world. These videos can be seen on any of the major browsers and on certain mobile devices. But they must be uploaded from a desktop.
YouTube 360 Video Specification
The first step of the process is to create a video that YouTube will approve as a 360 submission. Such a video should be either 24, 25, 30, 48, 50, or 60 frames per second. Do not go any higher or it will not be approved.
It is also a good idea to have videos that are between 7168x3584 and 8192x4096 in resolution. Any lower and the quality of the video will not be good enough to provide a pleasant viewing experience to the audience.
How to Upload to YouTube
Now that you have your video edited, you are a step closer to uploading it onto YouTube. But there are some steps that you must follow . These include downloading the 360 Video Metadata app on your Mac or Windows device.
Then you will choose the file, check the Spherical box and save it. Make sure that 3D top-bottom is not checked when you save the file. The file should be created in the folder where the original was located. Now you can upload that file to YouTube.
Read More to Get : YouTube Video Dimensions/Size: Guide for Upload Settings
Conclusion
If you want to upload 360 video to YouTube or some other platform, using a 360 video editor is the way to go. The best 360 video converter and editor program will let you take the raw footage that you have shot and turn it into a stunning video that anyone can enjoy.
Richard Bennett
Richard Bennett is a writer and a lover of all things video.
Follow @Richard Bennett
Richard Bennett
Mar 27, 2024• Proven solutions
360 degree videos have become incredibly popular on the Internet. Not only do they give people a complete look at a scene, but they also allow for a lot of artistic freedom. Those who are using VR-capable devices can get an even more immersive experience. It is why many content creators want to learn about the best 360 video editor they can use on their computers.
Here is a look at the 5 best 360 video converter and editor programs that you can use on your Windows or Mac computer.
Part 1: 5 Best 360 Video Editor for You
1. Movavi
Movavi is an affordable 360 degree video editor that makes it easy for you to create, edit and share these videos online. You can even add filters, titles and transitions to your videos, while soundtrack addition is also possible.
You can use the preview window in the program to see how your video will look if it is published as is. Plus you can use the software with both Windows and Mac, depending on the version that you download.
Pros:
- Works with all mainstream video formats
- Features support for 4K videos
- Includes color adjustment and picture in picture, even in 360 videos
- Speed adjustment capabilities
2. Premiere Pro
Adobe Premiere Pro CC is seen by many as the leading product that you can get if you want to edit high quality videos, including 360 degree content.
Any type of video format will be compatible. You should have no issues editing different segments of the content that you are creating, as Premiere Pro CC is known for having very efficient workflow screens.
Pros:
- Tools to adjust color, audio and graphics
- Works seamlessly with other Adobe apps
- Possible to create and edit content on the go using smartphones
3. After Effects
If you are attempting to add many unique graphics and transitions to your videos, then you will want to use Adobe After Effects. Most would recommend that be combined with Premiere Pro to get the best experience.
After Effects is ideal for adding introductions, end credits, transitions and other effects to the content that you have produced. You can use it to take the videos that you have created to the next level.
Pros:
- Support for movie titles, introductions, transitions and end credits
- Possible to animate logos and characters
- Works with Adobe Premiere Pro
4. Final Cut Pro X
Mac users who want to use their laptop or desktop to edit 360 videos will be happy to know that it is supported in Final Cut Pro X. It is one of the fastest and most powerful programs to use on a Mac, as it is completely optimized for the operating system and hardware.
It is possible to edit and playback 360 videos using a VR headset. It allows creators to not only put in great videos and edit them, but also see how they look after various adjustments.
Pros:
- Advanced color grading options
- Full HDR and 4K support
- View files with VR headset
- Optimized for Macs
- Includes free trial
Cons:
- Little bit expensive
5. Molanis VR
Molanis VR is ideal for anyone who wants to create 360 video that will look incredible when viewed through VR glasses. It is one of the most flexible software options, as it is inexpensive and includes many great features.
IT is possible to trim, cut and fade, include text and images, add effects and make other changes to videos on the fly. The software is intuitive to use, which is great for beginners who have not edited much in the past.
Pros:
- Support for 4K videos
- Options to add text, images and effects to videos
- Can manage color, correct horizon and stabilize 360 videos
- Includes a tree trial
Cons:
- Not as many tutorials on how to use the software compared to bigger brands
Part 2: How to Upload 360 Degree Videos to YouTube
It is possible to add 360 degree videos onto YouTube . Using YouTube to promote such content is sensible, as it is one of the largest streaming video platforms in the world. These videos can be seen on any of the major browsers and on certain mobile devices. But they must be uploaded from a desktop.
YouTube 360 Video Specification
The first step of the process is to create a video that YouTube will approve as a 360 submission. Such a video should be either 24, 25, 30, 48, 50, or 60 frames per second. Do not go any higher or it will not be approved.
It is also a good idea to have videos that are between 7168x3584 and 8192x4096 in resolution. Any lower and the quality of the video will not be good enough to provide a pleasant viewing experience to the audience.
How to Upload to YouTube
Now that you have your video edited, you are a step closer to uploading it onto YouTube. But there are some steps that you must follow . These include downloading the 360 Video Metadata app on your Mac or Windows device.
Then you will choose the file, check the Spherical box and save it. Make sure that 3D top-bottom is not checked when you save the file. The file should be created in the folder where the original was located. Now you can upload that file to YouTube.
Read More to Get : YouTube Video Dimensions/Size: Guide for Upload Settings
Conclusion
If you want to upload 360 video to YouTube or some other platform, using a 360 video editor is the way to go. The best 360 video converter and editor program will let you take the raw footage that you have shot and turn it into a stunning video that anyone can enjoy.
Richard Bennett
Richard Bennett is a writer and a lover of all things video.
Follow @Richard Bennett
Also read:
- [New] Best FreeFire YouTube Hashtags and Tips For YouTube Gaming Videos for 2024
- [New] Enhancing YouTube Videos with Professional Techniques Using WMM for 2024
- [New] Strategies for Improved Video Zoom During Virtual Gatherings (Google Meet) for 2024
- [Updated] 2024 Approved Advanced Techniques in Post-Uploaded YouTube Content Enhancement
- [Updated] Chart-Topping Ideas to Invigorate Your YouTube Channel for 2024
- [Updated] Diving Deep Into the Features of the Dell P2715Q Monitor for 2024
- 2024 Approved Prime Catchy Headline Creator
- Access Tons of Free Vocal Textures, In 2024
- Get the Latest Atheros Driver Software for Your Windows System Installed Easily
- How to Fix Your PC's Failure to Recognize a Second Screen (Windows 7)
- How to Transfer Videos from Vivo Y56 5G to iPad | Dr.fone
- The Elite Club of YouTube's Big Bucks for 2024
- The Magnificent Art of Pokemon Go Streaming On Motorola Moto E13? | Dr.fone
- Updated Building a Gradual Audio Fade-Out Feature in Multimedia Projects for 2024
- Title: [New] Endless Entertainment Loop YouTube Videos for Continuous TV Viewing for 2024
- Author: Kenneth
- Created at : 2025-01-28 09:33:05
- Updated at : 2025-01-29 03:32:34
- Link: https://facebook-video-footage.techidaily.com/new-endless-entertainment-loop-youtube-videos-for-continuous-tv-viewing-for-2024/
- License: This work is licensed under CC BY-NC-SA 4.0.