![[New] Elevate Viewing Experience – Enable AV1 on YouTube for 2024](https://thmb.techidaily.com/9482ded5e871af812d18f96a64c4deb315943988e9201916667eb608e7a9ffd3.jpg)
[New] Elevate Viewing Experience – Enable AV1 on YouTube for 2024
Elevate Viewing Experience – Enable AV1 on YouTube
Do you notice that many YouTube videos have been streamed in AV1? YouTube AV1 just happened suddenly a few years ago. This article will inform you about all the things you want to know about AV1 Youtube settings. I will let you know the tutorial to turn in AV1 settings on YouTube and the reason why should choose AV1 along with the others, and some more things about AV1.
 Greeting Card Builder
Part 1: How to turn on AV1 settings on YouTube?
Do you wonder how to turn on AV1 settings on YouTube? For your information, AV1 is a video codec that is developed by a consortium of companies. It offers you advanced compression, enabling you to do smoother HD streaming and data savings for the video. Google also has already implemented AV1 use on YouTube. To turn on AV1 settings on YouTube, here are the steps:
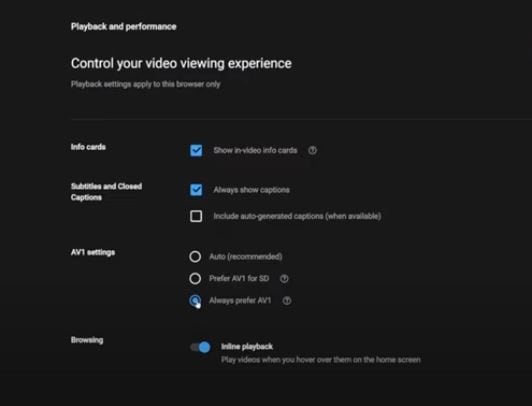
Step1Go to playback and performance
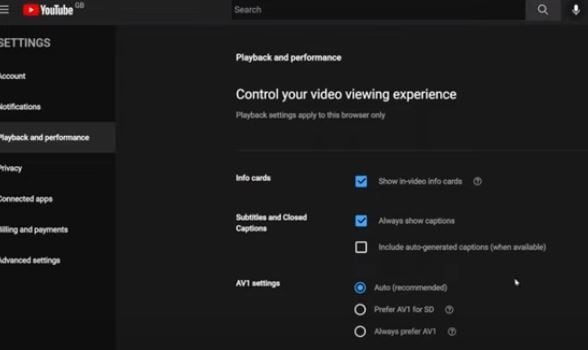
- To turn on the AV1 settings, go to your YouTube account, after that click “Playback and Performance”.
- In the AV1 settings. Besides “Auto (Recommended)”, there are other two options, which are “Prefer AV1 for SD” and also “Always prefer SD”.
- “Always Prefer AV1” uses the codec whenever it is available for a video while “Prefer AV1 for SD” limits it to SD videos. There are two options to avoid low-performance devices when AV1 videos are played on YouTube. You can select “Always Prefer AV1” to see if your device performance is good enough when you play videos on YouTube that support AV1.
Step2Test if the AV1 settings are already enabled in your video
You may ask how to confirm your YouTube videos are playing with AV1 Codec. Well, you can search playlist on YouTube with the keywords “4K, 5K, and 8K videos with the new AV1 Codec “. You can test it by playing one of the videos. You have to right-click on the media player and then select “Stats for nerd”. If it shows the av01 codec there, then the AV1 settings are enabled already.
Part 2: Why choose AV1 over VP9 and other formats?
Now, do you need a reason why you should choose AV1 compared to VP9 and the others? As you know, there is also another video codec like VP9. There are also the others such as VVC, and many more. So what is the superiority of AV1 over the others? I will let you know why you should choose AV1 in this part.
The main thing is, as mentioned before, AV1 is developed by a consortium of companies founded in 2015. It is supported by The Alliance for Open Media (AOMedia) such as Amazon, Facebook, Google, Microsoft, and Netflix, and also by web browser developers and semiconductor firms. Aomedia made it clear the algorithm is free-to-use. It means that there are no greedy negotiators that will be dependent on the developers.
Also, these days, with a format that provides a much smaller workload for internet providers. Their today focus is, that AV1 can reach the quality but can get the job done with 20% more efficiency. Then, with AV1 encoding, a “standard” 4K movie will be much more accessible than it is now. These are some more reasons why you should choose AV1.
### 1\. Royalty-freeAs mentioned before, AV1 is royalty-free. AV1 is such a next-generation of royalty video codec. It means that it is not just free to use, but also free of charge, obligations, or even liability. It is an open and royalty-free video codec that the video platform will not charge to pay royalties to the Moving Picture Experts Group (MPEG), the developer of video codecs.
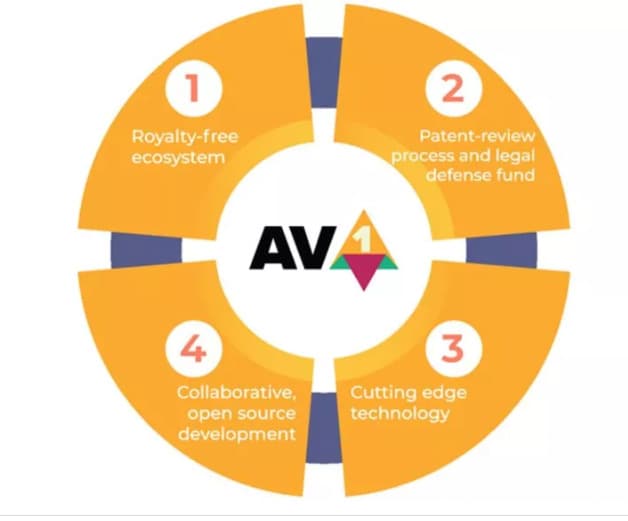
When it comes to the group that will ask for the royalty, MPEG is not the only one. There are also other patent groups and companies that can ask for it. Aomedia integrated Google, Mozilla, and Cisco, while they were busy creating their new video codec. However, the three companies joined together to create one codec to beat them all.
2. Better performance
It is said that the AV1 codec is 30% more efficient. According to the tests conducted by Moscow State University, AV1 can outperform AV1 by about 28% in the efficiency of encoding and decoding. As per the performance graph from the Graphics & Media Lab Video Group, MSU below, AV1 can offer the exactly same quality as X264 at 55% of the average bitrate.

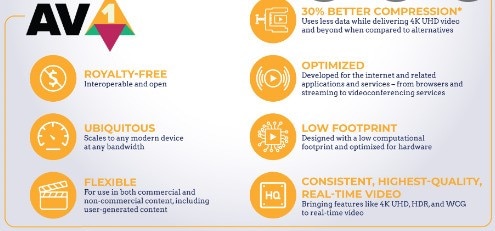
AV1 is designed so exclusively to function better than all the other codecs in the market. It is an open-sourced codec with simple patent licensing, and the integration manages to save, as mentioned, up to 30% of the bandwidth for the exactly same image quality. In other words, with AV1, distributors can send streams much faster and cheaper and we can enjoy higher definitions in the same bandwidth.
3. AV2 to come in the future
AV1 is undoubtedly superior if we compare it to other available video codecs and the exploration of the codec technology AV2 has already begun. This is such an early performance evaluation. There is some interesting part of the exploration development of AV2, such as multiple line selection for Intra prediction can make you select not just neighboring row/column for directional prediction. The same tool also exists in VVC.
There are also three essential improvements, which are simplifying the existing feature (also complete removal) and picking the tool used by VVC/H.266 (It is lack originality but so much work on it) and improvement periodically improvement of an existing tool, it is too few and also not original. We haven’t known yet when AV2 will be done completely though, maybe there still be some more essential improvements.
Part 3: What’s the best video editor for YouTubers with AV1 format?
When we talk about YouTube, it feels incomplete if we don’t talk about the video editor. So, what is the best video editing software for YouTubers with AV1 format? Yes, it is Filmora . It is such a great video editing software that allows you to import and edit many video file formats. Filmora also allows users to export AV1 MP4 format video and then can directly upload it to YouTube.


Filmora gives some ways to export your videos. Here are the five ways. You can also customize the export settings then you can save them to reuse the same settings next time. The first is you can export your project file and video to the local computer. It supports export as MP4, AVI, WMV, AV1, MOV, GoPro Cineform, F4V, MKV, TS, and 3GP.
After that, you can export your video to any device you want, such as iPhone, iPad, Apple TV, Apple TV 4K, iPod, Samsung Galaxy, Smart Phone, Android Generic, Google Pixel, Xbox One, PlayStation 4, PSP, and Smart TV. Then you can upload it to YouTube, Filmora provides you to export your video to Youtube directly. All you need to do is logging your Youtube account and export.
Free Download For Win 7 or later(64-bit)
Free Download For macOS 10.14 or later
Part 4: FAQ: Does YouTube use AV1 or VP9?
For today, YouTube encodes all the videos with the VP9 codec, but for some reason displays for low view count videos. AV1 usage also had been pushed to very low view counts. When it comes to cost or quality tradeoffs, AV1 took about 18 times longer to encode than x264.
 Lyric Video Creator Professional Version
Channel Dynamo: Craft Your Content Empire
YouTube Creator Studio is a powerful tool for content creators. It allows you to manage and optimize YouTube channels for better performance. With YouTube studio monetization features, you can keep track of your revenues. The creator study also allows you to manage your videos and see how well they are performing. This article explores the monetization Youtube Studio in detail, including how to access and use it.
YouTube-Ready Video Editor A top choice for many creators looking to outperform their competitors on YouTube!
Free Download Free Download Learn More
 SwifDoo PDF Perpetual (2-PC) Free upgrade. No monthly fees ever.

Part 1. Introduction to YouTube Studio: Definition and Uses
Every creator is aware of YouTube Studio com monetization as a tool for managing YouTube. However, how much can you say about channel monetization YouTube Studio? Let’s have a look at what you need to know:
What is YouTube Studio?

WPS Office Premium ( File Recovery, Photo Scanning, Convert PDF)–Yearly

YouTube Studio is a tool that allows creators and other users to manage their channels. Formerly known as YouTube Creator Studio, the tool helps you to edit and monitor the performance of your videos, You can also view and reply to comments, or even schedule content.
Uses of YouTube Studio
YouTube Studio is an essential tool for creators and brands. It helps them manage their presence on YouTube. Individuals can also grow their channels and track the progress they have made. Other people also use YouTube Studio as a hub to get a snapshot of their channel’s performance. It makes it easier to manage videos and offer opportunities for monetizing content through the YouTube Partner Program (YPP). The features that creators can access via the studio include:
- Manage the channel: YouTube Studio allows creators to customize their channel’s appearance, branding, description, and layout.
- Editing of videos: Options for editing videos in the Studio include details, end screens, thumbnails, uploading videos, subtitles, and adding or managing playlists.
- View your performance: Detailed insights are available about the performance of the videos, audience demographics, watch time, and more.
- YouTube Monetization: All the tools and settings for monetizing your videos and Shorts on YouTube are found on the Studio.
- Manage your comments: The comments section of the Studio allows you to view and reply to comments on your videos.

Part 2. Master Your YouTube Presence: Essential Steps to Dominate Creator Studio
Getting started with YouTube Creator Studio is simple. Log in to your YouTube, and click on the profile pic at the right corner of the page. Then select YouTube Studio from the dropdown menu.
Step-by-Step Guide for Using YouTube Creator Studio
Beginners may find it a bit tricky to navigate the YouTube Creator Studio. There are a lot of tools to explore, each with a unique function. Let’s break down the essentials to get you started.
- Step 1: Navigating the YouTube Studio
- Step 2: Exploring the Creator Dashboard
- Step 3: Manage Your Content
- Step 4: Monitoring Channel Performance
- Step 5: Review Your Studio Monetization Tab
Step 1: Navigating the YouTube Studio

To launch the YouTube Creator Studio, head over to studio.youtube.com and sign in. Then click on your profile pic and select YouTube Studio. On the left-hand side of the Studio screen, browse to navigate the features.
Step 2: Exploring the Creator Dashboard

The YouTube Creator Studio Dashboard provides all the handy information needed to create a growth strategy for your channel. You will see the analytics of your top videos and a summary of your views. You will also see your current subscribers watch time, and more:
- Review how your most recent video is performing
- Review personalized suggestions to grow your channel
- Check recent comments and respond appropriately
- Watch the latest updates from the YouTube team
- Look at important notifications to avoid copyright violations or monetization issues on time
- Explore the audio library to gain access to free soundtracks and music
Step 3: Manage Your Content

Click on the Content tab on the dashboard. Manage your content by editing or just reviewing the performance of each video. You can also create playlists linked to the videos to choose watch time.
Step 4: Monitoring Channel Performance

The YouTube Creator Studio Analytics provides a summary of your video metrics and reports. This will help you figure out what is working. The analytics also point out what needs to be improved to gain more views. Be sure to check views and watch time to get an accurate picture of the channel’s performance.
Step 5: Review Your Studio Monetization Tab

The monetization tab shows the monetization status of your channel. On the left side of the dashboard, click Earn to access this feature. After being accepted to the YPP, you can make money from advertising revenue, merch shelf, channel membership, and the fan-funded program. Before monetization, this page shows how far you are to meet the eligibility criteria.
Importance of Verifying the YouTube Channel
After uploading your videos to YouTube Creator Studio, you need to optimize each for monetization. This ensures that the algorithm works in your favor. It is also important to create an AdSense Account and link it to your channel. This will:
- Increase your level of credibility because a verified YouTube channel is seen as more trustworthy by viewers
- Protect you and your channel from impersonation by preventing other users from creating fake accounts under your name.
- Unlock additional features such as the ability to lie stream in HD and customer the channel layout.
Linking your AdSense to the Account is also a crucial step towards getting paid for your creation on YouTube. It ensures that your earnings get to you. After joining the YPP, you are allowed to change your linked AdSense account if you already have one. You can also monetize more than one channel using the same AdSense account, and keep track of your earnings.
 Screensaver Factory, Create stunning professional screensavers within minutes. Create screensavers for yourself, for marketing or unlimited royalty-free commercial distribution. Make screensavers from images, video and swf flash, add background music and smooth sprite and transition effects. Screensaver Factory is very easy to use, and it enables you to make self-installing screensaver files and CDs for easy setup and distribution. Screensaver Factory is the most advanced software of its kind.
Part 3. Create YouTube-Ready Videos with Wondershare Filmora
The success of your YouTube channel largely depends on the quality of the videos uploaded. You need video editing software that will make your creator studio attractive even before opening individual videos. Wondershare Filmora is a top choice for many creators looking to outperform their competitors on YouTube. Explore the range of possibilities with Filmora ranging from creative video effects to stunning text animations.
Free Download For Win 7 or later(64-bit)
Free Download For macOS 10.14 or later
Making YouTube-ready videos with Filmora is quick and easy. You need to have great footage to start with. Then, explore the editing features that will make the video stand out. Let’s have a look at the steps involved:
- Step 1: Launch Filmora
- Step 2: Create a New Project and Import Files
- Step 3: Organize Your Project Material
- Step 4: Place Files on the Timeline
- Step 5: Apply Visual Effects
- Step 6: Conduct the Color Correction Process
- Step 7: Export and Share

Step 1: Launch Filmora
Launch Filmora by double-clicking the desktop icon. On the welcome window, select the aspect ratio you want to use.


Step 2: Create a New Project and Import Files
After launching Filmora, click New Project on the welcome screen. Once the editor loads, import the media files from the options provided.
 Jet Profiler for MySQL, Enterprise Version: Jet Profiler for MySQL is real-time query performance and diagnostics tool for the MySQL database server. Its detailed query information, graphical interface and ease of use makes this a great tool for finding performance bottlenecks in your MySQL databases.
Step 3: Organize Your Project Material
Manage the files you will be using in the editing project. The My Album option allows you to organize the file using different criteria such as type or purpose.


Step 4: Place Files on the Timeline
Time to start editing your video. Place the video and audio files on the timeline while removing the redundant parts. Use the drag-and-drop feature to edit the clips, one at a time, cutting out unneeded footage to have a clear story.


Step 5: Apply Visual Effects
After removing the unwanted parts from the video clips, detach the audio and video files. Insert transitions between clips, add music, and use other visual effects on Filmora to make the video more exciting.

Step 6: Conduct the Color Correction Process
The effects icon gives you access to filters and overlays to make your video colors more vivid. Select the filters of choice, and drag and drop it to where you want to use on the timeline.

Step 7: Export and Share
Once you are satisfied with the video outcome, export it in MP4 format, ready for upload on YouTube. Save it in your local drive, and upload it to YouTube via the Creator Studio.

Conclusion
The YouTube Creator Studio allows you to manage your channel and content in a central location. You get access to all the essential features, including analytics and content editing. Also, manage the monetization of your videos and reply to comments. Good video editing software will play a crucial role in building your channel. We recommend exploring video editing features on Wondershare Filmora to make better videos for your channels. With most tasks now optimized, editing videos with Filmora is now easier and fun.
Free Download Free Download Learn More

Part 1. Introduction to YouTube Studio: Definition and Uses
Every creator is aware of YouTube Studio com monetization as a tool for managing YouTube. However, how much can you say about channel monetization YouTube Studio? Let’s have a look at what you need to know:
What is YouTube Studio?
YouTube Studio is a tool that allows creators and other users to manage their channels. Formerly known as YouTube Creator Studio, the tool helps you to edit and monitor the performance of your videos, You can also view and reply to comments, or even schedule content.

Uses of YouTube Studio
YouTube Studio is an essential tool for creators and brands. It helps them manage their presence on YouTube. Individuals can also grow their channels and track the progress they have made. Other people also use YouTube Studio as a hub to get a snapshot of their channel’s performance. It makes it easier to manage videos and offer opportunities for monetizing content through the YouTube Partner Program (YPP). The features that creators can access via the studio include:
- Manage the channel: YouTube Studio allows creators to customize their channel’s appearance, branding, description, and layout.
- Editing of videos: Options for editing videos in the Studio include details, end screens, thumbnails, uploading videos, subtitles, and adding or managing playlists.
- View your performance: Detailed insights are available about the performance of the videos, audience demographics, watch time, and more.
- YouTube Monetization: All the tools and settings for monetizing your videos and Shorts on YouTube are found on the Studio.
- Manage your comments: The comments section of the Studio allows you to view and reply to comments on your videos.
Part 2. Master Your YouTube Presence: Essential Steps to Dominate Creator Studio
Getting started with YouTube Creator Studio is simple. Log in to your YouTube, and click on the profile pic at the right corner of the page. Then select YouTube Studio from the dropdown menu.
Step-by-Step Guide for Using YouTube Creator Studio
Beginners may find it a bit tricky to navigate the YouTube Creator Studio. There are a lot of tools to explore, each with a unique function. Let’s break down the essentials to get you started.
- Step 1: Navigating the YouTube Studio
- Step 2: Exploring the Creator Dashboard
- Step 3: Manage Your Content
- Step 4: Monitoring Channel Performance
- Step 5: Review Your Studio Monetization Tab
Step 1: Navigating the YouTube Studio
 HD Video Converter Factory Pro
To launch the YouTube Creator Studio, head over to studio.youtube.com and sign in. Then click on your profile pic and select YouTube Studio. On the left-hand side of the Studio screen, browse to navigate the features.
Step 2: Exploring the Creator Dashboard
 WinUtilities Pro
The YouTube Creator Studio Dashboard provides all the handy information needed to create a growth strategy for your channel. You will see the analytics of your top videos and a summary of your views. You will also see your current subscribers watch time, and more:
- Review how your most recent video is performing
- Review personalized suggestions to grow your channel
- Check recent comments and respond appropriately
- Watch the latest updates from the YouTube team
- Look at important notifications to avoid copyright violations or monetization issues on time
- Explore the audio library to gain access to free soundtracks and music
Step 3: Manage Your Content
Click on the Content tab on the dashboard. Manage your content by editing or just reviewing the performance of each video. You can also create playlists linked to the videos to choose watch time.
Step 4: Monitoring Channel Performance
The YouTube Creator Studio Analytics provides a summary of your video metrics and reports. This will help you figure out what is working. The analytics also point out what needs to be improved to gain more views. Be sure to check views and watch time to get an accurate picture of the channel’s performance.
Step 5: Review Your Studio Monetization Tab
The monetization tab shows the monetization status of your channel. On the left side of the dashboard, click Earn to access this feature. After being accepted to the YPP, you can make money from advertising revenue, merch shelf, channel membership, and the fan-funded program. Before monetization, this page shows how far you are to meet the eligibility criteria.
Importance of Verifying the YouTube Channel
After uploading your videos to YouTube Creator Studio, you need to optimize each for monetization. This ensures that the algorithm works in your favor. It is also important to create an AdSense Account and link it to your channel. This will:
- Increase your level of credibility because a verified YouTube channel is seen as more trustworthy by viewers
- Protect you and your channel from impersonation by preventing other users from creating fake accounts under your name.
- Unlock additional features such as the ability to lie stream in HD and customer the channel layout.
Linking your AdSense to the Account is also a crucial step towards getting paid for your creation on YouTube. It ensures that your earnings get to you. After joining the YPP, you are allowed to change your linked AdSense account if you already have one. You can also monetize more than one channel using the same AdSense account, and keep track of your earnings.
Part 3. Create YouTube-Ready Videos with Wondershare Filmora
The success of your YouTube channel largely depends on the quality of the videos uploaded. You need video editing software that will make your creator studio attractive even before opening individual videos. Wondershare Filmora is a top choice for many creators looking to outperform their competitors on YouTube. Explore the range of possibilities with Filmora ranging from creative video effects to stunning text animations.
Free Download For Win 7 or later(64-bit)
Free Download For macOS 10.14 or later
Making YouTube-ready videos with Filmora is quick and easy. You need to have great footage to start with. Then, explore the editing features that will make the video stand out. Let’s have a look at the steps involved:
- Step 1: Launch Filmora
- Step 2: Create a New Project and Import Files
- Step 3: Organize Your Project Material
- Step 4: Place Files on the Timeline
- Step 5: Apply Visual Effects
- Step 6: Conduct the Color Correction Process
- Step 7: Export and Share
Step 1: Launch Filmora
Launch Filmora by double-clicking the desktop icon. On the welcome window, select the aspect ratio you want to use.
Step 2: Create a New Project and Import Files
After launching Filmora, click New Project on the welcome screen. Once the editor loads, import the media files from the options provided.
Step 3: Organize Your Project Material
Manage the files you will be using in the editing project. The My Album option allows you to organize the file using different criteria such as type or purpose.
Step 4: Place Files on the Timeline
Time to start editing your video. Place the video and audio files on the timeline while removing the redundant parts. Use the drag-and-drop feature to edit the clips, one at a time, cutting out unneeded footage to have a clear story.
 The Tube Sites Submitter is a fast and efficient tool for anyone who needs to upload videos quickly, easily and automatically to hundreds of tube sites in mere minutes .
 Step 5: Apply Visual Effects
After removing the unwanted parts from the video clips, detach the audio and video files. Insert transitions between clips, add music, and use other visual effects on Filmora to make the video more exciting.
Step 6: Conduct the Color Correction Process
The effects icon gives you access to filters and overlays to make your video colors more vivid. Select the filters of choice, and drag and drop it to where you want to use on the timeline.
Step 7: Export and Share
Once you are satisfied with the video outcome, export it in MP4 format, ready for upload on YouTube. Save it in your local drive, and upload it to YouTube via the Creator Studio.

Conclusion
The YouTube Creator Studio allows you to manage your channel and content in a central location. You get access to all the essential features, including analytics and content editing. Also, manage the monetization of your videos and reply to comments. Good video editing software will play a crucial role in building your channel. We recommend exploring video editing features on Wondershare Filmora to make better videos for your channels. With most tasks now optimized, editing videos with Filmora is now easier and fun.
- Title: [New] Elevate Viewing Experience – Enable AV1 on YouTube for 2024
- Author: Kenneth
- Created at : 2024-07-31 22:57:43
- Updated at : 2024-08-01 22:57:43
- Link: https://facebook-video-footage.techidaily.com/new-elevate-viewing-experience-enable-av1-on-youtube-for-2024/
- License: This work is licensed under CC BY-NC-SA 4.0.