![[New] A Comprehensive Guide to Use YouTube Movie Maker](https://thmb.techidaily.com/48eb4fc0f083727828418817e7d3c53949a229ffb44504b07d25f967a878becd.png)
[New] A Comprehensive Guide to Use YouTube Movie Maker
A Comprehensive Guide to Use YouTube Movie Maker
Do you want to convert video clips into intriguing movies? If yes, then you should download and install an advanced movie maker on your computer and creatively compile your video clips and photos. Movie Makers have multiple features such as transition overlays, timeline narration, audio options, and animations. This guide is about YouTube movie makers and how you can get started with this application.
What Is YouTube Movie Maker?
YouTube Movie Maker is a video editing program. It enables video editors to create videos for their YouTube channel. Furthermore, you can upload and manage your videos on YouTube using this software. You can perform all these tasks with a single interface. Creating videos using YouTube movie makers is entertaining as it includes interesting tools to express creative instinct. Furthermore, the moviemaker YouTube uploading process is also simpler than ever. Here are some features of YouTube movie maker:
1. Video Creation
YouTube movie maker is a simple-to-use video editing tool with wide-ranging features. You can add multiple images, video clips, audio, and icons and align them on the timeline. Beginners can use Movie Wizard to understand the platform interface and develop video editing skills.

3. Publishing
This tool has standard and special features. Using YouTube movie maker, you can upload videos on your YouTube channel and attract more audience with your content. This video editing tool makes it easy for YouTube content creators to publish their content on the platform. Furthermore, you can save the content on your computer and publish it later on.
 SwifDoo PDF Perpetual (2-PC) Free upgrade. No monthly fees ever.
3. Boost Productivity
Video editors such as YouTube movie maker improve productivity for video editors. With convenient features and tools, content creators can create more videos with efficiency and increase their content reach.
 CalendarBudget - Monthly subscription membership to CalendarBudget via web browser or mobile app. Support included.
 YouTube Movie Maker Tutorial
YouTube Movie Maker download process is simple. To download and install the application follow these steps:
Step 1: Visit MakeYouTubeVideo.com and choose the download option.
Step 2: This tool is compatible with every Windows version, so you don’t have to worry about compatibility.
 SwifDoo PDF Perpetual (1 PC) Free upgrade. No monthly fees ever.

Step 3: While downloading the application you need to evaluate the plans.
Step 4: The Platinum version of YouTube Movie Maker will cost $399. With this plan, you will get high-quality transition effects and audio materials.
Step 5: After choosing the plan, you have to enter the payment options and download the tool.
Step 6: A setup file will download to your computer.
Step 7: You need to open that file and run the installation process.
Here are some tips to use YouTube Movie Maker:
Step 1: When you open the application a clear interface will appear with easy-to-use options.

Step 2: From the left panel, you can browse through your computer storage and import content
Step 3: Also, you can drag and drop the media on your workspace.


Step 4: Align the content on different channels and add music.
Step 5: Once you align the content as required, you can publish the video on YouTube from the button on the bottom right.

4 Best Alternatives for YouTube Movie Maker
A plethora of video editing tools are available on the internet. Whether you are a marketing manager or a film producer, you would need a movie marker to boost your productivity and become a professional video content creator. If you want an alternate option for YouTube movie maker, you can check this list:
1. Wondershare Filmora
Filmora is one of the best video editing tools out there. Other than Filmora, Wondershare also offers Filmora (a video editing tool for mobile), and FilmStock with wide-ranging video effects and unique soundtracks. Filmora offers a simple and intuitive interface with lots of exciting overlays, filters, transitions, and motion elements. Since Filmora has a dedicated films tock, users can easily download royalty-free music and video clips. Some basic features of Filmora are:
- Noise removal
- Speed control
- GIF support
- 4K editing support
- Frame by frame preview
- Color tuning

For Win 7 or later (64-bit)
For macOS 10.12 or later
Only a few video editing tools offer 4K and GIF support, and Filmora is one of them. Filmora enables video editors to include engaging titles on their videos. This video editor offers a super easy and flexible interface to video editors so they can drag and drop relevant clips, select interesting music, and choose a striking theme.
The interface is clean, uncluttered, and organized with easy-to-access features. It includes basic as well as advanced features to enhance video quality and add outstanding effects. There are vast numbers of effects and transitions to make your video smooth and engaging. Color matching and motion tracker tools will completely change your video quality.
2. Nero Video
Nero Video is a cheap yet effective tool for YouTubers. This tool comes with a wide array of effects and tricks to create outstanding content. This tool is perfect for beginners because of its simple editing tools. Nero Video offers the finest functionalities and speed to video editors so they can create more engaging content and publish it on their YouTube channel. Some features of Nero Video are:
- Keyframe animation tools
- Movie templates
- Wide range of templates
- 4K support

 KoolReport Pro is an advanced solution for creating data reports and dashboards in PHP. Equipped with all extended packages , KoolReport Pro is able to connect to various datasources, perform advanced data analysis, construct stunning charts and graphs and export your beautiful work to PDF, Excel, JPG or other formats. Plus, it includes powerful built-in reports such as pivot report and drill-down report which will save your time in building ones.
 It will help you to write dynamic data reports easily, to construct intuitive dashboards or to build a whole business intelligence cockpit.
KoolReport Pro package goes with Full Source Code, Royal Free, ONE (1) Year Priority Support, ONE (1) Year Free Upgrade and 30-Days Money Back Guarantee.
Developer License allows Single Developer to create Unlimited Reports, deploy on Unlimited Servers and able deliver the work to Unlimited Clients.
4. InVideo
InVideo is different than other platforms as content creators can create interesting videos on the cloud using this tool. This means that you don’t have to download InVideo software. Instead, you can just log into your account and start editing. Furthermore, the tool is stocked with many frames, stickers, features, tricks, and transitions. This software is suitable for beginner as well as professional users. With more than 4000 templates, anyone can create a video on this platform. InVideo doesn’t irritate its users with a watermark, even if you are using the free version of this application. Here are some features of using the InVideo editing tool:
- No watermark
- More than 4000 templates
- More than 8Mn and iStock videos and images
- Intelligent frames
- Automate voice-overs
- Multiple layers
- Power transitions

5. Clipchamp Create
Clipchamp Create is a free video editing tool with wide-ranging transitional effects, and an export option without a watermark. Watermarks only appear when you use stock videos and images in your video. Premium and Business plans are available in this software that offer access to a vast stock library. Using stock library, you can download and add high-resolution images and videos to your project. The tool is incredibly handy as it offers you unique options webcam recorder, video converter, and video compressor. Clipchamp also offers the following features:
- Camera recorder
- Stock library
- Text to speech
- Brand kit
- Trimming videos

Closing Word
Now that you have notable information about the YouTube movie maker tool, you can easily download and install it on your computer. Many YouTube content creators find this application basic. If you want a more advanced tool, you can check the list of alternative movie makers and download the one that offers the best features.
3. Publishing
This tool has standard and special features. Using YouTube movie maker, you can upload videos on your YouTube channel and attract more audience with your content. This video editing tool makes it easy for YouTube content creators to publish their content on the platform. Furthermore, you can save the content on your computer and publish it later on.
3. Boost Productivity
Video editors such as YouTube movie maker improve productivity for video editors. With convenient features and tools, content creators can create more videos with efficiency and increase their content reach.
YouTube Movie Maker Tutorial
YouTube Movie Maker download process is simple. To download and install the application follow these steps:
Step 1: Visit MakeYouTubeVideo.com and choose the download option.
Step 2: This tool is compatible with every Windows version, so you don’t have to worry about compatibility.

Step 3: While downloading the application you need to evaluate the plans.
Step 4: The Platinum version of YouTube Movie Maker will cost $399. With this plan, you will get high-quality transition effects and audio materials.
Step 5: After choosing the plan, you have to enter the payment options and download the tool.
Step 6: A setup file will download to your computer.
Step 7: You need to open that file and run the installation process.
Here are some tips to use YouTube Movie Maker:
Step 1: When you open the application a clear interface will appear with easy-to-use options.
Step 2: From the left panel, you can browse through your computer storage and import content
Step 3: Also, you can drag and drop the media on your workspace.
Step 4: Align the content on different channels and add music.
Step 5: Once you align the content as required, you can publish the video on YouTube from the button on the bottom right.
4 Best Alternatives for YouTube Movie Maker
A plethora of video editing tools are available on the internet. Whether you are a marketing manager or a film producer, you would need a movie marker to boost your productivity and become a professional video content creator. If you want an alternate option for YouTube movie maker, you can check this list:
1. Wondershare Filmora
Filmora is one of the best video editing tools out there. Other than Filmora, Wondershare also offers Filmora (a video editing tool for mobile), and FilmStock with wide-ranging video effects and unique soundtracks. Filmora offers a simple and intuitive interface with lots of exciting overlays, filters, transitions, and motion elements. Since Filmora has a dedicated films tock, users can easily download royalty-free music and video clips. Some basic features of Filmora are:
- Noise removal
- Speed control
- GIF support
- 4K editing support
- Frame by frame preview
- Color tuning
For Win 7 or later (64-bit)
For macOS 10.12 or later
Only a few video editing tools offer 4K and GIF support, and Filmora is one of them. Filmora enables video editors to include engaging titles on their videos. This video editor offers a super easy and flexible interface to video editors so they can drag and drop relevant clips, select interesting music, and choose a striking theme.
The interface is clean, uncluttered, and organized with easy-to-access features. It includes basic as well as advanced features to enhance video quality and add outstanding effects. There are vast numbers of effects and transitions to make your video smooth and engaging. Color matching and motion tracker tools will completely change your video quality.
2. Nero Video
Nero Video is a cheap yet effective tool for YouTubers. This tool comes with a wide array of effects and tricks to create outstanding content. This tool is perfect for beginners because of its simple editing tools. Nero Video offers the finest functionalities and speed to video editors so they can create more engaging content and publish it on their YouTube channel. Some features of Nero Video are:
- Keyframe animation tools
- Movie templates
- Wide range of templates
- 4K support

4. InVideo
InVideo is different than other platforms as content creators can create interesting videos on the cloud using this tool. This means that you don’t have to download InVideo software. Instead, you can just log into your account and start editing. Furthermore, the tool is stocked with many frames, stickers, features, tricks, and transitions. This software is suitable for beginner as well as professional users. With more than 4000 templates, anyone can create a video on this platform. InVideo doesn’t irritate its users with a watermark, even if you are using the free version of this application. Here are some features of using the InVideo editing tool:
- No watermark
- More than 4000 templates
- More than 8Mn and iStock videos and images
- Intelligent frames
- Automate voice-overs
- Multiple layers
- Power transitions
Clipchamp Create is a free video editing tool with wide-ranging transitional effects, and an export option without a watermark. Watermarks only appear when you use stock videos and images in your video. Premium and Business plans are available in this software that offer access to a vast stock library. Using stock library, you can download and add high-resolution images and videos to your project. The tool is incredibly handy as it offers you unique options webcam recorder, video converter, and video compressor. Clipchamp also offers the following features:
- Camera recorder
- Stock library
- Text to speech
- Brand kit
- Trimming videos
Closing Word
Now that you have notable information about the YouTube movie maker tool, you can easily download and install it on your computer. Many YouTube content creators find this application basic. If you want a more advanced tool, you can check the list of alternative movie makers and download the one that offers the best features.
3. Publishing
This tool has standard and special features. Using YouTube movie maker, you can upload videos on your YouTube channel and attract more audience with your content. This video editing tool makes it easy for YouTube content creators to publish their content on the platform. Furthermore, you can save the content on your computer and publish it later on.

3. Boost Productivity
Video editors such as YouTube movie maker improve productivity for video editors. With convenient features and tools, content creators can create more videos with efficiency and increase their content reach.

YouTube Movie Maker Tutorial
YouTube Movie Maker download process is simple. To download and install the application follow these steps:
Step 1: Visit MakeYouTubeVideo.com and choose the download option.
Step 2: This tool is compatible with every Windows version, so you don’t have to worry about compatibility.
 Easy and Safe Partition Software & Hard Disk Manager
Step 3: While downloading the application you need to evaluate the plans.
Step 4: The Platinum version of YouTube Movie Maker will cost $399. With this plan, you will get high-quality transition effects and audio materials.
Step 5: After choosing the plan, you have to enter the payment options and download the tool.
Step 6: A setup file will download to your computer.
Step 7: You need to open that file and run the installation process.
Here are some tips to use YouTube Movie Maker:
Step 1: When you open the application a clear interface will appear with easy-to-use options.

Step 2: From the left panel, you can browse through your computer storage and import content
Step 3: Also, you can drag and drop the media on your workspace.
Step 4: Align the content on different channels and add music.
Step 5: Once you align the content as required, you can publish the video on YouTube from the button on the bottom right.
.png) Kanto Player Professional
Kanto Player Professional4 Best Alternatives for YouTube Movie Maker
A plethora of video editing tools are available on the internet. Whether you are a marketing manager or a film producer, you would need a movie marker to boost your productivity and become a professional video content creator. If you want an alternate option for YouTube movie maker, you can check this list:

1. Wondershare Filmora
Filmora is one of the best video editing tools out there. Other than Filmora, Wondershare also offers Filmora (a video editing tool for mobile), and FilmStock with wide-ranging video effects and unique soundtracks. Filmora offers a simple and intuitive interface with lots of exciting overlays, filters, transitions, and motion elements. Since Filmora has a dedicated films tock, users can easily download royalty-free music and video clips. Some basic features of Filmora are:
- Noise removal
- Speed control
- GIF support
- 4K editing support
- Frame by frame preview
- Color tuning
For Win 7 or later (64-bit)
For macOS 10.12 or later
Only a few video editing tools offer 4K and GIF support, and Filmora is one of them. Filmora enables video editors to include engaging titles on their videos. This video editor offers a super easy and flexible interface to video editors so they can drag and drop relevant clips, select interesting music, and choose a striking theme.
The interface is clean, uncluttered, and organized with easy-to-access features. It includes basic as well as advanced features to enhance video quality and add outstanding effects. There are vast numbers of effects and transitions to make your video smooth and engaging. Color matching and motion tracker tools will completely change your video quality.
2. Nero Video
Nero Video is a cheap yet effective tool for YouTubers. This tool comes with a wide array of effects and tricks to create outstanding content. This tool is perfect for beginners because of its simple editing tools. Nero Video offers the finest functionalities and speed to video editors so they can create more engaging content and publish it on their YouTube channel. Some features of Nero Video are:
- Keyframe animation tools
- Movie templates
- Wide range of templates
- 4K support

4. InVideo
InVideo is different than other platforms as content creators can create interesting videos on the cloud using this tool. This means that you don’t have to download InVideo software. Instead, you can just log into your account and start editing. Furthermore, the tool is stocked with many frames, stickers, features, tricks, and transitions. This software is suitable for beginner as well as professional users. With more than 4000 templates, anyone can create a video on this platform. InVideo doesn’t irritate its users with a watermark, even if you are using the free version of this application. Here are some features of using the InVideo editing tool:
- No watermark
- More than 4000 templates
- More than 8Mn and iStock videos and images
- Intelligent frames
- Automate voice-overs
- Multiple layers
- Power transitions
5. Clipchamp Create
Clipchamp Create is a free video editing tool with wide-ranging transitional effects, and an export option without a watermark. Watermarks only appear when you use stock videos and images in your video. Premium and Business plans are available in this software that offer access to a vast stock library. Using stock library, you can download and add high-resolution images and videos to your project. The tool is incredibly handy as it offers you unique options webcam recorder, video converter, and video compressor. Clipchamp also offers the following features:
- Camera recorder
- Stock library
- Text to speech
- Brand kit
- Trimming videos


Closing Word
Now that you have notable information about the YouTube movie maker tool, you can easily download and install it on your computer. Many YouTube content creators find this application basic. If you want a more advanced tool, you can check the list of alternative movie makers and download the one that offers the best features.
3. Publishing
This tool has standard and special features. Using YouTube movie maker, you can upload videos on your YouTube channel and attract more audience with your content. This video editing tool makes it easy for YouTube content creators to publish their content on the platform. Furthermore, you can save the content on your computer and publish it later on.
### 3\. Boost ProductivityVideo editors such as YouTube movie maker improve productivity for video editors. With convenient features and tools, content creators can create more videos with efficiency and increase their content reach.
YouTube Movie Maker Tutorial
YouTube Movie Maker download process is simple. To download and install the application follow these steps:
Step 1: Visit MakeYouTubeVideo.com and choose the download option.
Step 2: This tool is compatible with every Windows version, so you don’t have to worry about compatibility.
Step 3: While downloading the application you need to evaluate the plans.
Step 4: The Platinum version of YouTube Movie Maker will cost $399. With this plan, you will get high-quality transition effects and audio materials.
Step 5: After choosing the plan, you have to enter the payment options and download the tool.
Step 6: A setup file will download to your computer.
Step 7: You need to open that file and run the installation process.
Here are some tips to use YouTube Movie Maker:
Step 1: When you open the application a clear interface will appear with easy-to-use options.
Step 2: From the left panel, you can browse through your computer storage and import content
Step 3: Also, you can drag and drop the media on your workspace.
Step 4: Align the content on different channels and add music.
Step 5: Once you align the content as required, you can publish the video on YouTube from the button on the bottom right.

4 Best Alternatives for YouTube Movie Maker
A plethora of video editing tools are available on the internet. Whether you are a marketing manager or a film producer, you would need a movie marker to boost your productivity and become a professional video content creator. If you want an alternate option for YouTube movie maker, you can check this list:
1. Wondershare Filmora
Filmora is one of the best video editing tools out there. Other than Filmora, Wondershare also offers Filmora (a video editing tool for mobile), and FilmStock with wide-ranging video effects and unique soundtracks. Filmora offers a simple and intuitive interface with lots of exciting overlays, filters, transitions, and motion elements. Since Filmora has a dedicated films tock, users can easily download royalty-free music and video clips. Some basic features of Filmora are:
- Noise removal
- Speed control
- GIF support
- 4K editing support
- Frame by frame preview
- Color tuning
 Glary Utilities PRO - Premium all-in-one utility to clean, speed up, maintain and protect your PC
For Win 7 or later (64-bit)
For macOS 10.12 or later
Only a few video editing tools offer 4K and GIF support, and Filmora is one of them. Filmora enables video editors to include engaging titles on their videos. This video editor offers a super easy and flexible interface to video editors so they can drag and drop relevant clips, select interesting music, and choose a striking theme.
The interface is clean, uncluttered, and organized with easy-to-access features. It includes basic as well as advanced features to enhance video quality and add outstanding effects. There are vast numbers of effects and transitions to make your video smooth and engaging. Color matching and motion tracker tools will completely change your video quality.
2. Nero Video
Nero Video is a cheap yet effective tool for YouTubers. This tool comes with a wide array of effects and tricks to create outstanding content. This tool is perfect for beginners because of its simple editing tools. Nero Video offers the finest functionalities and speed to video editors so they can create more engaging content and publish it on their YouTube channel. Some features of Nero Video are:
- Keyframe animation tools
- Movie templates
- Wide range of templates
- 4K support
4. InVideo
InVideo is different than other platforms as content creators can create interesting videos on the cloud using this tool. This means that you don’t have to download InVideo software. Instead, you can just log into your account and start editing. Furthermore, the tool is stocked with many frames, stickers, features, tricks, and transitions. This software is suitable for beginner as well as professional users. With more than 4000 templates, anyone can create a video on this platform. InVideo doesn’t irritate its users with a watermark, even if you are using the free version of this application. Here are some features of using the InVideo editing tool:
- No watermark
- More than 4000 templates
- More than 8Mn and iStock videos and images
- Intelligent frames
- Automate voice-overs
- Multiple layers
- Power transitions
 WinUtilities Pro
5. Clipchamp Create
Clipchamp Create is a free video editing tool with wide-ranging transitional effects, and an export option without a watermark. Watermarks only appear when you use stock videos and images in your video. Premium and Business plans are available in this software that offer access to a vast stock library. Using stock library, you can download and add high-resolution images and videos to your project. The tool is incredibly handy as it offers you unique options webcam recorder, video converter, and video compressor. Clipchamp also offers the following features:
- Camera recorder
- Stock library
- Text to speech
- Brand kit
- Trimming videos
Closing Word
Now that you have notable information about the YouTube movie maker tool, you can easily download and install it on your computer. Many YouTube content creators find this application basic. If you want a more advanced tool, you can check the list of alternative movie makers and download the one that offers the best features.
Best Practices for Video Thumbnail Creation in the Digital Age
How to Make Video Thumbnails for YouTube

Richard Bennett
Oct 26, 2023• Proven solutions
The video thumbnails you use for YouTube are vital to getting views and subscribers. There are a lot of things that go into making people watch your videos, but your video thumbnail might be the most important factor.
Here are 5 easy tips for creating thumbnails that get views.
- Have a Consistent Layout
- Use Your Face
- Use Graphics/Emojis That is On Topic
- Make Your Text Huge
- Keep It Clutter-Free!
Contest now closed.
Edit Your Videos Before Creating Video Thumbnails


1. Have a Consistent Layout
Your thumbnails all must look like part of the same set. You want viewers to recognize your videos like yours, and they are more likely to do that if you build up a standard layout that they can start associating with you.
An example of a standard layout could be you in the middle of the screen wearing an expression that matches the theme of your video, with your title written underneath your face. Every individual thumbnail would still be different, but you and the text would always be in the same spot.
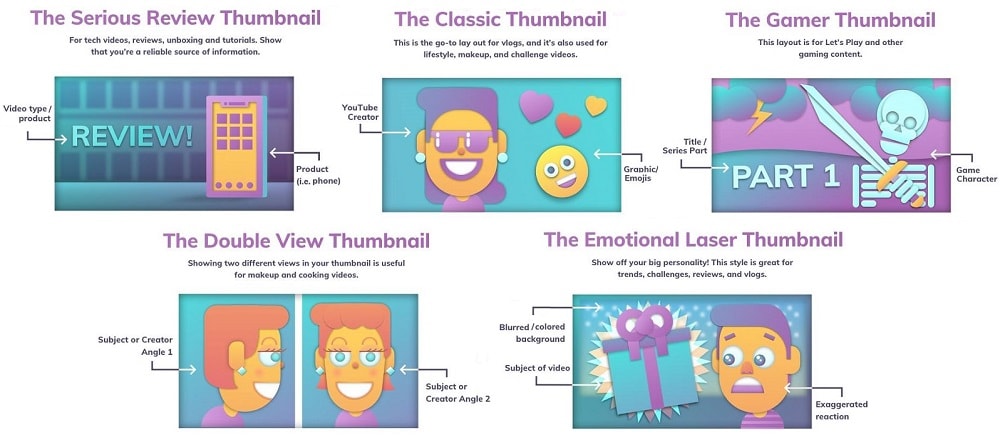
2. Use Your Face
People feel automatically connected and drawn into images that make eye contact. This makes thumbnails which feature faces more click-able than thumbnails which don’t, in most genres (i.e. if you make food videos then this may not apply – featuring the food might be more important than featuring your face). Check out more tips like this here .
Also, if somebody recognizes you in your thumbnail from a previous video of yours, that will go a long way towards making them click.
3. Use Graphics/Emojis that are On Topic
Anybody can take a screenshot of themselves in their video and use it as a thumbnail. To make your thumbnails look polished, consider using small images (like emojis or hearts) to stand out. This will add color and personality to your thumbnail.
Make sure the images you choose are relevant to the topic of your video.

4. Make Your Text Huge
If you use text in your thumbnail (you don’t have to) then it should be to add context. For example, if the main image is just you smiling then you might need some text to let viewers know the video is a makeup tutorial.
Thumbnails might look large while you’re putting them together in your image editor, but when they’re displayed on YouTube they’re a lot smaller. That goes double if a viewer is watching on their phone. So, make sure that any text you use is large enough that it can be read easily on small screens.
5. Keep it Clutter-Free
It’s great to add text and emojis to your thumbnails, but you do need to be careful not to add too much. You never want your thumbnails to look cluttered. Viewers should be able to glance at your thumbnails and know exactly what kind of video to expect – that’s difficult to do if there’s too much to process.
A good rule for text is to use only 1-3 words. That way they won’t clutter your screen, and you can make them large enough to read on small-screened devices.
For even more tips on making great YouTube thumbnails, click here .
Use these tips to make video thumbnails for YouTube, and tell us what kind of results you get!
Richard Bennett
Richard Bennett is a writer and a lover of all things video.
Follow @Richard Bennett
Richard Bennett
Oct 26, 2023• Proven solutions
The video thumbnails you use for YouTube are vital to getting views and subscribers. There are a lot of things that go into making people watch your videos, but your video thumbnail might be the most important factor.
Here are 5 easy tips for creating thumbnails that get views.
- Have a Consistent Layout
- Use Your Face
- Use Graphics/Emojis That is On Topic
- Make Your Text Huge
- Keep It Clutter-Free!
Contest now closed.
Edit Your Videos Before Creating Video Thumbnails

1. Have a Consistent Layout
Your thumbnails all must look like part of the same set. You want viewers to recognize your videos like yours, and they are more likely to do that if you build up a standard layout that they can start associating with you.
An example of a standard layout could be you in the middle of the screen wearing an expression that matches the theme of your video, with your title written underneath your face. Every individual thumbnail would still be different, but you and the text would always be in the same spot.
2. Use Your Face
People feel automatically connected and drawn into images that make eye contact. This makes thumbnails which feature faces more click-able than thumbnails which don’t, in most genres (i.e. if you make food videos then this may not apply – featuring the food might be more important than featuring your face). Check out more tips like this here .
Also, if somebody recognizes you in your thumbnail from a previous video of yours, that will go a long way towards making them click.
3. Use Graphics/Emojis that are On Topic
Anybody can take a screenshot of themselves in their video and use it as a thumbnail. To make your thumbnails look polished, consider using small images (like emojis or hearts) to stand out. This will add color and personality to your thumbnail.
Make sure the images you choose are relevant to the topic of your video.

4. Make Your Text Huge
If you use text in your thumbnail (you don’t have to) then it should be to add context. For example, if the main image is just you smiling then you might need some text to let viewers know the video is a makeup tutorial.
Thumbnails might look large while you’re putting them together in your image editor, but when they’re displayed on YouTube they’re a lot smaller. That goes double if a viewer is watching on their phone. So, make sure that any text you use is large enough that it can be read easily on small screens.

5. Keep it Clutter-Free
It’s great to add text and emojis to your thumbnails, but you do need to be careful not to add too much. You never want your thumbnails to look cluttered. Viewers should be able to glance at your thumbnails and know exactly what kind of video to expect – that’s difficult to do if there’s too much to process.
A good rule for text is to use only 1-3 words. That way they won’t clutter your screen, and you can make them large enough to read on small-screened devices.
For even more tips on making great YouTube thumbnails, click here .
Use these tips to make video thumbnails for YouTube, and tell us what kind of results you get!
Richard Bennett
Richard Bennett is a writer and a lover of all things video.
Follow @Richard Bennett
Richard Bennett
Oct 26, 2023• Proven solutions
The video thumbnails you use for YouTube are vital to getting views and subscribers. There are a lot of things that go into making people watch your videos, but your video thumbnail might be the most important factor.
Here are 5 easy tips for creating thumbnails that get views.
- Have a Consistent Layout
- Use Your Face
- Use Graphics/Emojis That is On Topic
- Make Your Text Huge
- Keep It Clutter-Free!
Contest now closed.
Edit Your Videos Before Creating Video Thumbnails
1. Have a Consistent Layout
Your thumbnails all must look like part of the same set. You want viewers to recognize your videos like yours, and they are more likely to do that if you build up a standard layout that they can start associating with you.
An example of a standard layout could be you in the middle of the screen wearing an expression that matches the theme of your video, with your title written underneath your face. Every individual thumbnail would still be different, but you and the text would always be in the same spot.

2. Use Your Face
People feel automatically connected and drawn into images that make eye contact. This makes thumbnails which feature faces more click-able than thumbnails which don’t, in most genres (i.e. if you make food videos then this may not apply – featuring the food might be more important than featuring your face). Check out more tips like this here .
Also, if somebody recognizes you in your thumbnail from a previous video of yours, that will go a long way towards making them click.
3. Use Graphics/Emojis that are On Topic
Anybody can take a screenshot of themselves in their video and use it as a thumbnail. To make your thumbnails look polished, consider using small images (like emojis or hearts) to stand out. This will add color and personality to your thumbnail.
Make sure the images you choose are relevant to the topic of your video.
4. Make Your Text Huge
If you use text in your thumbnail (you don’t have to) then it should be to add context. For example, if the main image is just you smiling then you might need some text to let viewers know the video is a makeup tutorial.
Thumbnails might look large while you’re putting them together in your image editor, but when they’re displayed on YouTube they’re a lot smaller. That goes double if a viewer is watching on their phone. So, make sure that any text you use is large enough that it can be read easily on small screens.
5. Keep it Clutter-Free
It’s great to add text and emojis to your thumbnails, but you do need to be careful not to add too much. You never want your thumbnails to look cluttered. Viewers should be able to glance at your thumbnails and know exactly what kind of video to expect – that’s difficult to do if there’s too much to process.
A good rule for text is to use only 1-3 words. That way they won’t clutter your screen, and you can make them large enough to read on small-screened devices.
For even more tips on making great YouTube thumbnails, click here .
Use these tips to make video thumbnails for YouTube, and tell us what kind of results you get!
Richard Bennett
Richard Bennett is a writer and a lover of all things video.
Follow @Richard Bennett
Richard Bennett
Oct 26, 2023• Proven solutions
The video thumbnails you use for YouTube are vital to getting views and subscribers. There are a lot of things that go into making people watch your videos, but your video thumbnail might be the most important factor.
Here are 5 easy tips for creating thumbnails that get views.
- Have a Consistent Layout
- Use Your Face
- Use Graphics/Emojis That is On Topic
- Make Your Text Huge
- Keep It Clutter-Free!
Contest now closed.
Edit Your Videos Before Creating Video Thumbnails
1. Have a Consistent Layout
Your thumbnails all must look like part of the same set. You want viewers to recognize your videos like yours, and they are more likely to do that if you build up a standard layout that they can start associating with you.
An example of a standard layout could be you in the middle of the screen wearing an expression that matches the theme of your video, with your title written underneath your face. Every individual thumbnail would still be different, but you and the text would always be in the same spot.
2. Use Your Face
People feel automatically connected and drawn into images that make eye contact. This makes thumbnails which feature faces more click-able than thumbnails which don’t, in most genres (i.e. if you make food videos then this may not apply – featuring the food might be more important than featuring your face). Check out more tips like this here .
Also, if somebody recognizes you in your thumbnail from a previous video of yours, that will go a long way towards making them click.
3. Use Graphics/Emojis that are On Topic
Anybody can take a screenshot of themselves in their video and use it as a thumbnail. To make your thumbnails look polished, consider using small images (like emojis or hearts) to stand out. This will add color and personality to your thumbnail.
Make sure the images you choose are relevant to the topic of your video.
4. Make Your Text Huge
If you use text in your thumbnail (you don’t have to) then it should be to add context. For example, if the main image is just you smiling then you might need some text to let viewers know the video is a makeup tutorial.
Thumbnails might look large while you’re putting them together in your image editor, but when they’re displayed on YouTube they’re a lot smaller. That goes double if a viewer is watching on their phone. So, make sure that any text you use is large enough that it can be read easily on small screens.
5. Keep it Clutter-Free
It’s great to add text and emojis to your thumbnails, but you do need to be careful not to add too much. You never want your thumbnails to look cluttered. Viewers should be able to glance at your thumbnails and know exactly what kind of video to expect – that’s difficult to do if there’s too much to process.
A good rule for text is to use only 1-3 words. That way they won’t clutter your screen, and you can make them large enough to read on small-screened devices.
For even more tips on making great YouTube thumbnails, click here .
Use these tips to make video thumbnails for YouTube, and tell us what kind of results you get!

Richard Bennett
Richard Bennett is a writer and a lover of all things video.
Follow @Richard Bennett
- Title: [New] A Comprehensive Guide to Use YouTube Movie Maker
- Author: Kenneth
- Created at : 2024-08-01 00:50:27
- Updated at : 2024-08-02 00:50:27
- Link: https://facebook-video-footage.techidaily.com/new-a-comprehensive-guide-to-use-youtube-movie-maker/
- License: This work is licensed under CC BY-NC-SA 4.0.