![[New] 2024 Approved Exploring How TSeries Harnesses Revenue From Online Viewer Base (YouTube)](https://thmb.techidaily.com/42db527a5e8afa7e682e92b7b056d02f1f5ec85f1c2a7e4bae6cede878df1e2d.jpg)
"[New] 2024 Approved Exploring How TSeries Harnesses Revenue From Online Viewer Base (YouTube)"
Exploring How TSeries Harnesses Revenue From Online Viewer Base (YouTube)
Founded by Gulshan Kumar on 11 July 1983, T-Series is an Indian Music record label with over 220 million subscribers on YouTube. Lately, there have been lots of controversies about the T-Series YouTube income, and one common question that we see is “What is T-Series income on YouTube?”
So, if you have the same question, then, you’ve come to the right page to find an answer. In this post, we’ve covered everything you need to know about the T-Series YouTube income. So, without wasting much time, let’s dive in to find out more.

Part 1: Information Box on T Series
Before we reveal all you need to know about T-Series YouTube income, here is an overview of Who T-Series is.
| Name | T-Series |
|---|---|
| Real Name | Bhushan Kumar Dua |
| Net Worth (2022) | $515.4 Million |
| Monthly Income and Salary | Approximately $8.6 Million |
| Yearly Income | Over $128 Million |
| Type | Private |
| Industry | Music & Entertainment |
| Founded | 11 July 1983; 39 years ago in Delhi, India |
| Founder | Gulshan Kumar |
| Key People | Bhushan Kumar Dua (Chairman, managing director), Krishan Kumar, Neeraj Kalyan (President) |
| Services | Music record label % Film production |
| YouTube Channel | T-Series |
| Awards and Recognition | Creator Awards |
Now you have an overview of what T-Series YouTube channel income is, read on to discover more
Part 2: T-Series YouTube Earning and Stats
T-Series main source of revenue is the views and adverts, and as of when this article was written, research shows that T-Series attracts more than 2.15 billion views per month. Since a YouTube channel could earn an average of $3 to $5 per one thousand views, it can be estimated that T-Series earn a monthly income of up to $8.6 Million per month, and could make up to over 128 Million per year. Do you still want to find out more? Check out the table on T-Series stats;
| Estimated Monthly Earning (USD/INDIAN RUPEES) | $8.6 Million / R.S699 Million |
|---|---|
| Estimated Yearly Earning (USD/INDIAN RUPEES) | Approximately $128 Million / R.S 10.4 Billion |
| Total Videos Uploads | 17, 516 |
| Total Views | 202,606,674,113 |
| Subscribers | 225 Million |
| Years Active | 16 years |
| Genre | Music |
T-Series is very popular on all social media platforms, including Facebook, Twitter, and Instagram. He has been in the game for so long that anyone believes in the content he creates. The company was discovered in the 1980s by Gulshan Kumar a cassette tape business, and it was focused on devotional music, especially Hindu hymns and Bollywood music.M


The good thing back then was that T-Series was the first of its kind, and the devotional music market was really big, especially amongst old folks. So, it was easy for T-Series music to reach the right audience within a short time, and it had its first breakthrough in the late 1980s.
Fast forward to 2004, telecommunication companies were having complaints from mobile phone users who were not satisfied with their ringtones. So, T-Series became their plug and started 30-second of their music to them. Then, in 2009, when YouTube was launched in India, T-Series discovered lots of his music where being uploaded on YouTube illegally. This led to a ruling against YouTube, and in January 2011, T-Series published its first video on YouTube.
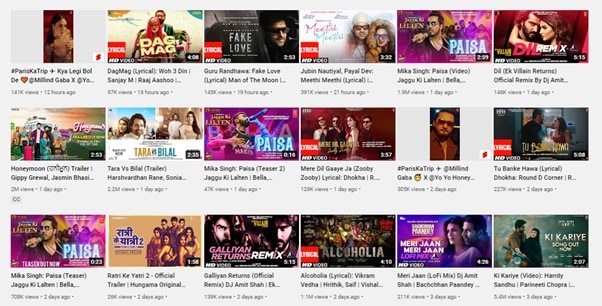
Since 2011 till now, T-Series has experienced tremendous growth. T-Series has up to 29 different YouTube channels with total subscribers of 225million with over a billion views monthly, making them one of the top-leading YouTube channels globally. Right now,

Part 3: Why Is T-Series Trending on YouTube?
Since you already know what T-Series income on YouTube is, you might be eager to find out what he did that made him so popular and became a trend on YouTube. Well, the truth is, T-Series is not doing anything no one can do. However, he has been in the industry for so long that his YouTube channel is like a dish for many viewers, especially the ones in India.
Below are the three main things why T-Series is always trending on YouTube;
Huge YouTube Channel Monthly Visits
Boasting monthly views of over 100 million per month, T-Series is one of the few YouTube channels that usually have millions of visits from users globally every month. Research shows that the YouTube channel usually has approximately 7.9million visitors per month. This huge monthly visit helps them stay at the top of most YouTube searches that relates with his videos keywords, thus making them trend more when compared with his competitor’s YouTube channel.
Large Subscriber Base
With over 225 million subscribers and still counting, T-Series YouTube channel is a home for many folks to listen to music and see movie thrillers. The large subscriber base plays a huge role in his trend, and the subscriber base continues to increase, he still has the high chance of maintaining his trend within the industry for a very long time.
 CollageIt Pro
Regular Posting of Quality Videos
Having a huge YouTube subscriber base is one thing, but being able to deliver quality video content that anyone would love to watch is different. T-Series has been consistent in delivering quality videos, that immediately he uploads a new video on YouTube, he starts getting massive views instantly. Many folks are always eager to see his next upload on YouTube. This has been the same thing for T-Series over the past years, and it has helped him gained more and more popularity.
Bonus Tip: How to be a YouTuber and Make Videos like t series
To be a YouTube-like T-Series you don’t only need to put in the hard work in what you do, you also need to be smart and stay consistent. Plus, you must acquire advanced video editing software that will help you create videos that will make you stand out in the industry. One such video editing software is Wondershare’s Filmora video editor.
Filmora is a video editing powerhouse that boasts lots of efficient tools that one can use to edit every aspect of a video clip. From removing background noise to editing audio, adding transitions, applying effects, and lots more. The tool is one that any YouTuber must have at his/her fingertips.
Besides, Filmora offers lots of free built-in video effects from popular platforms like FilmStock, Pixel, Unsplash, and many others. The amazing thing is you don’t necessarily need video editing skills to utilize the features of the software.
Here is how to use Filmora to Create Impressive Videos for YouTube;
Free Download For Win 7 or later(64-bit)
Free Download For macOS 10.14 or later
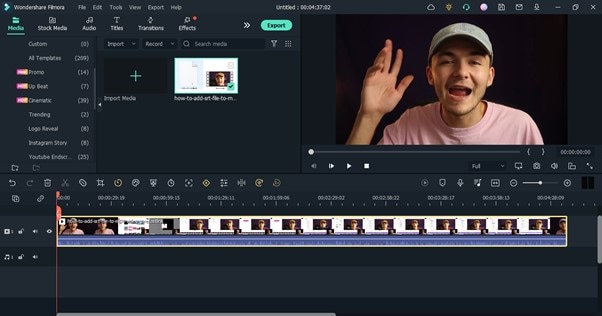
Step1 Download the latest version of Filmora from the official website and install it. Then, launch the tool and use the Import button to upload the YouTube video you wish to edit.
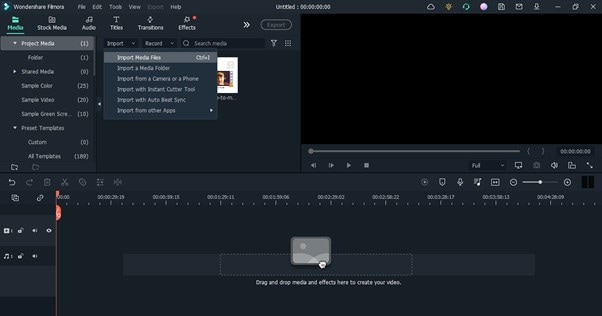
Drag-n-drop the imported video to the Timeline.
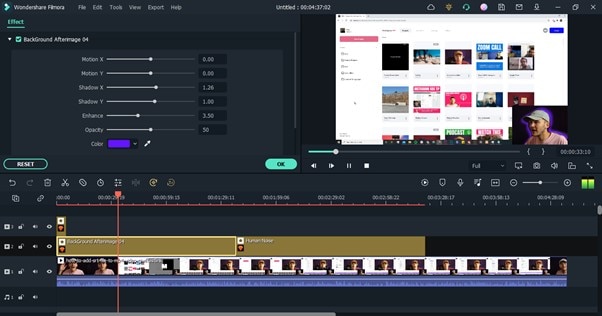
Step2 Navigate to the top of the screen and select Effects. Choose AI Portrait from the left-hand side. After that, drag-n-drop a preferred AI Portrait effect to the Timeline. Then, adjust it to the section of your video you want it to be displayed.

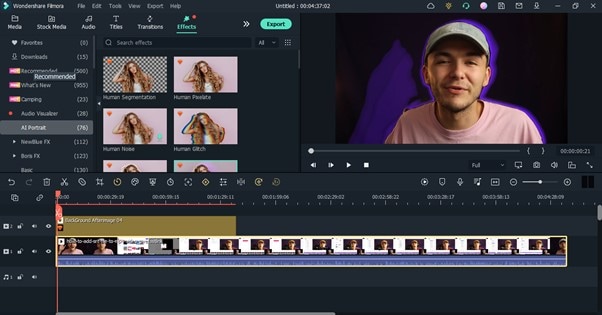
You can also change the AI Portrait effect settings. To do that, double-click on the effect from the timeline to prompt a pop-up window. Apply the AI Portrait effect from there.
Step3 You can add royalty-free music to your YouTube video by clicking Audio from the top. Then, select the preferred audio to use in the video and move it to the timeline.
 PDF application, powered by AI-based OCR, for unified workflows with both digital and scanned documents.
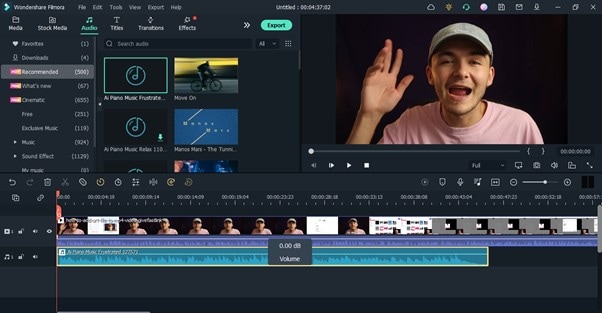
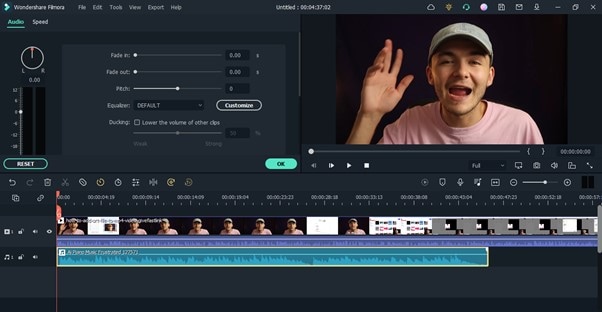
To adjust your audio settings, double-click the audio clip from the timeline and use the relevant button to balance audio fade-in and fade-out, volume, pitch, etc.
Step4 Another crucial thing you need to do is to add Subscribe watermark. To do this, click the >> icon next to Export from the top of the screen and select Element.
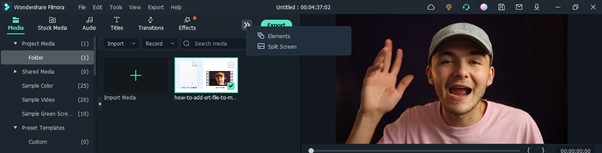
Locate and click ‘Social Media Show Element 07’ Effects. Drag-n-drop the selected effect to the Timeline.
 PDF application, powered by AI-based OCR, for unified workflows with both digital and scanned documents.
Step5 Change the position where the Subscribe watermark should appear in your video. Then, play the video to preview it.
Step6 After you’re done with the editing, click the Export button from the top bar and choose Burn DVD from the drop-down list that shows up.
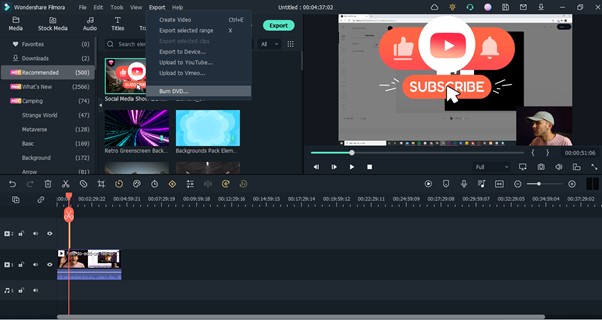
Spet 7: A pop-up window will appear on your PC screen. Select where you want to save the edited video file from the Folder Path section. Then, enter the file name in Lable. Click Export to finish.


 Glarysoft File Recovery Pro - Helps to recover your lost file/data, even permanently deleted data.
Final Words
That’s all on T-Series income on YouTube. T-Series did not just become successful overnight. It took consistent hard work. The team put so much effort not just to come up with ideas and create videos, but also to invest in the right tools to make their videos stand out in the industry. If you’re looking to start your YouTube journey and be like T-Series some days, you should start now. The first move you should make is to invest in Wondershare Filmora software, as it has lots of tools to offer for editing videos with high quality.
Free Download For Win 7 or later(64-bit)
Free Download For macOS 10.14 or later
Part 1: Information Box on T Series
Before we reveal all you need to know about T-Series YouTube income, here is an overview of Who T-Series is.
| Name | T-Series |
|---|---|
| Real Name | Bhushan Kumar Dua |
| Net Worth (2022) | $515.4 Million |
| Monthly Income and Salary | Approximately $8.6 Million |
| Yearly Income | Over $128 Million |
| Type | Private |
| Industry | Music & Entertainment |
| Founded | 11 July 1983; 39 years ago in Delhi, India |
| Founder | Gulshan Kumar |
| Key People | Bhushan Kumar Dua (Chairman, managing director), Krishan Kumar, Neeraj Kalyan (President) |
| Services | Music record label % Film production |
| YouTube Channel | T-Series |
| Awards and Recognition | Creator Awards |
Now you have an overview of what T-Series YouTube channel income is, read on to discover more
 Jet Profiler for MySQL, Enterprise Version: Jet Profiler for MySQL is real-time query performance and diagnostics tool for the MySQL database server. Its detailed query information, graphical interface and ease of use makes this a great tool for finding performance bottlenecks in your MySQL databases.
 Part 2: T-Series YouTube Earning and Stats
T-Series main source of revenue is the views and adverts, and as of when this article was written, research shows that T-Series attracts more than 2.15 billion views per month. Since a YouTube channel could earn an average of $3 to $5 per one thousand views, it can be estimated that T-Series earn a monthly income of up to $8.6 Million per month, and could make up to over 128 Million per year. Do you still want to find out more? Check out the table on T-Series stats;
| Estimated Monthly Earning (USD/INDIAN RUPEES) | $8.6 Million / R.S699 Million |
|---|---|
| Estimated Yearly Earning (USD/INDIAN RUPEES) | Approximately $128 Million / R.S 10.4 Billion |
| Total Videos Uploads | 17, 516 |
| Total Views | 202,606,674,113 |
| Subscribers | 225 Million |
| Years Active | 16 years |
| Genre | Music |
T-Series is very popular on all social media platforms, including Facebook, Twitter, and Instagram. He has been in the game for so long that anyone believes in the content he creates. The company was discovered in the 1980s by Gulshan Kumar a cassette tape business, and it was focused on devotional music, especially Hindu hymns and Bollywood music.M
The good thing back then was that T-Series was the first of its kind, and the devotional music market was really big, especially amongst old folks. So, it was easy for T-Series music to reach the right audience within a short time, and it had its first breakthrough in the late 1980s.
Fast forward to 2004, telecommunication companies were having complaints from mobile phone users who were not satisfied with their ringtones. So, T-Series became their plug and started 30-second of their music to them. Then, in 2009, when YouTube was launched in India, T-Series discovered lots of his music where being uploaded on YouTube illegally. This led to a ruling against YouTube, and in January 2011, T-Series published its first video on YouTube.
Since 2011 till now, T-Series has experienced tremendous growth. T-Series has up to 29 different YouTube channels with total subscribers of 225million with over a billion views monthly, making them one of the top-leading YouTube channels globally. Right now,
Part 3: Why Is T-Series Trending on YouTube?
Since you already know what T-Series income on YouTube is, you might be eager to find out what he did that made him so popular and became a trend on YouTube. Well, the truth is, T-Series is not doing anything no one can do. However, he has been in the industry for so long that his YouTube channel is like a dish for many viewers, especially the ones in India.
Below are the three main things why T-Series is always trending on YouTube;

Huge YouTube Channel Monthly Visits
Boasting monthly views of over 100 million per month, T-Series is one of the few YouTube channels that usually have millions of visits from users globally every month. Research shows that the YouTube channel usually has approximately 7.9million visitors per month. This huge monthly visit helps them stay at the top of most YouTube searches that relates with his videos keywords, thus making them trend more when compared with his competitor’s YouTube channel.
Large Subscriber Base
With over 225 million subscribers and still counting, T-Series YouTube channel is a home for many folks to listen to music and see movie thrillers. The large subscriber base plays a huge role in his trend, and the subscriber base continues to increase, he still has the high chance of maintaining his trend within the industry for a very long time.
Regular Posting of Quality Videos
Having a huge YouTube subscriber base is one thing, but being able to deliver quality video content that anyone would love to watch is different. T-Series has been consistent in delivering quality videos, that immediately he uploads a new video on YouTube, he starts getting massive views instantly. Many folks are always eager to see his next upload on YouTube. This has been the same thing for T-Series over the past years, and it has helped him gained more and more popularity.


Bonus Tip: How to be a YouTuber and Make Videos like t series
To be a YouTube-like T-Series you don’t only need to put in the hard work in what you do, you also need to be smart and stay consistent. Plus, you must acquire advanced video editing software that will help you create videos that will make you stand out in the industry. One such video editing software is Wondershare’s Filmora video editor.
Filmora is a video editing powerhouse that boasts lots of efficient tools that one can use to edit every aspect of a video clip. From removing background noise to editing audio, adding transitions, applying effects, and lots more. The tool is one that any YouTuber must have at his/her fingertips.
Besides, Filmora offers lots of free built-in video effects from popular platforms like FilmStock, Pixel, Unsplash, and many others. The amazing thing is you don’t necessarily need video editing skills to utilize the features of the software.
Here is how to use Filmora to Create Impressive Videos for YouTube;
Free Download For Win 7 or later(64-bit)
Free Download For macOS 10.14 or later
Step1 Download the latest version of Filmora from the official website and install it. Then, launch the tool and use the Import button to upload the YouTube video you wish to edit.
Drag-n-drop the imported video to the Timeline.

Step2 Navigate to the top of the screen and select Effects. Choose AI Portrait from the left-hand side. After that, drag-n-drop a preferred AI Portrait effect to the Timeline. Then, adjust it to the section of your video you want it to be displayed.
You can also change the AI Portrait effect settings. To do that, double-click on the effect from the timeline to prompt a pop-up window. Apply the AI Portrait effect from there.
Step3 You can add royalty-free music to your YouTube video by clicking Audio from the top. Then, select the preferred audio to use in the video and move it to the timeline.
To adjust your audio settings, double-click the audio clip from the timeline and use the relevant button to balance audio fade-in and fade-out, volume, pitch, etc.
Step4 Another crucial thing you need to do is to add Subscribe watermark. To do this, click the >> icon next to Export from the top of the screen and select Element.
Locate and click ‘Social Media Show Element 07’ Effects. Drag-n-drop the selected effect to the Timeline.
Step5 Change the position where the Subscribe watermark should appear in your video. Then, play the video to preview it.
Step6 After you’re done with the editing, click the Export button from the top bar and choose Burn DVD from the drop-down list that shows up.
 NeoDownloader - Fast and fully automatic image/video/music downloader.
Spet 7: A pop-up window will appear on your PC screen. Select where you want to save the edited video file from the Folder Path section. Then, enter the file name in Lable. Click Export to finish.
Final Words
That’s all on T-Series income on YouTube. T-Series did not just become successful overnight. It took consistent hard work. The team put so much effort not just to come up with ideas and create videos, but also to invest in the right tools to make their videos stand out in the industry. If you’re looking to start your YouTube journey and be like T-Series some days, you should start now. The first move you should make is to invest in Wondershare Filmora software, as it has lots of tools to offer for editing videos with high quality.
Free Download For Win 7 or later(64-bit)
Free Download For macOS 10.14 or later
Effortless Video Integration Into Blog Posts & Essays
How to Add Video to Text


Liza Brown
Mar 27, 2024• Proven solutions
It may be challenging to capture the attention of your audience if the video openings or PowerPoint presentations contain too much text. Striking a perfect balance between the visual and textual elements isn’t always easy, especially if the text is the only way to convey essential information to the audience.
Luckily, video editing and presentation software products offer the tools you will need to combine video and text. In this article, we are going to show you how to add a video to text in PowerPoint and Filmora.
Part 1: How to Add Video to Text for Free with PowerPoint?
An effective PowerPoint presentation should contain proportionate amounts of textual and visual elements. Using too many images, videos or animations can make following a presentation difficult, just as too much text can render a presentation too static.
Adding videos to titles or subtitles you include in a slideshow you’re creating in PowerPoint can help you create a presentation that is both informative and visually entertaining. The process of combining videos with text in PowerPoint isn’t overly complicated, but you will still need to go through it several times in order to become familiar with it.
You should start by creating a new slide and adding a textbox to it. Proceed to type the word or phrase into the textbox and go on to format the text. Pick the font that matches the style of your presentation and make sure that the text size is large enough for the video to be visible.
Head over to the Insert tab, select Rectangle from the Shapes menu, and create a rectangular shape over the entire slide. Right-click on the slide and choose the Send to Back option from the menu. In this manner, you will position the rectangle you created behind the textbox.

The next step you will have to take is to create the cut-out of the text within the rectangle. Select both the text and shape you placed in the background before clicking on the Format tab that is located near the end of PowerPoint’s ribbon.
Find the Insert Shape option and choose Subtract from the Merge Shapes drop-down menu. The shape of the text in the textbox will be applied to the object in the background, which enables you to add a video to that text.

Click on the Insert tab, and then choose the Video option from the Media menu. You can insert a video that is stored on a local hard drive or the Internet to PowerPoint. The video will cover the entire slide, so you must right-click on it and select the Send to Back option.
You can then fine-tune the video playback settings from the Playback tab. Preview the results before you move on to the next slide in your presentation, and make necessary adjustments if you don’t like how the video merged with the text.
Part 2: Adding Video to Text in Filmora
Besides presentation software, you can also use video editing software products to add a video to text. Filmora lets you add a video to text in just a few simple steps. You can first make a text video with animation first, and then use the picture in picture feature to add the video to text. Here are the detailed information about how to add a video to text in Filmora.


You should start by creating a new project in Filmora and importing the video you want to add to the text into the project. Click on the Titles tab, and choose the title that matches the visual style of your project.

Set the preferred duration of the title by dragging one of its ends to the left or right after you place it on the timeline, and then double-click on it to customize it. Click on the Advanced button once the Text tab opens and insert the text into the Input Text box.

Proceed to select a font and adjust the text size before deciding if you want to animate the text . When done, you should export the title as a video file, and then import it back into your project.
Now it’s time to add the text video and the background video to the project media library, and then place the two videos one above the other. Since we’re adding video to text, the text video should be placed above the background video.

Click on the video that contains text to gain access to the Video tab of the Editor panel and then expand the Compositing menu. Change the Blending Mode to Multiply, and the text in the overlaying video should be filled with the parts of the footage from the video below it.
Optionally you can enhance the colors in the background video or adjust the size of the text before exporting your project from Filmora.
Conclusion
There are so many different ways to create visually striking content, and adding videos to text is just one among numerous techniques that enable you to make a PowerPoint presentation or an opening of a video more interesting to watch.
Merging text with video is equally easy in PowerPoint and Filmora, so you just have to choose which software better suits your needs and select the materials that fit the style of your project. Learning how to add a video to text won’t take too much of your time, as this process can be completed in just a few quick steps. Which software are you using to add a video to text? Leave a comment below and let us know.
Liza Brown
Liza Brown is a writer and a lover of all things video.
Follow @Liza Brown
Liza Brown
Mar 27, 2024• Proven solutions
It may be challenging to capture the attention of your audience if the video openings or PowerPoint presentations contain too much text. Striking a perfect balance between the visual and textual elements isn’t always easy, especially if the text is the only way to convey essential information to the audience.
Luckily, video editing and presentation software products offer the tools you will need to combine video and text. In this article, we are going to show you how to add a video to text in PowerPoint and Filmora.
Part 1: How to Add Video to Text for Free with PowerPoint?
An effective PowerPoint presentation should contain proportionate amounts of textual and visual elements. Using too many images, videos or animations can make following a presentation difficult, just as too much text can render a presentation too static.
Adding videos to titles or subtitles you include in a slideshow you’re creating in PowerPoint can help you create a presentation that is both informative and visually entertaining. The process of combining videos with text in PowerPoint isn’t overly complicated, but you will still need to go through it several times in order to become familiar with it.
You should start by creating a new slide and adding a textbox to it. Proceed to type the word or phrase into the textbox and go on to format the text. Pick the font that matches the style of your presentation and make sure that the text size is large enough for the video to be visible.
Head over to the Insert tab, select Rectangle from the Shapes menu, and create a rectangular shape over the entire slide. Right-click on the slide and choose the Send to Back option from the menu. In this manner, you will position the rectangle you created behind the textbox.
The next step you will have to take is to create the cut-out of the text within the rectangle. Select both the text and shape you placed in the background before clicking on the Format tab that is located near the end of PowerPoint’s ribbon.
Find the Insert Shape option and choose Subtract from the Merge Shapes drop-down menu. The shape of the text in the textbox will be applied to the object in the background, which enables you to add a video to that text.
Click on the Insert tab, and then choose the Video option from the Media menu. You can insert a video that is stored on a local hard drive or the Internet to PowerPoint. The video will cover the entire slide, so you must right-click on it and select the Send to Back option.
You can then fine-tune the video playback settings from the Playback tab. Preview the results before you move on to the next slide in your presentation, and make necessary adjustments if you don’t like how the video merged with the text.
 Forex Robotron Basic Package
Part 2: Adding Video to Text in Filmora
Besides presentation software, you can also use video editing software products to add a video to text. Filmora lets you add a video to text in just a few simple steps. You can first make a text video with animation first, and then use the picture in picture feature to add the video to text. Here are the detailed information about how to add a video to text in Filmora.

You should start by creating a new project in Filmora and importing the video you want to add to the text into the project. Click on the Titles tab, and choose the title that matches the visual style of your project.
Set the preferred duration of the title by dragging one of its ends to the left or right after you place it on the timeline, and then double-click on it to customize it. Click on the Advanced button once the Text tab opens and insert the text into the Input Text box.
 Video Converter Factory Pro
Proceed to select a font and adjust the text size before deciding if you want to animate the text . When done, you should export the title as a video file, and then import it back into your project.
Now it’s time to add the text video and the background video to the project media library, and then place the two videos one above the other. Since we’re adding video to text, the text video should be placed above the background video.
Click on the video that contains text to gain access to the Video tab of the Editor panel and then expand the Compositing menu. Change the Blending Mode to Multiply, and the text in the overlaying video should be filled with the parts of the footage from the video below it.
Optionally you can enhance the colors in the background video or adjust the size of the text before exporting your project from Filmora.
Conclusion
There are so many different ways to create visually striking content, and adding videos to text is just one among numerous techniques that enable you to make a PowerPoint presentation or an opening of a video more interesting to watch.
Merging text with video is equally easy in PowerPoint and Filmora, so you just have to choose which software better suits your needs and select the materials that fit the style of your project. Learning how to add a video to text won’t take too much of your time, as this process can be completed in just a few quick steps. Which software are you using to add a video to text? Leave a comment below and let us know.
Liza Brown
Liza Brown is a writer and a lover of all things video.
Follow @Liza Brown
Liza Brown
Mar 27, 2024• Proven solutions
It may be challenging to capture the attention of your audience if the video openings or PowerPoint presentations contain too much text. Striking a perfect balance between the visual and textual elements isn’t always easy, especially if the text is the only way to convey essential information to the audience.
Luckily, video editing and presentation software products offer the tools you will need to combine video and text. In this article, we are going to show you how to add a video to text in PowerPoint and Filmora.
Part 1: How to Add Video to Text for Free with PowerPoint?
An effective PowerPoint presentation should contain proportionate amounts of textual and visual elements. Using too many images, videos or animations can make following a presentation difficult, just as too much text can render a presentation too static.
Adding videos to titles or subtitles you include in a slideshow you’re creating in PowerPoint can help you create a presentation that is both informative and visually entertaining. The process of combining videos with text in PowerPoint isn’t overly complicated, but you will still need to go through it several times in order to become familiar with it.
You should start by creating a new slide and adding a textbox to it. Proceed to type the word or phrase into the textbox and go on to format the text. Pick the font that matches the style of your presentation and make sure that the text size is large enough for the video to be visible.
Head over to the Insert tab, select Rectangle from the Shapes menu, and create a rectangular shape over the entire slide. Right-click on the slide and choose the Send to Back option from the menu. In this manner, you will position the rectangle you created behind the textbox.
The next step you will have to take is to create the cut-out of the text within the rectangle. Select both the text and shape you placed in the background before clicking on the Format tab that is located near the end of PowerPoint’s ribbon.
Find the Insert Shape option and choose Subtract from the Merge Shapes drop-down menu. The shape of the text in the textbox will be applied to the object in the background, which enables you to add a video to that text.
Click on the Insert tab, and then choose the Video option from the Media menu. You can insert a video that is stored on a local hard drive or the Internet to PowerPoint. The video will cover the entire slide, so you must right-click on it and select the Send to Back option.
You can then fine-tune the video playback settings from the Playback tab. Preview the results before you move on to the next slide in your presentation, and make necessary adjustments if you don’t like how the video merged with the text.

Part 2: Adding Video to Text in Filmora
Besides presentation software, you can also use video editing software products to add a video to text. Filmora lets you add a video to text in just a few simple steps. You can first make a text video with animation first, and then use the picture in picture feature to add the video to text. Here are the detailed information about how to add a video to text in Filmora.
You should start by creating a new project in Filmora and importing the video you want to add to the text into the project. Click on the Titles tab, and choose the title that matches the visual style of your project.
Set the preferred duration of the title by dragging one of its ends to the left or right after you place it on the timeline, and then double-click on it to customize it. Click on the Advanced button once the Text tab opens and insert the text into the Input Text box.
Proceed to select a font and adjust the text size before deciding if you want to animate the text . When done, you should export the title as a video file, and then import it back into your project.
Now it’s time to add the text video and the background video to the project media library, and then place the two videos one above the other. Since we’re adding video to text, the text video should be placed above the background video.
Click on the video that contains text to gain access to the Video tab of the Editor panel and then expand the Compositing menu. Change the Blending Mode to Multiply, and the text in the overlaying video should be filled with the parts of the footage from the video below it.
Optionally you can enhance the colors in the background video or adjust the size of the text before exporting your project from Filmora.
Conclusion
There are so many different ways to create visually striking content, and adding videos to text is just one among numerous techniques that enable you to make a PowerPoint presentation or an opening of a video more interesting to watch.
Merging text with video is equally easy in PowerPoint and Filmora, so you just have to choose which software better suits your needs and select the materials that fit the style of your project. Learning how to add a video to text won’t take too much of your time, as this process can be completed in just a few quick steps. Which software are you using to add a video to text? Leave a comment below and let us know.
Liza Brown
Liza Brown is a writer and a lover of all things video.
Follow @Liza Brown
Liza Brown
Mar 27, 2024• Proven solutions
It may be challenging to capture the attention of your audience if the video openings or PowerPoint presentations contain too much text. Striking a perfect balance between the visual and textual elements isn’t always easy, especially if the text is the only way to convey essential information to the audience.
Luckily, video editing and presentation software products offer the tools you will need to combine video and text. In this article, we are going to show you how to add a video to text in PowerPoint and Filmora.
Part 1: How to Add Video to Text for Free with PowerPoint?
An effective PowerPoint presentation should contain proportionate amounts of textual and visual elements. Using too many images, videos or animations can make following a presentation difficult, just as too much text can render a presentation too static.
Adding videos to titles or subtitles you include in a slideshow you’re creating in PowerPoint can help you create a presentation that is both informative and visually entertaining. The process of combining videos with text in PowerPoint isn’t overly complicated, but you will still need to go through it several times in order to become familiar with it.
You should start by creating a new slide and adding a textbox to it. Proceed to type the word or phrase into the textbox and go on to format the text. Pick the font that matches the style of your presentation and make sure that the text size is large enough for the video to be visible.
Head over to the Insert tab, select Rectangle from the Shapes menu, and create a rectangular shape over the entire slide. Right-click on the slide and choose the Send to Back option from the menu. In this manner, you will position the rectangle you created behind the textbox.
The next step you will have to take is to create the cut-out of the text within the rectangle. Select both the text and shape you placed in the background before clicking on the Format tab that is located near the end of PowerPoint’s ribbon.
Find the Insert Shape option and choose Subtract from the Merge Shapes drop-down menu. The shape of the text in the textbox will be applied to the object in the background, which enables you to add a video to that text.
Click on the Insert tab, and then choose the Video option from the Media menu. You can insert a video that is stored on a local hard drive or the Internet to PowerPoint. The video will cover the entire slide, so you must right-click on it and select the Send to Back option.
You can then fine-tune the video playback settings from the Playback tab. Preview the results before you move on to the next slide in your presentation, and make necessary adjustments if you don’t like how the video merged with the text.
Part 2: Adding Video to Text in Filmora
Besides presentation software, you can also use video editing software products to add a video to text. Filmora lets you add a video to text in just a few simple steps. You can first make a text video with animation first, and then use the picture in picture feature to add the video to text. Here are the detailed information about how to add a video to text in Filmora.
You should start by creating a new project in Filmora and importing the video you want to add to the text into the project. Click on the Titles tab, and choose the title that matches the visual style of your project.
Set the preferred duration of the title by dragging one of its ends to the left or right after you place it on the timeline, and then double-click on it to customize it. Click on the Advanced button once the Text tab opens and insert the text into the Input Text box.
Proceed to select a font and adjust the text size before deciding if you want to animate the text . When done, you should export the title as a video file, and then import it back into your project.
Now it’s time to add the text video and the background video to the project media library, and then place the two videos one above the other. Since we’re adding video to text, the text video should be placed above the background video.
Click on the video that contains text to gain access to the Video tab of the Editor panel and then expand the Compositing menu. Change the Blending Mode to Multiply, and the text in the overlaying video should be filled with the parts of the footage from the video below it.
Optionally you can enhance the colors in the background video or adjust the size of the text before exporting your project from Filmora.
Conclusion
There are so many different ways to create visually striking content, and adding videos to text is just one among numerous techniques that enable you to make a PowerPoint presentation or an opening of a video more interesting to watch.
Merging text with video is equally easy in PowerPoint and Filmora, so you just have to choose which software better suits your needs and select the materials that fit the style of your project. Learning how to add a video to text won’t take too much of your time, as this process can be completed in just a few quick steps. Which software are you using to add a video to text? Leave a comment below and let us know.
Liza Brown
Liza Brown is a writer and a lover of all things video.
Follow @Liza Brown
- Title: [New] 2024 Approved Exploring How TSeries Harnesses Revenue From Online Viewer Base (YouTube)
- Author: Kenneth
- Created at : 2024-07-31 23:09:28
- Updated at : 2024-08-01 23:09:28
- Link: https://facebook-video-footage.techidaily.com/new-2024-approved-exploring-how-tseries-harnesses-revenue-from-online-viewer-base-youtube/
- License: This work is licensed under CC BY-NC-SA 4.0.